关联关系
本文涵盖 Leoric 的关联关系特性。在阅读本文后,你将了解如下内容:
- 如何定义数据模型间的关联关系;
- 如何理解关联关系的各种类型。
目录
为什么需要关联关系
关联关系定义完成之后,一次查询即可返回所有关联结果。例如:
const shop = await Shop.findOne({ id }).with('items', 'owner')
// => Shop { id: 1,
//           name: 'Barracks',
//           items: [ Item { name: "Wirt's Leg" }, ... ],
//           owner: User { name: 'Tyreal' } }
关联关系的类型
Leoric 支持四种关联关系:
belongsTo()hasMany()hasMany({ through })hasOne()
这些方法需要在 Model.describe() 方法中调用。例如,声明店铺属于 belongsTo() 它的 owner 之后,Leoric 将在执行 Shop.find().with('owner') 时自动 JOIN 店铺和用户表,找到所查找的店铺对应的 owner,在结果中实例化对应的数据模型并挂载到店铺的 owner 属性。
使用 TypeScript 的项目也可以用更直观的装饰器配置方式,上述四种关联关系都有对应的装饰器:
@BelongsTo()@HasMany()@HasMany({ through })@HasOne()
和静态方法的区别主要是第一个参数不需要指定关联关系名称,其余基本一致,例如 Post.belongsTo('user') 对应的装饰器是:
class Post {
  @BelongsTo()
  user: User
}
belongsTo()

belongsTo() 方法设置的是一对一或者多对一的关联关系。例如,一家店铺可以有许多商品。而一个商品只能属于 belongsTo() 一家店铺。所以商品 Item 的数据模型定义可能是这样的:
class Item extends Bone {
  static initialize() {
    this.belongsTo('shop')
  }
}
或者使用对应的装饰器来声明关联关系:
class Item extends Bone {
  @BelongsTo()
  shop: Shop;
}
Leoric 会把关联关系的名称 shop 转为驼峰、首字母大写,再以转换后的 Shop 为数据模型名称寻找对应的数据模型定义。如果实际的数据模型名称并非如此,我们也可以使用 className 显式指定:
class Item extends Bone {
  static initialize() {
    this.belongsTo('shop', { className: 'Seller' })
  }
}
使用对应的装饰器:
class Item extends Bone {
  @BelongsTo({ className: 'Seller' })
  shop: Shop;
}
注意传给
className的值是字符串而非实际数据模型的类。在Model.describe()定义阶段互相传递数据模型的类很容易导致循环依赖,以至于require到不一致的exports。
如你在实例关系图中所见,用于关联 belongsTo() 关系的外键是存在于发起关联关系的数据模型中的。外键的名称默认根据目标数据模型的名称转换,首字母转为小写,再跟上 Id 后缀。在这个例子里,外键会自动根据 Shop 转换成 shopId。
Leoric 在数据模型底层实际维护两套名称。一个是数据模型中属性的名称,与 JavaScript 中常用的编码规范一致,采用驼峰格式。另一个则是这些属性名对应的实际字段名,即数据库表结构设计时所采用的名称,通常是以下划线分隔的。
可以使用 foreignKey 参数覆盖默认的外键名称:
class Item extends Bone {
  static initialize() {
    this.belongsTo('shop', { foreignKey: 'sellerId' })
  }
}
使用对应的装饰器:
class Item extends Bone {
  @BelongsTo({ foreignKey: 'sellerId' })
  shop: Shop;
}
hasMany()
如果你从店铺的角度看这个实例关系图,你会注意到这也是一对多 hasMany() 的关联关系。店铺 hasMany() 商品:
class Shop extends Bone {
  static initialize() {
    this.hasMany('items')
  }
}
使用对应的装饰器:
class Shop extends Bone {
  @HasMany()
  items: Item[];
}
注意,与
belongsTo()不同的是,传给hasMany()的名称通常是复数形式。
Leoric 寻找对应数据模型的方式都是差不多的。首先将关联关系的名称转为单数,继而首字母大写。在此例中,items 被转为 item,继而使用 Item 寻找实际的数据模型类。
可以使用 className 参数覆盖默认的数据模型名称:
class Shop extends Bone {
  static initialize() {
    this.hasMany('items', { className: 'Commodity' })
  }
}
使用对应的装饰器:
class Shop extends Bone {
  // 一般可以通过类型名识别出对应的 className
  @HasMany({ className: 'Commodity' })
  items: Commodity[];
}
如你在实例关系图所见,hasMany() 的外键是在目标数据模型对应的表 items 中的。要覆盖默认的外键名称,给 hasMany() 传 foreignKey 即可:
class Shop extends Bone {
  static initialize() {
    this.hasMany('items', { foreignKey: 'sellerId' })
  }
}
使用对应的装饰器:
class Shop extends Bone {
  @HasMany({ foreignKey: 'sellerId' })
  items: Item[];
}
hasMany({ through })
数据库实例关系的世界并不仅由一对一或者一对多两种关联关系组成。实际业务中存在大量需要多对多的关联关系需要配置。但是,在关系型数据库中多对多的关联关系没办法仅使用两个表实现。为实现这一特性,我们需要引入一张中间表来记录多对多的关系。
以下面这个标签系统为例:
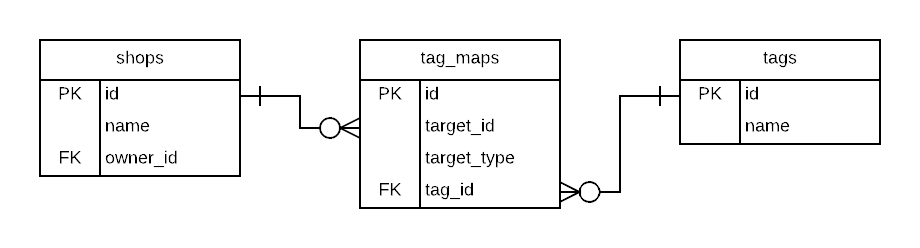
一家店铺可以有任意多个标签。而一个标签也可以与任意多的店铺关联。两者之间的关系存储在 tag_maps 表中。无论是从店铺还是标签查找彼此的关系,都需要先经过中间表 tag_maps。
正如你可能已经注意到的,在上述实体关系图中
tag_maps表并不一定仅与shops发生关联。它通过target_type字段支持任意类型的目标数据模型。以此方式,tags可以与任何模型建立多对多的关联关系。
hasMany({ through }) 正是用来支持这一关联方式的方法。以 Shop 的视角为例:
class Shop extends Bone {
  static initialize() {
    // the extra where is needed if you fancy this generic tag system
    this.hasMany('tagMaps', { foreignKey: 'targetId', where: { targetType: 0 } })
    this.hasMany('tags', { through: 'tagMaps' })
  }
}
使用对应的装饰器:
class Shop extends Bone {
  @HasMany({ foreignKey: 'targetId', where: { targetType: 0 } })
  tagMaps: TagMap[];

  @HasMany({ through: 'tagMaps' })
  tags: Tag[];
}
在 Tag 这边则是:
class Tag extends Bone {
  static initialize() {
    this.hasMany('shopTagMaps', {
      className: 'TagMap',
      foreignKey: 'targetId',
      where: { targetType: 0 },
    })
    this.hasMany('shops', { through: 'shopTagMaps' })
  }
}
使用对应的装饰器:
class Shop extends Bone {
  @HasMany({ className: 'TagMap', foreignKey: 'targetId', where: { targetType: 0 } })
  shopTagMaps: TagMap[];

  @HasMany({ through: 'shopTagMaps' })
  shops: Tag[];
}
假设需求有变,我们需要给商品也增加标签系统,我们在 Tag 数据模型这边只需稍许改动:
class Tag extends Bone {
  static initialize() {
    this.hasMany('shopTagMaps', { className: 'TagMap', where: { targetType: 0 } })
    this.hasMany('shops', { through: 'shopTagMaps' })
+   this.hasMany('itemTagMaps', { className: 'TagMap', where: { targetType: 1 } })
+   this.hasMany('items', { through: 'itemTagMaps' })
  }
}
hasOne()

hasOne() 方法也可以用来配置与其他数据模型的一对一关联。乍一看可能与 belongsTo() 甚至 hasMany() 都有些像,但在细节或者语义上存在稍许差别。
hasOne() 与 belongsTo() 的区别主要在外键的归属。在这一点上 hasOne() 和 hasMany() 比较像,它需要外键放在目标数据模型中。而 belongsTo() 需要外键留在发起关联的数据模型中。
hasOne() 与 hasMany() 的差别很小。当数据模型 hasOne() 另一个数据模型,目标数据模型会以单数挂载,即使查询结果存在多个。当数据模型hasMany() 另一个数据模型,则挂载关联数据模型的属性所包含的值永远是一个集合,即使查询结果中只有一条甚至一条都没有。
在这个例子中,用户拥有一家店铺:
class User extends Bone {
  static initialize() {
    this.hasOne('shop', { foreignKey: 'ownerId' })
  }
}
使用对应的装饰器:
class User extends Bone {
  @HasOne({ foreignKey: 'ownerId' })
  shop: Shop;
}
而店铺与用户也是一对一的关系:
class Shop extends Bone {
  static initialize() {
    this.belongsTo('owner', { className: 'User' })
  }
}
使用对应的装饰器:
class Shop extends Bone {
  @BelongsTo({ className: 'User' })
  owner: User;
}
在 belongsTo() 和 hasOne() 之间选择
正如 hasOne() 章节所讨论的,belongsTo() 和 hasOne() 之间的区别主要在外键应该在哪个数据模型。持有相应外键的数据模型应当是发起 belongsTo() 关联关系的一方。
例如,一个用户应当拥有 hasOne() 一家店铺,而一家店铺应当属于 belongsTo() 一个店主(也就是某类用户)。那么店铺就应该包含一个名为 owner_id 的字段,用作 this.hasOne('shop', { foreignKey: 'ownerId' }) 的外键。
厘清这种关联关系是有额外好处的。如果某一天业务逻辑有变,我们的用户突然又可以开多家店铺了,彼时我们把 hasOne() 改成 hasMany(),把对应的处理逻辑包在一个 for (const shop of user.shops) 循环里,就万事大吉了。都不需要修改 Shop 数据模型。