# Leoric 中文文档全集
> 由 docs/zh 下的指南拼接而成,供 AI 代理一次性获取完整上下文。
## 快速上手
### 快速上手
本文通过一个相册应用(姑且将它命名为 Portra)来讲解 Leoric 的配置使用方式。我们假定这个应用使用 MySQL 数据库,基于 Egg 框架开发,提供照片整理、备份、以及分享等功能。
#### 初始配置
Leoric 支持 MySQL、SQLite、以及 PostgreSQL 数据库,能够在 Node.js、Electron 等环境中运行,因此完全满足 Portra 应用的开发需求。我们将数据模型文件放在 `app/models` 目录,开发环境使用本地的 MySQL 服务,配置如下:
```js
const Realm = require('leoric');
const realm = new Realm({
host: 'localhost',
user: 'portra',
database: 'portra',
models: 'app/models',
migrations: 'database/migrations',
});
await realm.connect();
```
有关数据库或者运行环境的详细配置说明可以参考《[快速配置]({{ '/zh/setup' | relative_url }})》一文。
#### 声明与使用模型
如果不需要通过 Leoric 维护表结构,我们可以省略掉在数据模型中声明属性信息,根据数据库中的相关信息自动转换,这样在 `app/models` 目录中只需要声明对应的数据模型名称,以及必要的表结构关系即可。
以 `app/model/user.js` 为例,内容大致如下:
```js
const { Bone } = require('leoric');
module.exports = class User extends Bone {
static initialize() {
this.hasMany('books');
this.hasMany('comments');
}
}
```
在执行 `await realm.connect()` 之后,`User` 数据模型将被初始化,可以通过 `User.attributes` 访问属性信息,使用 `User.create()` 等方法新增、查询、更新、以及删除用户数据:
```js
// 创建用户
await User.create({ name: 'Stranger' });
// 查找第一条用户记录,也就是刚才创建的这条
const user = await User.first;
assert.equal(user.name, 'Stranger');
// 修改用户,更正用户名为泰瑞尔
await user.update({ name: 'Tyrael' });
// 删除用户记录
await user.remove();
```
有关表结构与数据模型属性名的约定关系,创建、读取、更新、以及删除数据记录的操作方法,推荐阅读《[基础]({{ '/zh/basics' | relative_url }})》一文详细了解。
#### 使用迁移任务管理表结构变更
不过我们的 Portra 应用预算比较拮据,没有专门的 DMS 系统来管理表结构变更,幸好 Leoric 也提供迁移任务管理,通过编写表结构变更相关的迁移任务,我们就可以将表结构变更纳入变更评审和版本管理。
例如,想要使用迁移任务创建用户表,大概有如下几个步骤:
1. 调用 `await realm.createMigrationFile('create-users')` 在目录创建迁移任务;
2. 编辑迁移任务,填写变更相关的执行与回滚逻辑,也就是 `driver.createTable('users', {...})` 和 `driver.dropTable('users')`;
3. 调用 `await realm.migrate()` 执行迁移任务,创建 `users` 表;
4. 创建 app/models/user.js 文件,声明用户数据模型
完成上述步骤之后,`User` 就可以用了。有关创建、修改、以及删除表的操作说明都可以参考《[迁移任务]({{ '/zh/migrations' | relative_url }})》一文。
另外,Leoric 也提供 `realm.sync({ force: true })` 的快捷方式,在 `User.attributes` 中声明属性信息,然后执行这个方法将属性信息同步到数据库即可,将自动检查模型声明和实际表结构信息的差异,然后执行相应的创建、修改表的操作。
### 从 Sequelize 迁移
使用 Sequelize 的项目如果考虑迁移到 Leoric,可以通过开启 Sequelize 适配器来简化迁移工作。开启 Sequelize 适配器之后,Leoric 将在数据模型的基类上层提供足够接近的 API 兼容,转换相关调用到 Bone,详细兼容程度可以参考《[Sequelize 适配器]({{ '/zh/sequelize' | relative_url }})》一文。
## 基础
本文主要向大家介绍 Leoric 基础概念。读完本文后,你将了解如下内容:
- 对象关系映射(Object Relational Mapping)和 Leoric 是什么, 以及怎么用;
- 如何使用 Leoric 的数据模型来操作关系数据库中存储的数据.
- Leoric 的表结构命名约定。
### Leoric 是什么
Leoric 是 Node.js 与关系型数据库之间的一层对象关系映射模型。它可以被用作 [MVC](https://en.wikipedia.org/wiki/Model%E2%80%93view%E2%80%93controller) 中的 M - 即 MVC 体系中负责表现业务数据与逻辑的那一层。
对象关系映射(简称 ORM)是应用程序中的对象与关系型数据管理系统中的表相互联系的一种方式。在许多编程语言中都有流行 ORM 的概念,例如 Ruby 的 Active Record、Python 的 SQLAlchemy、以及 Java 的 Hibernate。Leoric 受 [Active Record](http://guides.rubyonrails.org/active_record_basics.html) 影响颇多,或许你从 Leoric 的文档组织方式已经看出一二。
Leoric 应当具备的能力是:
- 表现数据模型及其背后的数据;
- 表现数据模型之前的关联;
- 无需在模型中重复字段定义即可映射存量表;
- 基于 async/await 的插入、读取、更新、删除(CRUD);
- 使用现代化的 JavaScript 编写、使用数据模型。
### 约定大于配置
一般而言,配置比约定要更加一目了然,也更经常被使用。但约定风格也有它的优势,如果你的表结构风格遵循 Leoric 的约定,几乎不需要写多少配置就可以编写数据模型。
#### 命名约定
默认情况下,Leoric 会按一定规则寻找数据模型与数据库表的对应关系。详细规则如下:
- 数据模型的类名遵从 `CamelCase` 格式,首字母大写,对应的表名则是类名变为复数、继而转为 `snake_case`;
- 数据模型的属性遵从 `camelCase` 格式,首字母小写。这些属性名称是从表结构信息中读取并自动转换的,通常在表中使用的字段名规范为 `snake_case`。
以下为一些转换示例:
| 数据模型 | 表 |
|---------|---------|
| Shop | shops |
| TagMap | tagMaps |
| Mouse | mice |
| Person | people |
Leoric 使用 [pluralize](https://www.npmjs.com/package/pluralize) 转换单复数。如果你觉得这些转换规则不直观(对非英语母语的人来说很正常),也可以明确配置数据模型对应的表名称、或者重命名数据模型的属性。我们将在“覆盖命名约定”一文深入讨论。
#### 表结构约定
Leoric 提供三个配置关联关系的静态方法 `.hasMany()`、`.hasOne()`、以及 `.belongsTo()`。用于关联的主键、外键约定如下:
- **外键**命名应当遵循 `modelNameId` 格式(例如 `shopId`)。对应的字段名则为属性名转为下划线分隔 `model_name_id`(例如 `shop_id`)。
- **主键**应为无符号整型 `id`。
还有一些可选的字段名,可为数据模型增加额外特性:
| 字段名 | 属性名 | 描述 |
|--------------|-------------|---------------------------|
| `created_at` | `createdAt` | 在数据记录被创建时自动更新 |
| `updated_at` | `updatedAt` | 在数据记录被更新时自动更新 |
| `deleted_at` | `deletedAt` | 在数据记录被伪删除时自动更新 |
> TDDL 使用的时间戳字段会被自动映射。`gmt_create` 映射为 `createdAt`、`gmt_modified` 映射为 `updatedAt`、以及 `gmt_deleted`(如果存在)会被映射为 `deletedAt`。
调用数据模型的 `Model.remove({...})` 方法时,如果存在`deletedAt` 属性,Leoric 将更新待删除记录的 `deletedAt` 属性,而不是将这些记录从数据库中永久删除。可以改为调用 `Model.remove({...}, true)` 方法来执行永久删除。
### 编写数据模型
假设 `shops` 表结构如下:
```sql
CREATE TABLE shops (
id int(11) NOT NULL auto_increment,
name varchar(255),
PRIMARY KEY (id)
);
```
`Shop` 数据模型需要继承 Leoric 输出的 `Bone` 基类:
```js
const { Bone } = require('leoric')
class Shop extends Bone {}
```
如果不希望使用第三方工具专门管理表结构,也可以直接让 Leoric 来完成这部分工作。在数据模型中声明模型的属性名,使用数据模型前同步到数据库即可:
```js
const { Bone, Realm } = require('leoric');
const { BIGINT, STRING } = Bone.DataTypes;
// define Shop
class Shop extends Bone {
static attributes = {
id: { type: BIGINT, primaryKey: true },
name: STRING,
}
}
// connecting Shop to shops table in database
const realm = new Realm({ host: 'localhost', models: [ Shop ] });
// synchronize model attributes to table
await realm.sync();
```
如果你的项目使用 TypeScript 编写,也可以使用装饰器来声明模型:
```ts
import { Bone, Realm } from 'leoric';
const { BIGINT, STRING } = Bone.DataTypes;
// define Shop
class Shop extends Bone {
// 主键声明也可以省略,默认按照如下方式声明
@Column({ primaryKey: true })
id: bigint;
// 字符串默认按照 VARCHAR(255) 类型定义
@Column()
name: string;
}
```
然后就可以用 `Shop` 数据模型操作数据了:
```js
const shop = new Shop({ name: 'Horadric Cube' })
await shop.save()
// 或者
await Shop.create({ name: 'Horadric Cube' })
```
### 覆盖命名约定
绝大部分命名约定都有对应的覆盖方法,我们可以使用 `static table` 覆盖表名:
```js
class Shop extends Bone {
static table = 'stores'
}
```
还可以使用 `static primaryKey` 指定主键名:
```js
class Shop extends Bone {
static primaryKey = 'shopId'
}
```
以及使用 `static attributes` 自定义数据模型属性对应的字段名:
```js
class Shop extends Bone {
static attributes = {
deletedAt: { type: DATE, columnName: 'removed_at' },
}
}
```
如果数据模型的属性信息不在模型中直接维护,也可以等数据模型信息从数据库加载后,在 `static initialize()` 方法中重命名属性名:
```js
class Shop extends Bone {
static initialize() {
this.renameAttribute('removedAt', 'deletedAt')
}
}
```
还可以在 `static initialize()` 中配置模型的关联关系,具体方法会在之后详细讨论。TypeScript 项目一般不需要通过这个静态方法,相关配置都有提供对应的装饰器版本,上述示例对应的 TypeScript 声明方式为:
```ts
class Shop extends Bone {
@Column({ name: 'removed_at' })
deltedAt: Date;
}
```
### 连接数据模型和数据库
数据模型需要和数据库连接方可使用,推荐使用如下方式:
```js
const Realm = require('leoric');
const realm = new Realm({
dialect: 'mysql',
host: 'localhost',
models: '/path/to/models',
});
await realm.sync();
```
`realm.sync()` 会根据数据模型中定义的字段信息 `Model.attributes` 自动执行表结构变更,确保数据库中的表结构和数据模型中的一致。在应用数据比较大或者应用表结构变更比较频繁且剧烈的情况下,一般不推荐使用。
后者这种情况比较适合仅连接数据库,使用 Leoric 的表结构变更功能来手动维护数据库中的表结构:
```js
const Realm = require('leoric');
const realm = new Realm(...);
await realm.connect();
```
v0.x 版本过来的用户,仍然可以选择使用 `connect()` 直接连接数据库:
```js
const { connect } = require('leoric');
// 连接数据模型到数据库
await connect({
host: 'example.com',
port: 3306,
user: 'john',
password: 'inputYourCodeHere',
db: 'tmall',
models: [Shop]
});
// 直接传入数据模型所在的路径
await connect({ ...opts, path: '/path/to/models' });
```
当然,如果是使用 Egg 开发 Web 应用,更加推荐直接用 egg-orm 插件。
### 读取与写入数据
数据模型声明、连接后,我们可以:
- 使用 `Model.find()`、`Model.findOne()` 等方法查询数据;
- 使用 `Model.create()`、`Model.update()` 等方法更新数据;
- 使用 `Model.remove()` 删除数据;
- 以及使用 `model.save()` 方法持久化当前实例上的改动。
```js
// 插入一条店铺记录
await Shop.create({ name: 'Barracks' });
// 查找店铺记录并更新
const shop = await Shop.findOne({ name: 'Barracks' });
shop.name = 'Horadric Cube';
await shop.save();
// 移除记录
await Shop.remove({ name: 'Horadric Cube' });
```
#### 创建
有两种插入数据库的方式。我们可以使用 `Model.create()`:
```js
const shop = await Shop.create({ name: 'Barracks', credit: 10000 })
```
或者先创建一个实例,更新属性,最后再使用 `model.save()`:
```js
const shop = new Shop({ name: 'Barracks' })
shop.credit = 10000
await shop.save()
```
两者对应的 SQL 都是:
```sql
INSERT INTO shops (name, credit, type) VALUES ('Barracks', 1000);
```
#### 读取
尽管 Leoric 提供的查询方法花样繁多,最常用的还是 `Model.find()` and `Model.findOne()`:
```js
// 读取所有店铺
Shop.find()
// 或者
Shop.all
// => SELECT * FROM shops;
// 读取一家店铺
Shop.findOne()
// => SELECT * FROM shops LIMIT 1;
// 查找一家名为 Deckard Cain 的店铺
Shop.findOne({ name: 'Deckard Cain' })
// => SELECT * FROM shops WHERE name = 'Deckard Cain' LIMIT 1;
// 找到所有信用分高于 1000 的店铺
Shop.where('credit > 1000')
// => SELECT * FROM shops WHERE credit > 1000;
```
有关读取数据库的详细说明,参考[查询接口]({{ '/zh/querying' | relative_url }})一文。
#### 更新
和插入数据一样,有两种更新数据的方式。如果数据模型对象已经读取在手,我们可以更新它们的属性值,再使用`model.save()` 持久化数据:
```js
const shop = await Shop.findOne({ name: 'Barracks' })
// => Shop { id: 1, name: 'Barracks' }
shop.credit = 10000
await shop.save()
```
上例对应的 SQL 如下:
```sql
UPDATE shops SET credit = 10000 WHERE id = 1;
```
如果想要节省反复读取、更新带来的数据库开销,我们也可以使用 `Model.update()` 一步到位:
```js
await Shop.update({ name: 'Barracks' }, { credit: 10000 })
```
上例对应的 SQL 如下:
```sql
UPDATE shops SET credit = 10000 WHERE name = 'Barracks';
```
#### 删除
同样的,实例方法 `model.remove()` 和静态方法 `Model.remove()` 均可用来从数据库删除数据。例如:
```js
const shop = await Shop.find({ name: 'Barracks' })
// => Shop { id: 1, name: 'Barracks' }
await shop.remove(true)
// DELETE FROM shops WHERE id = 1
await Shop.remove({ name: 'Barracks' }, true)
// DELETE FROM shops WHERE name = 'Barracks'
```
你可能会奇怪这里额外传递的 `true` 参数是做什么用的。这是因为默认情况下 Leoric 会执行伪删除,仅更新 `deleteAt` 属性,而不是真的把数据从数据库删除。数据模型必须包含 `deleteAt` 属性,用来记录删除时间。
所以如果 `Shop` 数据模型有 `deletedAt` 属性:
```js
const shop = await Shop.find({ name: 'Barracks' })
// => Shop { id: 1, name: 'Barracks' }
await shop.remove()
// UPDATE shops SET deleted_at = NOW() WHERE id = 1
await Shop.remove({ name: 'Barracks' })
// UPDATE shops SET deleted_at = NOW() WHERE name = 'Barracks'
```
如果 `Shop` 数据模型没有 `deletedAt` 属性,而 `model.remove()`、`Model.remove()` 方法并没有传递 `true`,Leoric 将抛出异常。
### 属性方法
#### attribute()
默认提供 `model.attribute(name)` 和 `model.attribute(name, value)` 方法来读写属性:
```js
const shop = new Shop({ name: 'FamilyMart' });
assert.equal(shop.attribute('name'), 'FamilyMart');
shop.attribute('name', '7-Eleven');
assert.equal(shop.attribute('name'), '7-Eleven');
```
对于模型属性,我们还默认提供 getter 和 setter,因此一般不需要用到 `model.attribute()` 方法。需要覆盖属性的 getter 或者 setter,这个方法就派上用场了:
```js
class Shop extends Bone {
set name(value) {
if ([ 'FamilyMart', '7-Eleven' ].includes(value)) {
this.attribute('name', value);
}
throw new Error(`unknown shop name: ${value}`);
}
}
```
应当避免在属性的 getter 或者 setter 中调用其他属性的 getter 或者 setter 方法,容易出现循环调用的情况,可以一律使用 `model.attribute()` 方法来替代。
#### getter / setter
默认情况下,我们会给模型属性生成对应的 getter / setter,例如:
```js
class Shop extends Bone {
static attributes = {
name: STRING,
createdAt: DATE,
updatedAt: DATE,
}
}
```
使用这个模型时,可以直接读取或者设置 `name`:
```js
const shop = new Shop({ name: 'FamilyMart' });
assert.equal(shop.name, 'FamilyMart');
shop.name = '7-Eleven';
assert.equal(shop.name, '7-Eleven');
```
可以只覆盖属性的 getter / setter 中的一个,模型会在初始化的时候自动补上剩余的部分,例如:
```js
class Shop extends Bone {
static attributes = {
name: STRING,
createdAt: DATE,
updatedAt: DATE,
}
set name(value) {
if ([ 'FamilyMart', '7-Eleven' ].includes(value)) {
this.attribute('name', value);
}
throw new Error(`unknown shop name: ${value}`);
}
}
```
使用装饰器的版本:
```ts
class Shop extends Bone {
@Column()
name: STRING;
@Column()
createdAt: DATE;
@Column()
updatedAt: DATE;
@Column({ type: STRING })
set name(value) {
if ([ 'FamilyMart', '7-Eleven' ].includes(value)) {
this.attribute('name', value);
}
throw new Error(`unknown shop name: ${value}`);
}
}
```
此时仍然可以直接读取 `name`:
```js
const shop = new Shop({ name: 'FamilyMart' });
assert.equal(shop.name, 'FamilyMart');
```
### 脏检查
#### changed()
对于已经存到数据库的记录来说,只有重新设置过属性,才会认为属性有改动:
```js
const user = await User.first; // => { name: 'James', login: 'james' }
user.name = 'Jimmy';
user.changed(); // => [ 'name' ]
user.login = 'jimmy';
user.changed(); // => [ 'name', 'login' ]
```
对于新初始化的模型实例,会认为所有的属性都被改了(从 null 设置成当前值)
```js
const user = new User({ name: 'Jimmy', login: 'Jimmy' });
user.changed(); // => [ 'name', 'login' ]
```
实例保存之后,会重置属性改动判断
```js
const user = new User({ name: 'Jimmy', login: 'Jimmy' });
user.changed(); // => [ 'name', 'login' ]
await user.save();
user.changed(); // => false
```
这里需要注意的是,如果没有属性改动,将返回 false 而不是空数组 `[]` 。这是有意为之,目的是和现有其他库的 API 保持一致。如果需要返回值类型固定,可以考虑使用 `changes()` ,后者的返回类型始终为对象。
#### changes()
`changes()` 是 `changed()` 的孪生版本,两者判断属性是否有改动的逻辑是一致的。最主要的区别是, `changes()` 返回的是对象而不是数组,对象中包含有改动的属性在改动之前的值和当前的值。
```js
const user = new User({ name: 'Jimmy', login: 'Jimmy' });
user.changes(); // => { name: [ null, 'Jimmy' ], login: [ null, 'login' ] }
```
此外,即便没有属性改动, `changes()` 也会返回 `{}` ,它的返回类型始终为对象。
#### previousChanged()
我们可以使用 `previousChanged()` 来检查模型是否之前有过改动,即使刚刚保存过。
```js
const user = new User({ name: 'Jimmy' });
user.changed(); // => [ 'name' ]
user.previousChanged(); // => false
await user.save();
user.changed(); // => false
user.previousChanged(); // => [ 'name' ]
```
一般情况下不太会需要使用 `previousChanged()` ,但是在一些需要事后判断变更的场景,比如 `afterCreate` 或者 `afterUpdate` 回调,会特别方便:
```js
User.init(attributes, {
hooks: {
afterUpdate(obj) {
this.previousChanged(); // => check if changed previously or not
},
},
});
```
和 `changes()` 类似,可以用 `previousChanges()` 读取前一个变更版本的具体值。
#### previousChanges()
```js
const user = new User({ name: 'Jimmy' });
user.changes(); // => { name: [ null, 'Jimmy' ] }
user.previousChanges(); // => {}
await user.save();
user.changes(); // => {}
user.previousChanged(); // => { name: [ null, 'Jimmy' ] }
```
可以使用 `preivousChanges(name)` 读取单个属性的变更记录:
```js
const user = new User({ name: 'Jimmy', login: 'jimmy' });
user.changes('login'); // => { name: [ null, 'jimmy' ] }
user.previousChanges('login'); // => {}
await user.save();
user.changes('login'); // => {}
user.previousChanged('login'); // => { name: [ null, 'jimmy' ] }
```
`previousChanges()` 和 `changes()` 的逻辑基本一样,只是对比是前一个版本而非属性当前值。
### 数据校验
可以通过 `allowNull` 选项开启数据库自带的非空校验:
```js
class Shop extends Bone {
static attributes = {
name: { allowNull: false },
}
}
```
也可以使用 Leoric 集成的 validator.js 提供的校验规则:
```js
class Shop extends Bone {
static attributes = {
name: {
type: STRING,
validate: {
notIn: [['FamilyMart', '7-Eleven']], // 不是其中任何一个
},
},
}
}
```
还可以在模型属性定义中自定义验证器:
```js
class User extends Bone {
static attributes = {
desc: {
type: DataTypes.STRING,
validate: {
isValid() {
if (this.desc && this.desc.length < 2) { // 可通过 this 访问属性值
throw new Error('Invalid desc');
}
},
}
}
}
}
```
详细使用参考《[数据校验]({% link zh/validations.md %})》 帮助文档。
### 钩子
可以通过声明对应的静态方法来配置钩子,具体作用顾名思义:
```js
class Shop extends Bone {
static beforeCreate() {}
static afterUpdate() {}
});
```
可配置的钩子列表和详细使用参考《[钩子]({% link zh/hooks.md %})》 帮助文档。
### 迁移任务
使用 `realm.createMigrationFile(name)` 来创建迁移任务:
```js
const Realm = require('leoric');
const realm = new Realm({
client: 'mysql',
migrations: 'database/migrations',
});
await realm.createMigrationFile('create-products');
// 将会在 database/migrations 目录下创建文件名类似 20210621170235-create-products.js 的文件
```
使用 `realm.migrate()` 执行迁移任务,也可以指定步数来控制执行的任务数量,比如 `realm.migrate(1)` 单步执行;还可以使用 `realm.rollback()` 回滚迁移任务,同样支持指定步数来控制回滚的任务数量。
迁移任务需要实现对应的 `async up()` 和 `async down()`,例如下面这个用来创建产品表的迁移任务:
```js
module.exports = {
async up(driver, DataTypes) {
const { BIGINT, STRING, TEXT } = DataTypes;
await driver.createTable('products', {
id: { type: BIGINT, primaryKey: true },
name: STRING,
description: TEXT,
});
},
async down(driver, DataTypes) {
await driver.dropTable('products');
},
}
```
详细使用参考《[迁移任务]({% link zh/migrations.md %})》 帮助文档。
## 数据迁移
Leoric 提供迁移任务来帮助开发者完成日常工作中的表结构变更与数据迁移。
### 什么是迁移任务
以下面这个迁移任务为例:
```js
module.exports = {
async up(driver, DataTypes) {
const { BIGINT, STRING, TEXT } = DataTypes;
await driver.createTable('products', {
id: { type: BIGINT, primaryKey: true },
name: STRING,
description: TEXT,
});
},
async down(driver, DataTypes) {
await driver.dropTable('products');
},
}
```
上面这个迁移任务创建了一张名为 `products` 的表,包含三个字段,分别是主键 `id`、字符串类型的 `name`、以及长文本 `description`。迁移任务需要同时提供 `up()` 和 `down()` 两个方法,确保任务是可以回退或者重做的。在这个迁移任务里,回退操作就是删除 `products` 表,重做则会重新创建 `products` 表。
迁移任务不仅仅可以用来做表结构变更,也可以用来做数据迁移来订正脏数据,比如新增的字段如果存量数据需要订正为与字段默认值不同的值,我们可以这么写:
```js
module.exports = {
async up(driver, DataTypes) {
await driver.addColumn('users', {
wants_marketing_email: { type: BOOLEAN, default: false },
});
await driver.query('UPDATE users SET wants_marketing_email = 1');
},
async down(driver, DataTypes) {
await driver.removeColumn('users', 'wants_marketing_email');
},
}
```
上面这个迁移任务的作用是给 `users` 表增加 `wants_marketing_email` 字段,默认值为 `false`,但同时给存量数据设置默认值为 `true`(因为业务上之前是按 `true` 来处理的)。
#### 创建迁移任务
可以使用 `Realm#createMigrationFile(name)` 来创建迁移任务:
```js
const Realm = require('leoric');
const realm = new Realm({
client: 'mysql',
migrations: 'database/migrations',
});
await realm.createMigrationFile('create-products');
// 将会在 database/migrations 目录下创建文件名类似 20210621170235-create-products.js 的文件
```
迁移任务骨架内容如下:
```js
'use strict';
module.exports = {
async up(driver, DataTypes) {
// TODO
},
async down(driver, DataTypes) {
// TODO
}
};
```
#### 迁移任务文件命名约定
如前文所述,使用 `Realm#createMigrationFile(name)` 方法创建的迁移任务文件名类似 `20210621170235-create-products.js`,前缀是当前迁移任务的创建时间,格式为 `YYYYMMDDHHMMSS`,剩余的部分就是传入的 `name`,迁移任务名称即两者的组合,格式为 `YYYYMMDDHHMMSS-${name}`。
迁移任务的执行状态会被记录到 `leoric_meta` 表。如果在执行迁移任务的时候还没有 `leoric_meta` 表,就会自动创建一个。已经成功执行的迁移任务名会被存到 `leoric_meta.name`。
如果迁移任务被回退,相关执行记录则会被从 `leoric_meta` 表移除。
#### 修改迁移任务内容
原则上不建议反复修改同一个迁移任务,尤其是在迁移任务已经被提交到仓库中,可能被合作的开发者在其他地方已经执行的情况下。如果发现搞错了需要执行的表结构变更或者数据迁移内容,请尽量通过增加新的迁移任务的方式。
#### 支持的数据类型
Leoric 支持如下数据类型:
```js
STRING
INTEGER
BIGINT
DATE
BOOLEAN
TEXT
BLOB
JSON
JSONB
```
这些类型会被映射到对应的数据库字段类型。例如,在 MySQL 数据库中 `STRING` 默认会映射为 `VARCHAR(255)`。
### 编写迁移任务
#### 创建表
```js
module.exports = {
async up(driver, DataTypes) {
const { STRING, BIGINT, INTEGER } = DataTypes;
await driver.createTable('products', {
id: { type: BIGINT, primary: true },
category_id: { type: BIGINT },
name: STRING,
price: INTEGER,
});
},
};
```
上述代码等价于如下 SQL:
```sql
CREATE TABLE `products` (
`id` BIGINT PRIMARY KEY,
`category_id` BIGINT,
`name` VARCHAR(255),
`price` INT,
);
```
#### 增加字段
```js
module.exports = {
async up(driver, DataTypes) {
await driver.addColumn('products', 'volume', {
type: DataTypes.INTEGER,
defaultValue: 0,
});
},
}
```
上述代码等价于如下 SQL:
```sql
ALTER TABLE `products` ADD COLUMN `volume` INTEGER;
```
#### 修改字段
```js
module.exports = {
async up(driver, DataTypes) {
await driver.changeColumn('products', 'volume', {
type: DataTypes.INTEGER.UNSIGNED,
defaultValue: 0,
});
},
}
```
上述代码等价于如下 SQL:
```sql
ALTER TABLE `products` ADD COLUMN `volume` INTEGER UNSIGNED;
```
#### 重命名字段
```js
module.exports = {
async up(driver, DataTypes) {
await driver.renameColumn('products', 'volume', 'stock');
},
};
```
上述代码等价于如下 SQL(旧版本 MySQL 使用的 SQL 不完全相同):
```sql
ALTER TABLE `products` RENAME COLUMN `volume` TO `stock`;
```
#### 删除字段
|---|------------------|
| ⚠️ | 操作前请务必做好备份 |
```js
module.exports = {
async up(driver, DataTypes) {
await driver.removeColumn('products', 'stock');
},
};
```
上述代码等价于如下 SQL:
```sql
ALTER TABLE `products` DROP COLUMN `stock`;
```
#### 增加索引
```js
module.exports = {
async up(driver, DataTypes) {
await driver.addIndex('products', [ 'category_id', 'price' ]);
},
};
```
上述代码等价于如下 SQL:
```sql
CREATE INDEX `idx_products_category_id_price` ON `products` (`category_id`, `price`);
```
#### 删除索引
```js
module.exports = {
async up(driver, DataTypes) {
await driver.removeIndex('products', [ 'category_id', 'price' ]);
},
};
```
上述代码等价于如下 SQL:
```sql
DROP INDEX `idx_products_category_id_price`;
```
#### 清空表
|---|------------------|
| ⚠️ | 操作前请务必做好备份 |
```js
module.exports = {
async up(driver, DataTypes) {
await driver.truncateTable('products');
}
};
```
上述代码等价于如下 SQL:
```sql
TRUNCATE TABLE `products`;
```
#### 删除表
|---|------------------|
| ⚠️ | 操作前请务必做好备份 |
```js
module.exports = {
async down(driver, DataTypes) {
await driver.dropTable('products');
},
};
```
上述代码等价于如下 SQL:
```sql
DROP TABLE `table_name`;
```
#### 使用 `up`/`down` 方法
迁移任务默认需要提供 `up`/`down` 两个方法,前者用来执行正向的数据迁移或者表结构变更操作,后者用来回滚。默认创建的迁移任务文件内容如下:
```js
'use strict';
module.exports = {
async up(driver, DataTypes) {
},
async down(driver, DataTypes) {
},
};
```
建议在 `down` 方法中确保相关变更能够被正确回滚,不留下可能带来冲突的遗留表结构或者字段,避免影响其他执行任务回滚、或者当前执行任务的重新执行。
### 执行迁移任务
```js
const Realm = require('leoric');
const realm = new Realm();
await realm.migrate();
```
所有未被执行的迁移任务都会被找出来并按照时间顺序执行。如果有如下数据迁移任务:
```
// database/migrations
20210622130000-create-products.js
20210623150000-add-product-price.js
20210623160000-create-recipients.js
```
如果上面三个任务都没有被执行过,那么在调用 `realm.migrate()` 的时候将会依次执行 `create-products`、`add-product-price`、以及 `create-recipients`,依次调用三个任务中的 `up()` 方法。
被执行过的任务会被记录到 `leoric_meta` 表,大致内容如下:
```bash
mysql> select * from leoric_meta;
+------------------------------------------------------------------------+
| name |
+------------------------------------------------------------------------+
| 20210622130000-create-products.js |
| 20210623150000-add-product-price.js |
| 20210623160000-create-recipients.js |
+------------------------------------------------------------------------+
```
#### 回退
```js
const Realm = require('leoric');
const realm = new Realm();
// 回退一步
await realm.rollback()
// 回退三步
await realm.rollback(3);
```
`realm.rollback()` 会从 `leoric_meta` 表查找执行记录,按照迁移任务倒序依次执行任务的 `down()` 方法。
#### 重置数据库
重置数据库需要先回退所有已执行的迁移,然后从头重新执行。目前 Leoric 没有提供专门的 `reset()` 方法,但可以通过组合 `rollback()` 和 `migrate()` 实现:
```js
const Realm = require('leoric');
const realm = new Realm({
client: 'mysql',
migrations: 'database/migrations',
});
// 回退所有迁移(使用一个足够大的数字)
await realm.rollback(Infinity);
// 重新执行所有迁移
await realm.migrate();
```
> **警告**:此操作会销毁所有现有数据,执行前务必备份数据库。
#### 执行单个迁移任务
可以通过给 `realm.migrate()` 传入 `steps` 参数来控制执行的迁移数量:
```js
// 只执行下一个待执行的迁移
await realm.migrate(1);
// 执行接下来的 3 个待执行的迁移
await realm.migrate(3);
```
类似地,`realm.rollback()` 也接受步数参数:
```js
// 回退最后一个迁移
await realm.rollback();
// 回退最后 3 个迁移
await realm.rollback(3);
```
> **注意**:目前没有内置方式按名称执行特定迁移。迁移始终按照文件名时间戳的顺序执行。
### 在迁移任务中使用 Model
某些场景下你可能需要在迁移中使用模型来操作数据。此时可以引入模型并使用原始查询或模型方法。需要注意模型必须先建立连接:
```js
module.exports = {
async up(driver, DataTypes) {
// 先添加新列
await driver.addColumn('users', 'display_name', {
type: DataTypes.STRING,
});
// 使用原始 SQL 从已有数据填充新列
await driver.query(`
UPDATE users SET display_name = CONCAT(first_name, ' ', last_name)
`);
},
async down(driver, DataTypes) {
await driver.removeColumn('users', 'display_name');
},
};
```
如果需要使用模型 API 而非原始 SQL,可以在迁移中创建 Realm 实例。但一般不推荐这样做,因为模型定义可能会随时间变化,与迁移产生不一致:
```js
const Realm = require('leoric');
const User = require('../../app/models/user');
module.exports = {
async up(driver, DataTypes) {
await driver.addColumn('users', 'display_name', {
type: DataTypes.STRING,
});
// 使用模型 API(需要先 connect)
const realm = new Realm({
client: 'mysql',
database: 'myapp',
models: [User],
});
await realm.connect();
const users = await User.find();
for (const user of users) {
await user.update({ displayName: `${user.firstName} ${user.lastName}` });
}
await realm.disconnect();
},
async down(driver, DataTypes) {
await driver.removeColumn('users', 'display_name');
},
};
```
> **最佳实践**:在迁移中优先使用原始 SQL 查询(`driver.query()`)而非模型 API。原始 SQL 是确定性的,不会因为后续模型定义变更而出问题。
### 转存表结构信息
|---|-----------------|
| ⚠️ | 相关功能仍在实现中 |
迁移任务执行成功后(不管是 `realm.migrate()` 还是 `realm.rollback()`),都会在 `opts.migrations` 所指定的目录的同级目录生成一份 `schema.js` 文件。例如,如果指定的 `opts.migrations` 路径是 `database/migrations`,Leoric 就会在迁移任务执行结束后转存一份完整的当前数据库结构信息到 `database/schema.js`,内容大致如下:
```js
module.exports = async function createSchema(driver, DataTypes) {
const { STRING, INTEGER, BIGINT, DATE } = DataTypes;
await driver.dropTable('products');
await driver.createTable('products', {
id: { type: BIGINT, primaryKey: true },
name: STRING,
price: INTEGER,
createdAt: DATE,
updatedAt: DATE,
});
// 其他表的创建语句类似
}
```
此文件仅包含表结构信息,不包含数据。
## 数据校验
本文将介绍如何通过 leoric 对模型的属性进行约束以及对其赋值进行数据校验
### allowNull 是否允许为空
模型的属性定义可以设置该属性是否可为空,在进行模型同步时会根据设置条件生成相应的数据表字段属性特征( `NOT NULL` 或者 `NULL` ),且模型实例属性设值时不符合空值检查时会抛出错误
```js
const { Bone, DataTypes } = require('leoric');
class User extends Bone {
static attributes = {
id: { type: DataTypes.BIGINT, primaryKey: true },
email: { type: DataTypes.STRING, allowNull: false },
...
}
};
User.sync();
/*
CREATE TABLE `users` (
`id` bigint(20) AUTO_INCREMENT PRIMARY KEY,
`email` varchar(256) NOT NULL,
....
);
*/
User.create({ name: 'OldHunter' }); // throw LeoricValidateError('notNull'); email should not be null
```
### unique 唯一约束
可通过 `unique` 设置字段的唯一约束
```js
const { Bone, DataTypes } = require('leoric');
class User extends Bone {
static attributes = {
id: { type: DataTypes.BIGINT, primaryKey: true },
email: { type: DataTypes.STRING, allowNull: false, unique: true },
...
}
};
User.sync();
/*
CREATE TABLE `users` (
`id` bigint(20) AUTO_INCREMENT PRIMARY KEY,
`email` varchar(256) NOT NULL UNIQUE,
....
);
*/
```
### 内置验证器
leoric 除了提供 [validator.js](https://github.com/validatorjs/validator.js) 包含的验证器作为内置验证器外还提供以下的内置验证
```js
class User extends Bone {
static attributes = {
var: {
type: ANYTYPE,
validate: {
notIn: [['MHW', 'Bloodborne']], // 不是其中任何一个
notNull: true, // 不能为 NULL
isNull: true, // 只能为 NULL
min: 1988, // 最小值
max: 2077, // 最大值
contains: 'Handsome', //一定要包含**字符串
notContains: 'Handsome', // 不能包含 ** 字符串
regex: /^iceborne/g, // 匹配正则
notRegex: /^iceborne/g, // 不匹配这个正则
is: /^iceborne/g, // 匹配正则
notEmpty: true, // 不允许空字符串
}
},
}
});
```
#### 自定义错误信息
内置验证器支持传入自定义错误信息,验证失败时不再抛出 leoric 默认的错误信息
```js
class User extends Bone {
static attributes = {
var: {
type: ANYTYPE,
validate: {
isIn: {
args: [ 'MHW', 'Bloodborne' ], // args 为该内置验证器需要的参数
msg: 'OH! WHAT HAVE YOU DONE?!' // msg 即为自定义错误信息
},
notNull: {
args: true,
msg: 'OH! WHAT HAVE YOU DONE?!'
}
}
}
}
}
```
### 自定义验证器
leoric 也支持自定义验证器,只需要传入函数即可,在自定义验证器中可使用 `this` 来访问模型的函数或属性值,同时在验证不通过时你既可以在验证器中直接抛出错误,也可以返回 `false` ,leoric 会根据返回值进行下一步处理
```js
class User extends Bone {
static attributes = {
desc: {
type: DataTypes.STRING,
validate: {
isValid() {
if (this.desc && this.desc.length < 2) { // 可通过 this 访问属性值
throw new Error('Invalid desc');
}
},
lengthMax(value) { //自定义验证器函数的第一个参数即为当前属性的赋值
if (value && value.length >= 10) {
return false;
}
}
}
}
}
}
```
## 关联关系
本文涵盖 Leoric 的关联关系特性。在阅读本文后,你将了解如下内容:
- 如何定义数据模型间的关联关系;
- 如何理解关联关系的各种类型。
### 为什么需要关联关系
关联关系定义完成之后,一次查询即可返回所有关联结果。例如:
```js
const shop = await Shop.findOne({ id }).with('items', 'owner')
// => Shop { id: 1,
// name: 'Barracks',
// items: [ Item { name: "Wirt's Leg" }, ... ],
// owner: User { name: 'Tyreal' } }
```
### 关联关系的类型
Leoric 支持四种关联关系:
- `belongsTo()`
- `hasMany()`
- `hasMany({ through })`
- `hasOne()`
这些方法需要在 `Model.describe()` 方法中调用。例如,声明店铺属于 `belongsTo()` 它的 `owner` 之后,Leoric 将在执行 `Shop.find().with('owner')` 时自动 JOIN 店铺和用户表,找到所查找的店铺对应的 `owner`,在结果中实例化对应的数据模型并挂载到店铺的 `owner` 属性。
使用 TypeScript 的项目也可以用更直观的装饰器配置方式,上述四种关联关系都有对应的装饰器:
- `@BelongsTo()`
- `@HasMany()`
- `@HasMany({ through })`
- `@HasOne()`
和静态方法的区别主要是第一个参数不需要指定关联关系名称,其余基本一致,例如 `Post.belongsTo('user')` 对应的装饰器是:
```ts
class Post {
@BelongsTo()
user: User
}
```
#### `belongsTo()`
 `belongsTo()` 方法设置的是一对一或者多对一的关联关系。例如,一家店铺可以有许多商品。而一个商品只能属于 `belongsTo()` 一家店铺。所以商品 `Item` 的数据模型定义可能是这样的:
```js
class Item extends Bone {
static initialize() {
this.belongsTo('shop')
}
}
```
或者使用对应的装饰器来声明关联关系:
```ts
class Item extends Bone {
@BelongsTo()
shop: Shop;
}
```
Leoric 会把关联关系的名称 `shop` 转为驼峰、首字母大写,再以转换后的 `Shop` 为数据模型名称寻找对应的数据模型定义。如果实际的数据模型名称并非如此,我们也可以使用 `className` 显式指定:
```js
class Item extends Bone {
static initialize() {
this.belongsTo('shop', { className: 'Seller' })
}
}
```
使用对应的装饰器:
```ts
class Item extends Bone {
@BelongsTo({ className: 'Seller' })
shop: Shop;
}
```
> 注意传给 `className` 的值是字符串而非实际数据模型的类。在 `Model.describe()` 定义阶段互相传递数据模型的类很容易导致循环依赖,以至于 `require` 到不一致的 `exports`。
如你在实例关系图中所见,用于关联 `belongsTo()` 关系的外键是存在于发起关联关系的数据模型中的。外键的名称默认根据目标数据模型的名称转换,首字母转为小写,再跟上 `Id` 后缀。在这个例子里,外键会自动根据 `Shop` 转换成 `shopId`。
> Leoric 在数据模型底层实际维护两套名称。一个是数据模型中属性的名称,与 JavaScript 中常用的编码规范一致,采用驼峰格式。另一个则是这些属性名对应的实际字段名,即数据库表结构设计时所采用的名称,通常是以下划线分隔的。
可以使用 `foreignKey` 参数覆盖默认的外键名称:
```js
class Item extends Bone {
static initialize() {
this.belongsTo('shop', { foreignKey: 'sellerId' })
}
}
```
使用对应的装饰器:
```ts
class Item extends Bone {
@BelongsTo({ foreignKey: 'sellerId' })
shop: Shop;
}
```
#### `hasMany()`
如果你从店铺的角度看这个实例关系图,你会注意到这也是一对多 `hasMany()` 的关联关系。店铺 `hasMany()` 商品:
```js
class Shop extends Bone {
static initialize() {
this.hasMany('items')
}
}
```
使用对应的装饰器:
```ts
class Shop extends Bone {
@HasMany()
items: Item[];
}
```
> 注意,与 `belongsTo()` 不同的是,传给 `hasMany()` 的名称通常是复数形式。
Leoric 寻找对应数据模型的方式都是差不多的。首先将关联关系的名称转为单数,继而首字母大写。在此例中,`items` 被转为 `item`,继而使用 `Item` 寻找实际的数据模型类。
可以使用 `className` 参数覆盖默认的数据模型名称:
```js
class Shop extends Bone {
static initialize() {
this.hasMany('items', { className: 'Commodity' })
}
}
```
使用对应的装饰器:
```ts
class Shop extends Bone {
// 一般可以通过类型名识别出对应的 className
@HasMany({ className: 'Commodity' })
items: Commodity[];
}
```
如你在实例关系图所见,`hasMany()` 的外键是在目标数据模型对应的表 `items` 中的。要覆盖默认的外键名称,给 `hasMany()` 传 `foreignKey` 即可:
```js
class Shop extends Bone {
static initialize() {
this.hasMany('items', { foreignKey: 'sellerId' })
}
}
```
使用对应的装饰器:
```ts
class Shop extends Bone {
@HasMany({ foreignKey: 'sellerId' })
items: Item[];
}
```
#### `hasMany({ through })`
数据库实例关系的世界并不仅由一对一或者一对多两种关联关系组成。实际业务中存在大量需要多对多的关联关系需要配置。但是,在关系型数据库中多对多的关联关系没办法仅使用两个表实现。为实现这一特性,我们需要引入一张中间表来记录多对多的关系。
以下面这个标签系统为例:
`belongsTo()` 方法设置的是一对一或者多对一的关联关系。例如,一家店铺可以有许多商品。而一个商品只能属于 `belongsTo()` 一家店铺。所以商品 `Item` 的数据模型定义可能是这样的:
```js
class Item extends Bone {
static initialize() {
this.belongsTo('shop')
}
}
```
或者使用对应的装饰器来声明关联关系:
```ts
class Item extends Bone {
@BelongsTo()
shop: Shop;
}
```
Leoric 会把关联关系的名称 `shop` 转为驼峰、首字母大写,再以转换后的 `Shop` 为数据模型名称寻找对应的数据模型定义。如果实际的数据模型名称并非如此,我们也可以使用 `className` 显式指定:
```js
class Item extends Bone {
static initialize() {
this.belongsTo('shop', { className: 'Seller' })
}
}
```
使用对应的装饰器:
```ts
class Item extends Bone {
@BelongsTo({ className: 'Seller' })
shop: Shop;
}
```
> 注意传给 `className` 的值是字符串而非实际数据模型的类。在 `Model.describe()` 定义阶段互相传递数据模型的类很容易导致循环依赖,以至于 `require` 到不一致的 `exports`。
如你在实例关系图中所见,用于关联 `belongsTo()` 关系的外键是存在于发起关联关系的数据模型中的。外键的名称默认根据目标数据模型的名称转换,首字母转为小写,再跟上 `Id` 后缀。在这个例子里,外键会自动根据 `Shop` 转换成 `shopId`。
> Leoric 在数据模型底层实际维护两套名称。一个是数据模型中属性的名称,与 JavaScript 中常用的编码规范一致,采用驼峰格式。另一个则是这些属性名对应的实际字段名,即数据库表结构设计时所采用的名称,通常是以下划线分隔的。
可以使用 `foreignKey` 参数覆盖默认的外键名称:
```js
class Item extends Bone {
static initialize() {
this.belongsTo('shop', { foreignKey: 'sellerId' })
}
}
```
使用对应的装饰器:
```ts
class Item extends Bone {
@BelongsTo({ foreignKey: 'sellerId' })
shop: Shop;
}
```
#### `hasMany()`
如果你从店铺的角度看这个实例关系图,你会注意到这也是一对多 `hasMany()` 的关联关系。店铺 `hasMany()` 商品:
```js
class Shop extends Bone {
static initialize() {
this.hasMany('items')
}
}
```
使用对应的装饰器:
```ts
class Shop extends Bone {
@HasMany()
items: Item[];
}
```
> 注意,与 `belongsTo()` 不同的是,传给 `hasMany()` 的名称通常是复数形式。
Leoric 寻找对应数据模型的方式都是差不多的。首先将关联关系的名称转为单数,继而首字母大写。在此例中,`items` 被转为 `item`,继而使用 `Item` 寻找实际的数据模型类。
可以使用 `className` 参数覆盖默认的数据模型名称:
```js
class Shop extends Bone {
static initialize() {
this.hasMany('items', { className: 'Commodity' })
}
}
```
使用对应的装饰器:
```ts
class Shop extends Bone {
// 一般可以通过类型名识别出对应的 className
@HasMany({ className: 'Commodity' })
items: Commodity[];
}
```
如你在实例关系图所见,`hasMany()` 的外键是在目标数据模型对应的表 `items` 中的。要覆盖默认的外键名称,给 `hasMany()` 传 `foreignKey` 即可:
```js
class Shop extends Bone {
static initialize() {
this.hasMany('items', { foreignKey: 'sellerId' })
}
}
```
使用对应的装饰器:
```ts
class Shop extends Bone {
@HasMany({ foreignKey: 'sellerId' })
items: Item[];
}
```
#### `hasMany({ through })`
数据库实例关系的世界并不仅由一对一或者一对多两种关联关系组成。实际业务中存在大量需要多对多的关联关系需要配置。但是,在关系型数据库中多对多的关联关系没办法仅使用两个表实现。为实现这一特性,我们需要引入一张中间表来记录多对多的关系。
以下面这个标签系统为例:
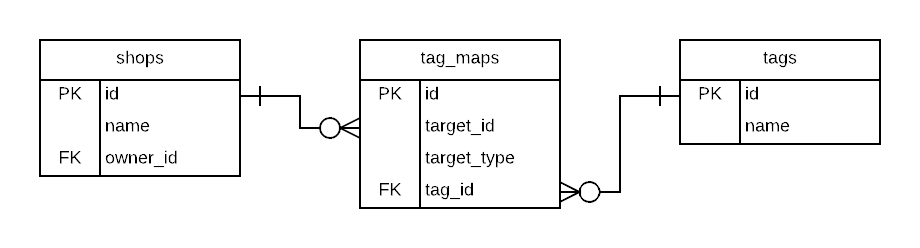 一家店铺可以有任意多个标签。而一个标签也可以与任意多的店铺关联。两者之间的关系存储在 `tag_maps` 表中。无论是从店铺还是标签查找彼此的关系,都需要先经过中间表 `tag_maps`。
> 正如你可能已经注意到的,在上述实体关系图中 `tag_maps` 表并不一定仅与 `shops` 发生关联。它通过 `target_type` 字段支持任意类型的目标数据模型。以此方式,`tags` 可以与任何模型建立多对多的关联关系。
`hasMany({ through })` 正是用来支持这一关联方式的方法。以 `Shop` 的视角为例:
```js
class Shop extends Bone {
static initialize() {
// the extra where is needed if you fancy this generic tag system
this.hasMany('tagMaps', { foreignKey: 'targetId', where: { targetType: 0 } })
this.hasMany('tags', { through: 'tagMaps' })
}
}
```
使用对应的装饰器:
```ts
class Shop extends Bone {
@HasMany({ foreignKey: 'targetId', where: { targetType: 0 } })
tagMaps: TagMap[];
@HasMany({ through: 'tagMaps' })
tags: Tag[];
}
```
在 `Tag` 这边则是:
```js
class Tag extends Bone {
static initialize() {
this.hasMany('shopTagMaps', {
className: 'TagMap',
foreignKey: 'targetId',
where: { targetType: 0 },
})
this.hasMany('shops', { through: 'shopTagMaps' })
}
}
```
使用对应的装饰器:
```ts
class Shop extends Bone {
@HasMany({ className: 'TagMap', foreignKey: 'targetId', where: { targetType: 0 } })
shopTagMaps: TagMap[];
@HasMany({ through: 'shopTagMaps' })
shops: Tag[];
}
```
假设需求有变,我们需要给商品也增加标签系统,我们在 `Tag` 数据模型这边只需稍许改动:
```diff
class Tag extends Bone {
static initialize() {
this.hasMany('shopTagMaps', { className: 'TagMap', where: { targetType: 0 } })
this.hasMany('shops', { through: 'shopTagMaps' })
+ this.hasMany('itemTagMaps', { className: 'TagMap', where: { targetType: 1 } })
+ this.hasMany('items', { through: 'itemTagMaps' })
}
}
```
#### `hasOne()`
一家店铺可以有任意多个标签。而一个标签也可以与任意多的店铺关联。两者之间的关系存储在 `tag_maps` 表中。无论是从店铺还是标签查找彼此的关系,都需要先经过中间表 `tag_maps`。
> 正如你可能已经注意到的,在上述实体关系图中 `tag_maps` 表并不一定仅与 `shops` 发生关联。它通过 `target_type` 字段支持任意类型的目标数据模型。以此方式,`tags` 可以与任何模型建立多对多的关联关系。
`hasMany({ through })` 正是用来支持这一关联方式的方法。以 `Shop` 的视角为例:
```js
class Shop extends Bone {
static initialize() {
// the extra where is needed if you fancy this generic tag system
this.hasMany('tagMaps', { foreignKey: 'targetId', where: { targetType: 0 } })
this.hasMany('tags', { through: 'tagMaps' })
}
}
```
使用对应的装饰器:
```ts
class Shop extends Bone {
@HasMany({ foreignKey: 'targetId', where: { targetType: 0 } })
tagMaps: TagMap[];
@HasMany({ through: 'tagMaps' })
tags: Tag[];
}
```
在 `Tag` 这边则是:
```js
class Tag extends Bone {
static initialize() {
this.hasMany('shopTagMaps', {
className: 'TagMap',
foreignKey: 'targetId',
where: { targetType: 0 },
})
this.hasMany('shops', { through: 'shopTagMaps' })
}
}
```
使用对应的装饰器:
```ts
class Shop extends Bone {
@HasMany({ className: 'TagMap', foreignKey: 'targetId', where: { targetType: 0 } })
shopTagMaps: TagMap[];
@HasMany({ through: 'shopTagMaps' })
shops: Tag[];
}
```
假设需求有变,我们需要给商品也增加标签系统,我们在 `Tag` 数据模型这边只需稍许改动:
```diff
class Tag extends Bone {
static initialize() {
this.hasMany('shopTagMaps', { className: 'TagMap', where: { targetType: 0 } })
this.hasMany('shops', { through: 'shopTagMaps' })
+ this.hasMany('itemTagMaps', { className: 'TagMap', where: { targetType: 1 } })
+ this.hasMany('items', { through: 'itemTagMaps' })
}
}
```
#### `hasOne()`
 `hasOne()` 方法也可以用来配置与其他数据模型的一对一关联。乍一看可能与 `belongsTo()` 甚至 `hasMany()` 都有些像,但在细节或者语义上存在稍许差别。
`hasOne()` 与 `belongsTo()` 的区别主要在外键的归属。在这一点上 `hasOne()` 和 `hasMany()` 比较像,它需要外键放在目标数据模型中。而 `belongsTo()` 需要外键留在发起关联的数据模型中。
`hasOne()` 与 `hasMany()` 的差别很小。当数据模型 `hasOne()` 另一个数据模型,目标数据模型会以单数挂载,即使查询结果存在多个。当数据模型`hasMany()` 另一个数据模型,则挂载关联数据模型的属性所包含的值永远是一个集合,即使查询结果中只有一条甚至一条都没有。
在这个例子中,用户拥有一家店铺:
```js
class User extends Bone {
static initialize() {
this.hasOne('shop', { foreignKey: 'ownerId' })
}
}
```
使用对应的装饰器:
```ts
class User extends Bone {
@HasOne({ foreignKey: 'ownerId' })
shop: Shop;
}
```
而店铺与用户也是一对一的关系:
```js
class Shop extends Bone {
static initialize() {
this.belongsTo('owner', { className: 'User' })
}
}
```
使用对应的装饰器:
```ts
class Shop extends Bone {
@BelongsTo({ className: 'User' })
owner: User;
}
```
#### 在 `belongsTo()` 和 `hasOne()` 之间选择
正如 `hasOne()` 章节所讨论的,`belongsTo()` 和 `hasOne()` 之间的区别主要在外键应该在哪个数据模型。持有相应外键的数据模型应当是发起 `belongsTo()` 关联关系的一方。
例如,一个用户应当拥有 `hasOne()` 一家店铺,而一家店铺应当属于 `belongsTo()` 一个店主(也就是某类用户)。那么店铺就应该包含一个名为 `owner_id` 的字段,用作 `this.hasOne('shop', { foreignKey: 'ownerId' })` 的外键。
厘清这种关联关系是有额外好处的。如果某一天业务逻辑有变,我们的用户突然又可以开多家店铺了,彼时我们把 `hasOne()` 改成 `hasMany()`,把对应的处理逻辑包在一个 `for (const shop of user.shops)` 循环里,就万事大吉了。都不需要修改 `Shop` 数据模型。
## 查询接口
本文涵盖使用 Leoric 从数据库读取数据的各种方式。读完本文后你将了解如下内容:
- 如何使用一系列方法和条件过滤数据记录;
- 如何指定查询结果的排序方式、所需获取的字段、分组、以及其他。
- 如何使用 `.include()` 来一次性读取当前数据模型以及模型的关联关系。
### 从数据库读取数据
Leoric 提供两种主要的查询方式,`.find()` 和 `.findOne()`。`.findOne()` 除了仅返回一条记录或者返回 `null`,其他方面跟 `.find()` 没有差别。
#### 读取一条数据
##### `.findOne()`
```js
const post = await Post.findOne(1)
// => Post { id: 1, ... }
```
上例对应的 SQL 如下:
```sql
SELECT * FROM posts WHERE id = 1 LIMIT 1;
```
`.findOne()` 被称作 `.find()` 的孪生兄弟,是因为它和 `.find()` API 完全一样,只是它会追加一个 `.limit(1)` 到当前查询。所以我们也可以使用 `.findOne()` 执行相对复杂的条件查询:
```js
const post = await Post.findOne({
title: ['New Post', 'Untitled'],
createdAt: new Date(2012, 4, 15)
})
// => Post { id: 1, title: 'New Post', ... }
```
上例对应的 SQL 如下:
```sql
SELECT * FROM posts WHERE title IN ('New Post', 'Untitled') AND created_at = '2012-04-15 00:00:00' LIMIT 1;
```
如果查无记录,`.findOne()` 会返回 `null` 而不是像 `.find()` 一样返回空集合。
##### `.first`
可以通过 `.first` 属性获取 id 最小的记录。例如:
```js
const post = await Post.first
// => Post { id: 1, ... }
```
上例对应的 SQL 如下:
```sql
SELECT * FROM posts ORDER BY id LIMIT 1;
```
##### `.last`
可以通过 `.last` 属性获取 id 最大的记录。例如:
```js
const post = await Post.last
// => Post { id: 42, ... }
```
上例对应的 SQL 如下:
```sql
SELECT * FROM posts ORDER BY id DESC LIMIT 1;
```
#### 读取多条数据
要读取多条数据,把 `.findOne()` 改为 `.find()` 即可。它接收的参数与 `.findOne()` 一样,但会返回集合。如果查无记录,集合会是空的。例如:
```js
const posts = await Post.find({ id: [1, 10] })
// => Collection [ Post { id: 1, ... },
// Post { id: 10, ... } ]
```
上例对应的 SQL 如下:
```sql
SELECT * FROM posts WHERE id in (1, 10);
```
#### 批量读取多条数据
要遍历较大的数据集时,我们的第一反应可能是:
```js
for (const post of (await Post.all)) {
// handle post
}
```
但假如 `Post` 表所包含的数据条数过多,这种遍历方式会变得耗时,因此不切实际。有很多种避免这种情况的方法,而转 `.all` 为批量查询是其中最方便的一个:
```js
for await (const post of Post.all.batch()) {
// handle post
}
```
The SQL equivalent of the above is:
```sql
-- 假设 posts 表包含 2000 条记录,默认查询 LIMIT 1000
SELECT * FROM posts LIMIT 1000;
SELECT * FROM posts LIMIT 1000 OFFSET 1000;
SELECT * FROM posts LIMIT 1000 OFFSET 2000;
```
可以给 `.batch()` 传参来设置批量查询时每批查询的个数:
```js
// 将以每批 100 个逐批查询 Post
for await (const post of Post.all.batch(100)) {
// handle post
}
```
### 查询条件
`.find()` 和 `.findOne()` 都支持传入查询条件来过滤数据库中的记录。查询条件可以是:
- 纯字符串;
- 带占位符的字符串;
- 或者对象。
出于简洁以及安全考虑,我们最为推荐使用带占位符的字符串,并将外部输入作为参数传入。
#### 纯字符串的查询条件
需要查询确定值的时候,纯字符串的查询条件会很合适:
```js
Post.find('title != "New Post"')
// => SELECT * FROM posts WHERE title != 'New Post';
```
但如果使用时不加注意,这种使用方式也很危险:
```js
Post.find(`title != ${title}`)
// 假设 title 值为 "'' or 1 = 1"
// => SELECT * FROM posts WHERE title != '' OR 1 = 1;
```
为避免这种极易被 SQL 注入的查询方式,当条件判断的左操作数并非 identifier 时,Leoric 将抛出异常。但这并不能完全避免被注入的情况,所以在查询条件中需要包含外部输入时,请使用对象查询条件或者带占位符的字符串查询条件,比如:
```js
Post.find('title != ?', title);
```
#### 对象查询条件
由于对象查询条件在 JavaScript 世界里(不管是关系型数据库还是 MongoDB 这种 NoSQL)是比较常用的查询方式,你可能会觉得它有些眼熟。使用对象查询条件,以属性名为键,查询条件为值,绝大多数简单的查询条件都可以实现。对象中的值可以是简单值,也可以是一个键为操作符(`$operator`)的对象,用来传入对比条件。以下是一些使用简单值的对象查询条件示例:
```js
Post.find({ id: 1 })
// => SELECT * FROM posts WHERE id = 1;
Post.find({ title: 'New Post' })
// => SELECT * FROM posts WHERE title = 'New Post';
Post.find({ title: undefined })
Post.find({ title: null })
// => SELECT * FROM posts WHERE title IS NULL;
```
以下是一些使用数组或者其他非简单值的对象查询条件示例:
```js
Post.find({ title: ['New Post', 'Untitled'] })
// => SELECT * FROM posts WHERE title IN ('New Post', 'Untitled');
Post.find({
title: { toSqlString: () => "'New Post'" }
})
// 如果传入的是个包含 toSqlString() 方法的对象,将会使用 toSqlString() 的返回值。
// => SELECT * FROM posts WHERE title = 'New Post';
```
#### 包含操作符的对象查询条件
可能在之前的示例中你已经注意到了,对象查询条件中的值也可以是一个对象。如果这个对象的所有属性都是 `($eq, $gt, $gte, $lt, $lte, $ne, $in, $nin, $notIn, $like, $notLike, $between, $notBetween)` 的其中一个,这个对象将被映射为 SQL 查询条件:
```js
Post.find({ title: { $ne: 'New Post' } })
// => SELECT * FROM posts WHERE title != 'New Post';
Post.find({ title: { $like: '%King%' } })
// => SELECT * FROM posts WHERE title LIKE '%King%';
Post.find({ createdAt: { $lt: new Date(2017, 10, 11) } })
// => SELECT * FROM posts WHERE gmt_create < '2017-11-11 00:00:00';
Post.find({ createdAt: { $notBetween: [new Date(2017, 10, 11), new Date(2017, 11, 12)] } })
// => SELECT * FROM posts WHERE gmt_create NOT BETWEEN '2017-11-11 00:00:00' AND '2017-12-12 00:00:00';
```
如果对象包含多个操作符,相关查询条件将以 `AND` 逻辑合并:
```js
Post.find({ id: { $gt: 0, $lt: 999999 }})
// => SELECT * FROM posts WHERE id >= 0 AND id <= 999999
```
目前对象查询条件所支持的操作符还不包含逻辑操作符(比如 `AND`、`OR`、或者 `!`),可以改用纯字符串的查询条件实现。
#### 字符串查询条件
需要组合查询条件的时候,带占位符的字符串查询条件通常是比对象查询条件更合适的选择。上文中有关对象查询条件的示例使用带占位符的字符串查询条件可以写成:
```js
Post.find('title != ?', 'New Post')
// => SELECT * FROM posts WHERE title != 'New Post';
Post.find('title like ?', '%King%')
// => SELECT * FROM posts WHERE title LIKE '%King%';
Post.find('createdAt < ?', new Date(2017, 10, 11))
// => SELECT * FROM posts WHERE gmt_create < '2017-11-11 00:00:00'
Post.find('createdAt < ? or createdAt > ?', new Date(2017, 10, 11), new Date(2017, 11, 12))
// => SELECT * FROM posts WHERE gmt_create < '2017-11-11 00:00:00'
```
带占位符的字符串查询会自动处理各种类型的 JavaScript 变量:
```js
Post.find('title = ?', null)
Post.find('title = ?', undefined)
// => SELECT * FROM posts WHERE title IS NULL;
Post.find('title = ?', ['New Post', 'Untitled'])
// => SELECT * FROM posts WHERE title in ('New Post', 'Untitled');
```
需要组合多个查询条件时,使用带占位符的字符串查询条件是最方便的:
```js
Post.find('title != ? and createdAt > ?', 'New Post', new Date(2017, 10, 11))
// => SELECT * FROM posts WHERE title != 'New Post' AND gmt_create > '2017-10-11';
```
### 排序
我们可以使用 `.order()` 方法让从数据库获取的数据按一定顺序排序。例如,要获取最近更新的文章列表,我们可以将文章按 `updatedAt` 降序排序:
```js
Post.order('updatedAt', 'desc')
```
`.order()` 还接收如下几种参数形式:
```js
Post.order('updatedAt desc')
Post.order({ updatedAt: 'desc' })
```
上例对应的 SQL 如下:
```sql
SELECT * FROM posts ORDER BY updated_at DESC;
```
默认的排序方式是 `asc` 升序。因此 `Post.order('updatedAt')` 和 `Post.order('updatedAt asc')` 的效果是一样的。
要按多个字段排序时,我们可以:
```js
Post.order({ updatedAt: 'desc', title: 'asc' })
// 或者
Post.order('updatedAt desc').order('title')
```
上例中的两个查询对应的 SQL 都是:
```sql
SELECT * FROM posts ORDER BY updated_at DESC, title ASC;
```
### 选取特定字段
默认情况下,`.find()` 会使用 `*` 选择表中所有字段。如果需要仅选择某些字段,可以使用 `.select()` 方法:
```js
Post.select('id', 'title', 'createdAt')
// or
Post.select('id, title, createdAt')
```
上例对应的 SQL 如下:
```sql
SELECT id, title, created_at FROM posts;
```
### Limit 与 Offset
我们推荐保持给查询条件加 LIMIT 的习惯,除非能确保查询结果不会很膨胀。LIMIT 与 OFFSET 最为常用的场景之一,就是分页。例如,获取 20 篇最近更新的文章:
```js
const posts = await Post.order('updatedAt desc').limit(20)
```
要获取第二批 20 篇最近更新的文章,也就是说用户翻到了第二页,每页文章篇数为 20:
```js
const posts = await Post.order('updatedAt desc').limit(20).offset(20)
```
上例对应的 SQL 如下:
```sql
SELECT * FROM posts ORDER BY updated_at DESC LIMIT 20 OFFSET 20;
```
### 分组
`GROUP BY` 是关系型数据中最为重要的特性之一。将分组与 `COUNT()` 和 `SUM()` 之类的计算函数相结合,是一个非常方便的从数据库中获取有效信息的方式。
例如,假设你想知道哪一天发表的文章最多:
```js
Post.group('DATE(createdAt)').count().order('count desc')
```
上例对应的 SQL 如下:
```sql
SELECT COUNT(*) as count, DATE(created_at) FROM posts GROUP BY DATE(created_at) ORDER BY count DESC;
```
分组查询的返回值和普通的查询有所区别,因为没办法将查询结果交给某个数据模型实例化。上例返回的查询结果类似:
```js
[ { count: 1, 'DATE(created_at)': '2017-12-12' },
{ count: 5, 'DATE(created_at)': '2017-11-11' },
... ]
```
不过分组查询仍然是可以 join 其他数据模型的,我们将在 join 章节深入讨论。
### Having
只有在需要按计算字段过滤结果的时候才需要使用 `HAVING`。尽可能将过滤条件放到 `WHERE` 中,只将计算字段放到 `HAVING` 中过滤,是比较推荐的做法。因为数据库会用 `WHERE` 过滤的结果建立临时结果集,继而给 `HAVING` 过滤,这样可以让临时结果集维持在一个较小的体量。
再以上文中的例子为例,我们可以把发布文章数少于 5 的日期过滤出来:
```js
Post.group('DATE(createdAt)').count().order('count desc').having('count < 5')
```
上例对应的 SQL 如下:
```sql
SELECT COUNT(*) as count, DATE(created_at) FROM posts GROUP BY DATE(created_at) HAVING count < 5 ORDER BY count DESC;
```
查询结果类似:
```js
[ { count: 4, 'DATE(created_at)': '2017-11-11' },
... ]
```
### Transactions
> 由于缺乏 `LOCK` 支持,当前的事务实现还比较初级。希望我们可以尽快解决这个问题。
可以使用 `Model.transaction()` 执行事务,执行这个方法时会从数据库连接池获取连接,再通过所获取的连接执行 `BEGIN` 和 `COMMIT`/`ROLLBACK`。`Model.transaction()` 支持传入 `AsyncFunction` 或者 `GeneratorFunction`,以前者为例:
```js
Post.transaction(async function({ connection }) {
await Comment.create({ content: 'tl;dr', articleId: 1 }, { connection });
await Post.findOne({ id: 1 }).increment('commentCount', { connection });
});
```
若以后者为例,使用方式则是:
```js
Post.transaction(function* () {
yield Comment.create({ content: 'tl;dr', articleId: 1 });
yield Post.findOne({ id: 1 }).increment('commentCount');
});
```
后者省却了 `connection` 显式传递,其余大同小异,对应的 SQL 都是:
```sql
BEGIN
INSERT INTO comments (content, article_id) VALUES ('tl;dr', 1);
UPDATE posts SET comment_count = comment_count + 1 WHERE id = 1;
COMMIT
```
如果回调函数抛出异常,`Model.transaction()` 将执行 `ROLLBACK` 回滚事务并将异常继续向上抛出。
使用生成器可以省却 `connection` 传递是因为 generator 可以控制执行过程:
1. 从数据库连接池获取连接;
2. `BEGIN`
3. 执行回调函数,获取 Generator;
4. 使用 `generator.next()` 推动执行进度;
5. 如果 `generator.next()` 的返回值是个 Spell 实例,设置 `spell.connection` 为当前连接;
6. 如此迭代直到异步流程结束;
7. `COMMIT`
如果不太习惯,使用默认的 `AsyncFunction` 格式,确保 `connection` 准确传入即可。
### Joining Tables
Leoric 提供两种构建 JOIN 查询的方式:
- 使用 `.with(relationName)` 或者 `.include(relationName)` JOIN 预定义的关联关系,
- 使用 `.join(Model, onConditions)` JOIN 其他任意数据模型。
#### 预定义的关联关系
可以通过 `Model.relations` 查看当前数据模型预定义的关联关系,这些关系都是在 Leoric 内部调用 `Model.describe()` 方法时生成的。我们可以在这个方法里调用 `.hasMany()`、`.hasOne()`、以及 `.belongsTo()` 来定义关联关系,例如:
```js
class Post extends Bone {
static initialize() {
this.hasMany('comments')
this.belongsTo('author', { foreignKey: 'authorId', Model: 'User' })
}
}
```
在查询时可以使用 `.include(name)` JOIN 预定义的关联关系:
```js
Post.include('comments')
// or
Post.find().with('comments')
```
上例对应的 SQL 如下:
```sql
SELECT * FROM posts LEFT JOIN comments ON posts.id = comments.post_id;
```
为保证主表的值不会被关联条件过滤,默认采用 LEFT JOIN。关联条件表达式 ON 是根据关联关系的配置信息自动生成的。我们在 [关联关系]({{ '/associations' | relative_url }}) 一文中有详细讨论。
要 JOIN 多个关联关系时,可以给 `.include()` 传入多个参数,或者重复调用 `.with()` 方法:
```js
Post.include('comments', 'author')
// or
Post.find().with('comments').with('author')
```
注意,链式调用 `.with()` 产生的作用会跟调用顺序有关系,下面两个写法是不等价的:
```js
Post.findOne().with('comments')
// 不等同于
Post.find().with('comments').first
```
虽然从接口定义来看,两者都会返回 Post 实例或者 null,但是两者所执行的 SQL 会有差别:
```sql
SELECT * FROM (SELECT * FROM posts LIMIT 1) AS posts LEFT JOIN comments ON comments.post_id = posts.id
-- 不等同于
SELECT * FROM posts AS posts LEFT JOIN comments ON comments.post_id = posts.id LIMIT 1
```
可以看到区别在于 LIMIT 所在的位置,前者会返回第一条 Post 及其所有的 Comment,后者则只会返回第一条 Post 及其第一条 Comment。
使用第一种查询时,如果需要限制返回的评论数量,可以直接写:
```js
Post.findOne().with('comments').limit(10)
```
等价于下面的 SQL:
```sql
SELECT * FROM (SELECT * FROM posts LIMIT 1) AS posts LEFT JOIN comments ON comments.post_id = posts.id LIMIT 10
```
#### 任意 JOIN
如果需要 JOIN 未在 `Model.describe()` 预先定义的关联关系,可以使用 `.join()` 方法:
```js
Post
.join(Comment, 'posts.id = comments.postId')
.join(User, 'posts.authorId = users.id')
```
上例对应的 SQL 如下:
```sql
SELECT * FROM posts LEFT JOIN comments ON posts.id = comments.post_id LEFT JOIN users ON posts.author_id = users.id;
```
和预定义的 JOIN 类似,为保留主表结果,默认采用 LEFT JOIN。
查询中所有表的别名都是按 `pluralize(camelCase(Model.name))` 规则计算。在上例中涉及转换的数据模型名称、别名如下:
| 数据模型 | 表别名 |
|------------|-------------|
| Post | posts |
| Comment | comments |
| User | users |
我们可以在 `.join()` 之后使用这些别名,在 `.where()` 或者 `.order()` 等查询方法中引用字段:
```js
Post.join(Comment, 'posts.id = comments.postId').where('comments.id = 1')
Post.join(Comment, 'posts.id = comments.postId').where({ 'comments.id': 1 })
```
### 查询限定
如果数据模型有 `deletedAt` 属性,`Model.remove()` 并不会实际删除对应的记录,而是更新 `deleteAt` 的值为最新时间。这一特性被称作伪删除(soft delete)。
伪删除逻辑对数据模型的用户来说是透明的,Leoric 默认会在每次查询生成 SQL 之前补上一个默认的查询条件。例如,如果 `Post` 数据模型有 `deletedAt` 属性,那么 `Post.find()` 对应的 SQL 实际上是:
```sql
SELECT * FROM posts WHERE deleted_at IS NULL;
```
但假如查询条件中已经涉及 `deletedAt` 属性,那么默认的 `.where({ deletedAt: null })` 就不会被添加。例如,`Post.find('deletedAt != null')` 对应的 SQL 是:
```sql
SELECT * FROM posts WHERE deleted_at IS NOT NULL;
```
Leoric 将这一行为按查询限定形式实现,后者其实是 Leoric 从 Active Record 抄袭过来的诸多概念之一。目前仅有 `.where({ deletedAt: null })` 这一个默认的查询限定。
#### unscoped
要移除所有默认的限定条件,可以访问 `unscoped` 属性:
```js
Post.find({ id: [1, 10] }).unscoped
```
无论 `Post` 是否有 `deletedAt` 属性,上例对应的 SQL 如下:
```sql
SELECT * FROM posts WHERE id IN (1, 10)
```
### 理解链式调用
Leoric 支持[链式调用](http://en.wikipedia.org/wiki/Method_chaining),允许在编写查询条件时连续各种方法。实现这一特性的原理是,每个查询方法,例如 `.find()` 或者 `.order()`,被调用时都会返回一个 `Spell` 实例。
```js
Post.find() // => Spell { Model: Post }
```
`Spell` 类提供 `.where()`、`.order()`、`.group()`、`.having()`、`limit()`、以及 `.join()` 等方法。绝大多数会返回一个 `Spell` 实例,因此可以往后追加方法。在这些方法被调用的时候,SQL 不是马上生成的。我们可以在结尾手动调用 `.toSqlString()` 方法来生成 SQL。要获取查询结果,把 `Spell` 实例当作 `Promise` 来用就可以了。例如:
```js
// ES5 风格
const spell = Post.find()
spell
.then(posts => { ... })
.catch(err => console.error(err.stacak))
// ES6 使用 co 和 generator function
co(function* () {
const posts = yield Post.find()
})
// ES2016 使用 async await
async function() {
const posts = await Post.find()
}
```
因为 Leoric 采用 ES2016 编写,其中大多数标准已经在最新的 Node.js LTS 版本中实现,所以我们推荐使用 async/await。
书归正传,我们可以往查询对象后面追加任意方法,直到完成查询构建为止:
```js
const query = Post.where('title LIKE ?', '%King%')
const posts = await query.order('updatedAt desc').limit(10)
const [{ count }] = await query.count() // 没有排序、LIMIT
this.body = { posts, count }
```
### 查询或者创建一条记录
查找记录,如果找不到就创建一条,是个很常见的需求。我们所借鉴的 Active Record 还专门提供 `find_or_create_by` 方法。虽然实现起来很简单,但这个方法实在是太容易和 `upsert` 行为混淆了。
> MongoDB 里有 [`db.collection.update({ upsert: true })`](https://docs.mongodb.com/manual/reference/method/db.collection.update/#mongodb30-upsert-id),PostgreSQL 里则有 [`INSERT ... ON CONFLICT ... DO UPDATE`](https://www.postgresql.org/docs/9.5/static/sql-insert.html#SQL-ON-CONFLICT), 而 MySQL(以及 MariaDB 等衍生数据库)里则有 [`INSERT ... ON DUPLICATE KEY UPDATE`](https://dev.mysql.com/doc/refman/5.7/en/insert-on-duplicate.html)。大致来说,都是寻找重复主键,如果存在就更新对应记录。如果不存在重复主键,则插入这条数据。
Leoric 使用 `upsert` 来创建或者更新记录,例如:
```js
const post = new Post({ id: 1, title: 'New Post' })
await post.save()
```
如果 `Post { id: 1 }` 已经存在,就把它的标题更新为 `New Post`。
不过 `upsert` 的特性跟“查询或者创建对象”的逻辑是有区别的。例如,如果用户是以 `email` 区分的,我们可以先按 `email` 查找用户,如果找不到,就创建一个新用户:
```js
const user = (await User.findOne({ email: 'john@example.com' })) ||
await User.create({ email: 'john@example.com' })
```
简而言之,如果需要判断的主键是已知的,用 `model.save()` 就够了,因为它底层会走 `upsert` 逻辑。如果主键不明确,就需要自己手动查找或者创建一条记录了。
### 计算函数
计算函数可以在数据模型上直接调用:
```js
const results = await Post.count()
```
也可以在查询条件后:
```js
const results = await Post.where('name like ?', '%King%').count()
```
#### Count 计数
可以使用 `Model.count()` 统计数据模型对应表中存储的数据条数。如果要统计特定数据的条数,比如寻找店铺中所销售的商品数量,你也可以执行:
```js
Shop.find(1).with('items').count('items.*')
```
上例对应的 SQL 如下:
```sql
SELECT COUNT(items.*) AS count FROM (SELECT * FROM shops WHERE id = 1) AS shops LEFT JOIN items ON items.shop_id = shops.id;
```
#### Average
可以使用 `Model.average()` 计算数据模型对应表中某个数字字段的平均数,比如查找网站订阅用户的平均年龄:
```js
User.where({ subscribed: true }).average('age')
```
上例对应的 SQL 如下:
```sql
SELECT AVG(age) FROM users WHERE subscribed = 1;
```
#### Minimum
可以使用 `Model.minimum()` 计算数据模型对应表中某个字段的最小值,比如寻找用户的最小年龄:
```js
User.minimum('age')
```
上例对应的 SQL 如下:
```sql
SELECT MIN(age) AS minimum FROM users;
```
#### Maximum
可以使用 `Model.maximum()` 计算数据模型对应表中某个字段的最大值,比如寻找用户的最大年龄:
```js
User.maximum('age')
```
上例对应的 SQL 如下:
```sql
SELECT MAX(age) AS maximum FROM users;
```
#### Sum
可以使用 `Model.sum()` 计算数据模型对应表中某个字段的和,比如计算某个店铺所销售的商品总价格:
```js
Shop.find(42).with('items').sum('items.price')
```
上例对应的 SQL 如下:
```sql
SELECT SUM(items.price) FROM (SELECT * FROM shops WHERE id = 42) AS shops LEFT JOIN items ON items.shop_id = shops.id;
```
## JSON 字段
### 字段声明
```typescript
import { Bone, DataTypes } from 'leoric';
class Post extends Bone {
@Column(DataTypes.JSONB)
extra: Record;
}
```
### 查询
可以使用 JSON 函数来自定义过滤条件:
```typescript
const post = await Post.find('JSON_EXTRACT(extra, "$.foo") = ?', 1);
```
MySQL 中的 `column->path`简写方式(比如 `extra->"$.foo"`)暂时不支持。
### 更新
下面这种更新方式容易遇到并发问题,导致数据彼此覆盖:
```typescript
const post = await Post.first;
// 假设在这个时间间隔内,同时有其他进程更新 post.extra,更新的数据就会被覆盖
await post.update('extra', { ...post.extra, foo: 1 });
```
MySQL 里面有两个函数可以用来解决这一情况:
- [JSON_MERGE_PATCH()](https://dev.mysql.com/doc/refman/8.4/en/json-modification-functions.html#function_json-merge-patch) // 覆盖更新
- [JSON_MERGE_PRESERVE()](https://dev.mysql.com/doc/refman/8.4/en/json-modification-functions.html#function_json-merge-preserve) // 遇到重名属性时会保留两者的值
#### JSON_MERGE_PATCH()
Leoric 里面提供了相应的封装:
```typescript
const post = await Post.first;
await post.jsonMerge('extra', { foo: 1 });
```
第二行语句实际执行的 SQL 类似这样:
```sql
UPDATE posts SET extra = JSON_MERGE_PATCH('extra', '{"foo":1}')
```
需要注意的是 JSON_MERGE_PATCH() 函数只会对 object 做属性合并,如果是数组、字符串、布尔类型,会直接覆盖。
> 由于 JSON_MERGE_PATCH() 更接近 JavaScript 中的 merge 行为(`Object.assign()`、lodash/merge),因此默认的 bone.jsonMerge() 方法并没有和 MySQL 中已经不被鼓励使用 JSON_MERGE() 函数对应,后者效果等同于 JSON_MERGE_PRESERVE()。
#### JSON_MERGE_PRESERVE()
JSON_MERGE_PRESERVE() 的逻辑则有所不同,如果是数组、字符串等类型,会返回合并结果:
```sql
JSON_MERGE_PRESERVE('[1, 2]', '[true, false]') // -> [1, 2, true, false]
JSON_MERGE_PRESERVE('1', 'true'); // -> [1, true]
JSON_MERGE_PRESERVE('{ "a": 1 }', '{ "a": 2 }'); // -> { "a": [1, 2] }
```
Leoric 里面也有提供相应的封装:
```typescript
const post = await Post.first;
await post.jsonMergePreserve('extra', { foo: 1 });
```
由于 JSON_MERGE_PRESERVE() 会改变值的类型,如果原始属性值并不是数组,更新的时候就需要谨慎。
### 变更检查
Leoric 默认会在查询结果返回的时候拷贝一份模型的属性值,从而实现以下特性:
```typescript
const post = await Post.first;
post.extra.foo = 2;
post.changes();
// -> { extra: [ { foo: 1 }, { foo: 2 } ] }
await post.save();
// -> UPDATE posts SET extra = JSON_MERGE_PATCH('extra', '{"foo":1}');
```
JavaScript 中的对象深拷贝操作非常重,原生的 `structuredClone(value)` 比 `JSON.parse(JSON.stringify(value))` 还要慢。如果使用的是 mysql2,查询结果返回的时候已经是对象了,这也进一步导致这里可以优化的空间非常有限。
如果数据库中有比较大或者多的 JSON 数据,并且并不依赖上面这种自动标记更新的特性,可以考虑跳过对象深拷贝:
```typescript
new Realm({
skipCloneValue: true,
});
```
然后在需要保存对象的地方手动处理:
```typescript
const post = await Post.first;
post.extra.foo = 2;
post.changes();
// -> {}
post.extra = { ...post.extra, foo, 2 };
post.changes();
// -> { extra: [ { foo: 1 }, { foo: 2 } ] }
await post.save();
// -> UPDATE posts SET extra = JSON_MERGE_PATCH('extra', '{"foo":1}');
```
## 钩子
钩子(hooks)支持在执行查询的特定时机插入根据上下文所做的特殊操作,本文将介绍 Leoric 支持的钩子函数以及如何使用它们
### 声明钩子
可通过以下方式声明:
```javascript
// class syntax
class User extends Bone {
static beforeCreate() {}
static afterUpdate() {}
});
// define
Realm.define('User', attrs, {
hooks: {
beforeCreate() {},
afterUpdate() {},
}
});
```
### 支持的钩子函数
> 其中 `Model.method` 表示直接通过模型类调用方法,`instance.method` 表示通过模型实例调用方法,针对不同的调用方式其 hook 的入参和都略有不同
#### create
`create` 支持以下几个钩子函数:
```javascript
// create hooks,其中 args 为函数本身调用时的参数
Model.beforeCreate(args) // 函数上下文为将要创建的实例
Model.afterCreate(instance, createResult)
instance.beforeCreate(args)
instance.afterCreate(instance, createResult) // 函数上下文为将要创建的实例
```
**需要注意的是,`create` 的钩子函数的函数上下文 `context` 皆为将要创建的实例**
#### bulkCreate
`bulkCreate` 支持以下两个钩子函数,其函数上下文为模型类:
```javascript
// bulkCreate hooks
Model.beforeBulkCreate(records, queryOptions) // 函数上下文为 Model
Model.afterBulkCreate(instances, Model) // instances 为批量创建的实例
```
#### update
`update` 支持以下几个钩子函数:
```javascript
// update hooks
Model.beforeUpdate(args) // 函数上下文为 Model
Model.afterUpdate(updateResult, Model) // 函数上下文为 Model
instance.beforeUpdate(args) // 函数上下文为 instance
instance.afterUpdate(instance, updateResult) // 函数上下文为 instance, updateResult 为 `update` 函数的更新结果。
```
#### save
`save` 支持以下两个钩子函数:
```javascript
Instance.beforeSave(options)
Instance.afterSave(instance, options)
```
需要注意的是, `save` 属于保存操作,模型实例调用 `save` 时会根据实际情况再触发 `create` 、 `update` 或 `upsert` 的钩子函数。
- 当实例是未持久化且主键未设值的数据时会触发 `create` 的钩子函数
- 当实例是未持久化且主键已经设值的数据时 `upsert` 的钩子函数被触发
- 当实例是已持久化的数据时会触发 `upsert` 的钩子函数
#### upsert
`upsert` 支持以下两个钩子函数:
```javascript
instance.beforeUpsert(opts) // 函数上下文为 instance
instance.bafterUpsert(instance, upsertResult) // upsertResult 为 `upsert` 执行结果。
```
#### remove
`remove` 支持以下四个钩子函数:
```javascript
Model.beforeRemove(args)
Model.afterRemove(removeResult, Model) // removeResult 为函数执行结果
instance.beforeRemove(args)
instance.afterRemove(instance, removeResult)
```
### 汇总
```javascript
// create hooks,其中 args 为函数本身调用时的参数
Model.beforeCreate(args) // 函数上下文为将要创建的实例
Model.afterCreate(instance, createResult)
instance.beforeCreate(args)
instance.afterCreate(instance, createResult) // 函数上下文为将要创建的实例
// bulkCreate hooks
Model.beforeBulkCreate(records, queryOptions) // 函数上下文为 Model
Model.afterBulkCreate(instances, Model) // instances 为批量创建的实例
// update hooks
Model.beforeUpdate(args) // 函数上下文为 Model
Model.afterUpdate(updateResult, Model) // 函数上下文为 Model
instance.beforeUpdate(args) // 函数上下文为 instance
instance.afterUpdate(instance, updateResult) // 函数上下文为 instance
// save hooks
instance.beforeSave(options)
instance.afterSave(instance, options)
// upsert hooks
instance.beforeUpsert(opts) // 函数上下文为 instance
instance.bafterUpsert(instance, upsertResult)
// remove hooks
Model.beforeRemove(args)
Model.afterRemove(removeResult, Model)
instance.beforeRemove(args)
instance.afterRemove(instance, removeResult)
```
## 日志
可以通过 `logger` 配置项覆盖相关方法来指定日志输出方式:
```js
const realm = new Realm({
dialect: 'mysql',
host: 'localhost',
logger: {
logQuery(sql, duration, opts) {}, // 数据库查询
logQueryError(err, sql, duration, opts) {}, // 数据库查询失败
logMigration(name) {}, // 迁移任务
},
});
```
### `logQuery`
完成一次数据库查询即调用 `logQuery(sql, duration, opts)` 方法,相关参数说明如下:
| 参数 | 类型 | 描述 |
|-----|------|------|
| `sql` | `string` | 执行的 SQL 语句 |
| `duration` | `number` | 执行耗时,从执行查询到返回结果,不包含连接池等候时间 |
| `opts.command` | `string` | 执行 SQL 查询指令 |
| `opts.connection` | `Connection` | 执行本次查询的数据库连接 |
| `opts.Model` | `Model` | 关联的数据模型 |
#### 执行 SQL
默认按原文输出实际执行的 SQL 语句,如果配置了 `hideKeys` 参数来隐藏部分字段的输出,则相关字段的值会被隐藏。
#### 执行耗时
从调用者的视角来看,数据模型的查询耗时可能比执行耗时要更长,例如执行 `await User.findOne()` 时包含如下步骤:
1. 从数据库连接池获取连接,如果请求并发量太高,此时可能需要等候
2. 在获取到的连接上调用查询方法,执行查询
3. 等待数据库返回执行结果,将结果处理成对应格式
`logQuery` 中的执行耗时即步骤二到步骤三所消耗的时间,主要用来评估数据库执行查询时性能表现。如果应用并发量比较高,建议通过调大连接池或者增加一层业务缓存来降低数据库负载。
#### 关联的数据模型
可以通过 `opts.Model` 获取到本次查询相关的数据模型,如果存在多个数据模型的联表查询或者查询子句,`opts.Model` 仅代表发起查询的主数据模型。
#### 其他参数
通过数据模型的查询方法执行数据库查询时,`opts` 还可能包含额外信息,包括但不限于:
| 参数 | 类型 | 描述 |
|-----|------|-----|
| `opts.hints` | `Hint[]` | 优化提示 |
| `opts.columns` | `string[]` | 查询的字段列表 |
| `opts.whereConditions` | `object[]` | 查询限定条件 |
### `logQueryError`
`logQueryError(err, sql, duration, opts)` 接收的参数与 `logQuery()` 大致相仿,唯一的区别是第一个参数为 `err`,仅在数据库查询出现异常时被调用,比如 SQL 语法错误、数据库校验不通过等情况。
| 参数 | 类型 | 描述 |
|-----|-----|------|
| `err` | `Error` | 数据库查询失败时的异常信息 |
### `logMigration`
执行迁移任务时,除了常规的 `logQuery()` 或者 `logQueryError()` 日志,还会额外执行 `logMigration(name)` 来记录当前执行的数据迁移任务。
### `hideKeys`
可以使用 `hideKeys` 参数隐藏敏感数据,避免敏感信息被记录到日志服务中:
```js
const realm = new Realm({
logger: {
hideKeys: [ 'users.password', 'docs.content' ],
},
});
```
相关 SQL 语句将会被替换,效果大致如下:
```sql
INSERT INTO users (name, password) VALUES ('John', '***');
```
## TypeScript 支持
### 装饰器
#### Column
```ts
import { Bone, DataTypes: { SMALLINT } } from 'leoric';
class User extends Bone {
@Column({ primaryKey: true })
id: bigint;
@Column({ allowNull: false })
name: string;
@Column()
createdAt: Date;
@Column()
updatedAt: Date;
@Column({ type: SMALLINT })
age: number;
}
```
下面是 `@Column()` 支持的配置项列表:
| 配置项 | 功能描述 |
|-----------------------|-------------|
| primaryKey = false | 声明主键 |
| autoIncrement = false | 启用自增字段,字段类型必须是数值类型 |
| allowNull = true | 允许字段存储空值 NULL |
| type = typeof field | 自定义字段类型 |
| name = string | 原始字段名 |
如果省略 `type` 配置项,`@Column()` 会尝试按照如下映射关系推导当前字段类型:
| ts type | data type |
|---------|-----------|
| number | INTEGER |
| string | STRING / VARCHAR(255) |
| Date | DATE |
| bigint | BIGINT |
| boolean | BOOLEAN / TINYINT(1) |
一个比较复杂的例子:
```ts
class User extends Bone {
@Column({ name: 'ssn', primaryKey: true, type: VARCHAR(16) })
ssn: string;
@Column({ name: 'gmt_create', allowNull: false })
createdAt: Date;
}
```
#### BelongsTo
```ts
import User from './user';
class Post extends Bone {
@BelongsTo()
user: User;
}
const post = await Post.include('user').first;
assert.ok(post.user.id);
```
如果关联字段的命名不符合命名约定,需要按如下方式手动配置:
```ts
class Post extends Bone {
@BelongsTo({ foreignKey: 'authorId' })
user: User;
}
```
#### HasMany
```ts
import Post from './post';
class User extends Bone {
@HasMany()
posts: Post[];
}
```
如果关联字段的命名不符合命名约定,需要按如下方式手动配置:
```ts
class User extends Bone {
@HasMany({ foreignKey: 'authorId' })
posts: Post[];
}
```
在一个 `hasMany` 关联关系中(也叫一对多关联),用来创建关联关系的字段应该在外表上面,在上述示例中,也就是需要 `posts.user_id` 或者 `posts.author_id`。推荐阅读《[关联关系]({% link zh/associations.md %})》文档了解更多使用细节。
#### HasOne
```ts
import Profile from './profile';
class User extends Bone {
@HasOne()
profile: Profile;
}
```
如果关联字段的命名不符合命名约定,需要按如下方式手动配置:
```ts
import Profile from './profile';
class User extends Bone {
@HasOne({ foreignKey: 'ownerId' })
profile: Profile;
}
```
`hasOne` 的配置方式和 `hasMany` 几乎相同,同样需要在外表中添加关联字段。
虽然 `hasOne` 和 `belongsTo` 都可以被用来配置一对一关联,但两者之间有个比较大的差别在于关联字段所属的表。如果是 `belongsTo`,需要关联字段添加到主表中,如果是 `hasOne`,则需要放到外表。推荐阅读《[关联关系]({% link zh/associations.md %})》文档了解更多使用细节。
#### 通过中间表的 HasMany 关联
对于多对多关联,可以使用 `through` 选项:
```ts
import Tag from './tag';
import TagMap from './tag_map';
class Post extends Bone {
@HasMany({ through: 'tagMaps' })
tags: Tag[];
@HasMany()
tagMaps: TagMap[];
}
```
### Validate 校验
可以在 `@Column()` 中添加 `validate` 选项来启用字段校验:
```ts
class User extends Bone {
@Column({
allowNull: false,
validate: {
isEmail: true,
},
})
email: string;
@Column({
validate: {
isUrl: true,
},
})
website: string;
}
```
### 完整 TypeScript 模型示例
以下是一个完整的 TypeScript 模型定义示例:
```ts
import { Bone, Column, BelongsTo, HasMany, DataTypes } from 'leoric';
const { TEXT, JSONB } = DataTypes;
import User from './user';
import Comment from './comment';
export default class Post extends Bone {
@Column({ primaryKey: true, autoIncrement: true })
id: bigint;
@Column({ allowNull: false })
title: string;
@Column(TEXT)
content: string;
@Column(JSONB)
extra: Record;
@Column()
userId: bigint;
@Column()
createdAt: Date;
@Column()
updatedAt: Date;
@Column()
deletedAt: Date;
@BelongsTo()
user: User;
@HasMany()
comments: Comment[];
}
```
### TypeScript 4.9 兼容性
Leoric 通过 `package.json` 中的 `typesVersions` 配置为 TypeScript 4.9 及更早版本提供向后兼容的类型声明。这是自动处理的,无需额外配置。
如果你使用的是 TypeScript <= 4.9,会自动使用 `types/ts4.9/` 目录下的类型声明。
### 查询中的类型推断
TypeScript 集成支持类型安全的查询:
```ts
// 返回类型推断为 Post | null
const post = await Post.findOne({ title: 'Hello' });
// 返回类型推断为 Post[]
const posts = await Post.find({ userId: 1 });
// 属性会进行类型检查
await Post.create({
title: '新文章', // OK
content: '你好', // OK
// unknown: 'value', // TypeScript 错误:未知属性
});
```
### 配置
要在 TypeScript 中使用装饰器,需要在 `tsconfig.json` 中启用以下编译选项:
```json
{
"compilerOptions": {
"experimentalDecorators": true,
"emitDecoratorMetadata": true
}
}
```
`emitDecoratorMetadata` 选项是 `@Column()` 自动类型推断所必需的。你还需要安装 `reflect-metadata`(它是 Leoric 的依赖项)。
## Sequelize 适配器
为了降低 Sequelize 用户的迁移成本,Leoric 也提供兼容 Sequelize API 的适配器,打开 `sequelize` 开关即可:
```js
const Realm = require('leoric');
const realm = new Realm({
sequelize: true, // 开启 sequelize 适配器
host: 'localhost',
});
await realm.connect();
```
开启 Sequelize 适配器之后,数据模型的 API 将和 [Sequelize Model](https://sequelize.org/master/class/lib/model.js~Model.html) 基本保持一致,具体异同见下文。
### 读取与写入数据
#### 创建
Sequelize 适配器支持三种常见的数据插入方式:
```js
await Shop.create({ name: 'MILL' });
await Shop.bulkCreate([
{ name: 'wagas' },
{ name: 'family mart' },
]);
await (new Shop({ name: "McDonald's" })).save();
```
同时也支持一些相对复杂的数据插入方式:
```js
// 有点类似 upsert 的查找或者插入
await Shop.findOrCreate({
where: { name: 'Shanghai Brewhouse' },
});
// 查找,插入,如果插入失败就再次查找
await Shop.findCreateFind({
where: { name: 'Shanghai Brewhouse' },
});
```
#### 读取
Sequelize 中 `Model.find()` 和 `Model.findOne()` 均返回一条记录,前者只是后者的别名,下文使用后者展示开启 Sequelize 适配器时,如何从数据库获取一条数据:
```js
const shop = await Shop.findOne({
where: { name: 'Free Mori' },
});
```
返回类型为 `Shop|null`,如果有对应记录就返回 `Shop` 实例,如果没有就返回 `null`。
如果需要返回多条数据,则需要使用 `Model.findAll()` 方法,参数格式与 `Model.findOne()` 一致,支持如下几种:
```js
const shops = await Shop.findAll({
attributes: [ 'id', 'name', 'created_at', 'updated_at' ],
where: {
name: { $like: '%Mori%' },
},
order: [[ 'id', 'desc' ]],
});
```
Leoric 默认提供的查询相关辅助方法比较多,如果 Sequelize 没有对应版本,就会切换到 Leoric 默认实现,包括但不限于:
```js
const shops = await Shop.all;
const shop = await Shop.first;
const top10 = await Shop.order('credit', 'desc').limit(10);
```
#### 更新
可以在数据模型实例上发起更新,持久化相关改动到数据库,比如:
```js
const shop = await Shop.findOne({ name: '85℃' });
shop.name = 'Bread Talk';
await shop.save();
// 也可以简化成
await shop.update({ name: 'Nayuki' });
```
也可以调用数据模型上的静态方法来批量更新:
```js
await Shop.update({ status: STATUS.open }, {
where: { category_id: CATEGORY.food },
});
```
一些便于对数据做增量更新的辅助方法也有支持,比如:
```js
const shop = await Shop.findOne({ name: 'Nayuki' });
await shop.increment('price');
await shop.increment({ price: 0.5 });
// 或者批量更新
await Shop.increment({ price: 1.5 });
```
#### 删除
Sequelize 适配器支持批量删除:
```js
// TRUNCATE TABLE `shops`
await Shop.truncate({});
// 不需要处理钩子时可以直接批量删除
await Shop.bulkDestroy();
// 会触发钩子的批量删除
await Shop.destroy();
```
其中触发钩子的 `Model.destroy()` 方法有两种情况:
| 方法 | 对应的钩子 |
|------|------------|
| `Model.destroy()` | 仅触发 `bulkDestroy` 钩子|
| `Model.destroy({ individualHooks: true })` | 逐一查找相关记录执行删除然后触发 `destroy` 钩子 |
也支持单条记录的删除:
```js
const shop = await Post.first;
// 如果有 deletedAt,默认软删除
await shop.destroy();
// 忽略 deletedAt 字段,强制删除
await shop.destory({ force: true });
```
### 表结构变更与数据迁移
Leoric 用来处理表结构变更和数据迁移的迁移任务与 Sequelize 基本一致,并没有做额外兼容,参考《[迁移任务]({{ '/zh/migrations' | relative_url }})》一文即可。下文是对迁移任务的配置及使用方式的简单说明,首选需要在初始化数据库时配置迁移任务文件的存储目录:
```js
const realm = new Realm({
migrations: 'path/to/migrations', // 一般推荐 database/migrations
});
```
创建迁移任务:
```js
await realm.createMigrationFile('create-shops');
```
迁移任务的写法也基本一致:
```js
// 20210718140000-create-shops.js
'use strict';
module.exports = {
async up(driver, { STRING, NUMBER }) {
await driver.createTable('shops', {
name: { type: STRING, allowNull: false },
price: { type: NUMBER },
});
},
async down(driver) {
await driver.dropTable('shops');
},
};
```
调用对应方法执行或者回滚迁移任务:
```js
await realm.migrate(); // 执行
await realm.rollback(); // 回滚
```
### 属性方法
#### 读取与更新属性
支持通过 `instance.get(name)` 和 `instance.set(name, value)` 读取或者更新实例上的属性值,这两个的方法的作用和直接用 `instance[name]` 和 `instance[name] = value` 是一样的,支持这对方法主要目的是为了和 Sequelize 原有使用习惯兼容,推荐使用后者,更加直观。
`instance.get(name)` 和 `instance.set(name, value)` 会受数据模型上自定义的 getter 和 setter 影响,返回的可能是加工过的数据。如果需要读取数据库中存储的原始数据,或者绕开 setter 设置数据,可以使用下文中的这对方法。
#### 读取与更新字段
支持通过 `instance.getDataValue(name)` 和 `instance.setDataValue(name, value)` 来操作原始数据,此方法为底层方法,会绕开数据模型上自定义的 getter 和 setter,例如:
```js
class Shop extends Bone {
static attributes = {
name: STRING,
}
get name() {
return this.getDataValue('name').replace(/^([a-z])/, function(m, chr) {
return chr.toUpperCase();
});
}
set name(value) {
this.setDataValue('name', value == null ? '' : value);
}
}
const shop = new Shop({ name: 'yakitori' });
assert.equal(shop.name, 'Yakitori');
assert.equal(shop.getDataValue('name'), 'yakitori');
```
如果传入的属性名并非对应表中实际存在的字段,则会走默认的 `instance[name]` 和 `instance[name] = value` 逻辑,确保相互兼容。
### 数据校验
Leoric 的数据校验方案与 Sequelize 的没有太大出入,因此没有额外的兼容层,详见《[数据校验]({{ '/zh/validations' }})》一文。
### 关联关系
没有对 Sequelize 的关联关系 API 做深度兼容,Leoric 原有实现已经足够强大,大致对应关系:
| Sequelize | Leoric |
|-----------------|----------------------|
| belongsTo() | belongsTo() |
| hasMany() | hasMany() |
| hasOne() | hasOne() |
| belongsToMany() | hasMany({ through }) |
由于存在数据模型之间相互引用的关系,推荐将关联关系声明放到专门的数据模型初始化环节:
```js
class Shop extends Bone {
static initialize() {
this.hasMany('items');
this.belongsTo('owner');
this.hasMany('memberships');
this.hasMany('members', { through: 'memberships' });
}
}
```
支持一对一、一对多、以及多对多的关联关系声明,具体参数用法会有出入,详见《[关联关系]({{ '/zh/associations' | relative_url }})》一文。
### 高级查询
#### 覆盖查询条件
## 快速配置
### Web 框架
- [在 Egg / Chair 应用中配置]({{ '/zh/setup/egg' | relative_url }})
- [在 Express 应用中配置]({{ '/zh/setup/express' | relative_url }})
- [在 Midway 应用中配置]({{ '/zh/setup/midway' | relative_url }})
### 数据库
Leoric 支持通过 `options.dialect` 切换数据库,还可以通过 `options.client` 切换具体访问数据库的客户端,目前支持的数据库类型如下:
- [配置 MySQL]({{ '/setup/mysql' | relative_url }})
- [配置 SQLite]({{ '/setup/sqlite' | relative_url }})
- [配置 PostgreSQL]({{ '/setup/postgres' | relative_url }})
## 在 Egg 应用中使用
我们为 Egg 准备了专门的插件 [egg-orm](https://github.com/eggjs/egg-orm),使用 egg-orm 即可快速搞定 Egg 应用中的数据模型定义以及消费。
### 安装
```bash
$ npm i --save egg-orm
$ npm install --save mysql2 # MySQL 或者其他兼容 MySQL 的数据库
# 其他数据库类型
$ npm install --save pg # PostgreSQL
$ npm install --save sqlite3 # SQLite
```
### 使用
开启 egg-orm 插件即可在 `app/model` 中定义数据模型:
```js
// app/model/user.js
module.exports = function(app) {
const { STRING } = app.model.DataTypes;
return app.model.define('User', {
name: STRING,
password: STRING,
avatar: STRING(2048),
}, {
tableName: 'users',
});
}
```
在 Controller 调用:
```js
// app/controller/home.js
const { Controller } = require('egg');
module.exports = class HomeController extends Controller {
async index() {
const users = await ctx.model.User.find({
corpId: ctx.model.Corp.findOne({ name: 'tyrael' }),
});
ctx.body = users;
}
};
```
### 配置
首先开启(并安装) egg-orm 插件
```js
// config/plugin.js
exports.orm = {
enable: true,
package: 'egg-orm',
};
```
然后按需配置数据库:
```js
// config/config.default.js
exports.orm = {
client: 'mysql',
database: 'temp',
host: 'localhost',
baseDir: 'app/model',
};
```
在上面这个例子中,我们将数据模型定义文件放在 `app/model` 目录,通过 `localhost` 访问 MySQL 中的 `temp` 数据库。
#### opts.baseDir
egg-orm 默认会加载 `app/model` 目录下的 js 文件并将对应的数据模型定义挂载应用中,可以使用 `opts.baseDir` 自定义加载目录:
```js
// config/config.default.js
exports.orm = {
bsaeDir: 'app/bone',
};
```
#### opts.delegate
egg-orm 默认会挂载到 `app.model` 和 `ctx.model` 上,如果已经有插件使用同名挂载属性名,可以使用 `opts.delegate` 自定义挂载属性名:
```js
// config/config.default.js
exports.orm = {
delegate: 'bone',
};
```
如此配置,egg-orm 就会挂载到 `app.bone` 而不是默认的 `app.model` 了。
#### opts.sequelize
如果应用原先已经使用 Sequelize 实现数据模型层,可以通过 `opts.sequelize` 配置项开启 egg-orm 的 Sequelize 模式来减少迁移工作:
```js
// config/config.default.js
exports.orm = {
client: 'mysql',
sequelize: true,
};
```
可以参考 [Sequelize 适配器]({{ '/zh/sequelize' | relative_url }})一文了解更多有关内容。
### 示例代码
#### 使用 TypeScript 编写
参考 [eggjs/egg-orm!examples/typescript](https://github.com/eggjs/egg-orm/tree/master/examples/typescript) 中的示例代码,使用 TypeScript 编写数据模型时,可以使用 Leoric 提供的 Column、BelongsTo、HasMany、HasOne 等装饰器:
```ts
// app/model/user.ts
import { Application } from 'egg';
import PostFactory from './post';
export default function(app: Application) {
const { Bone, Column, DataTypes: { STRING } } = app.model;
class User extends Bone {
@Column({ allowNull: false })
nickname: string;
@Column()
email: string;
@Column()
createdAt: Date;
@HasMany();
posts: ReturnType[];
}
return User;
};
```
在 Controller 或者 Service 中调用数据模型层时,就可以利用到 TypeScript 类型系统:
```ts
// app/controller/users.ts
import { Application } from 'egg';
import { strict as assert } from 'assert';
export default function(app: Application) {
return class UsersController extends app.Controller {
async show() {
const user = await this.ctx.model.User.findOne(this.ctx.params.id).with('posts');
assert(user);
assert(Array.isArray(user.posts));
this.ctx.body = user;
}
async create() {
const user = await app.model.User.create({
nickname: this.ctx.request.body.nickname,
email: this.ctx.request.body.email,
});
this.ctx.body = user;
}
};
}
```
#### 使用 JavaScript 编写
参考 [eggjs/egg-orm!examples/basic](https://github.com/eggjs/egg-orm/tree/master/examples/basic) 中的示例代码。
## 在 Express 应用中使用
### 安装
```bash
$ npm i --save leoric
$ npm i --save mysql2 # MySQL 或兼容数据库
# 其他数据库
$ npm i --save pg # PostgreSQL
$ npm i --save better-sqlite3 # SQLite
```
### 快速开始
#### 项目结构
典型的 Express + Leoric 项目结构:
```text
my-app/
├── app.js # Express 应用入口
├── models/
│ ├── user.js
│ ├── post.js
│ └── comment.js
├── routes/
│ ├── users.js
│ └── posts.js
├── database/
│ └── migrations/ # 迁移任务文件
└── package.json
```
#### 定义数据模型
```js
// models/user.js
const { Bone, DataTypes } = require('leoric');
const { STRING, BIGINT, INTEGER } = DataTypes;
class User extends Bone {
static attributes = {
id: { type: BIGINT, primaryKey: true, autoIncrement: true },
name: STRING,
email: STRING,
age: INTEGER,
}
}
module.exports = User;
```
```js
// models/post.js
const { Bone, DataTypes } = require('leoric');
const { STRING, TEXT, BIGINT } = DataTypes;
class Post extends Bone {
static attributes = {
id: { type: BIGINT, primaryKey: true, autoIncrement: true },
title: STRING,
content: TEXT,
userId: BIGINT,
}
static initialize() {
this.belongsTo('user');
}
}
module.exports = Post;
```
#### 连接数据库
创建 Realm 实例并在启动 Express 服务之前完成连接:
```js
// app.js
const express = require('express');
const { Realm } = require('leoric');
const app = express();
app.use(express.json());
const realm = new Realm({
dialect: 'mysql',
host: 'localhost',
user: 'root',
database: 'my_app',
models: 'models',
});
// 将 realm 挂载到 app 上,便于在路由中访问
app.set('realm', realm);
// 路由
app.use('/users', require('./routes/users'));
app.use('/posts', require('./routes/posts'));
// 先连接数据库,再启动服务
realm.connect().then(() => {
app.listen(3000, () => {
console.log('Server running on http://localhost:3000');
});
}).catch(err => {
console.error('数据库连接失败:', err);
process.exit(1);
});
```
如果数据模型中没有显式声明 `static attributes`,Leoric 会在 `connect()` 时自动从 `information_schema.columns` 加载表结构信息:
```js
// models/user.js
const { Bone } = require('leoric');
class User extends Bone {
static initialize() {
this.hasMany('posts');
}
}
module.exports = User;
```
#### 在路由中使用模型
```js
// routes/users.js
const express = require('express');
const User = require('../models/user');
const router = express.Router();
// GET /users
router.get('/', async (req, res) => {
const users = await User.find().order('id', 'desc').limit(20);
res.json(users);
});
// GET /users/:id
router.get('/:id', async (req, res) => {
const user = await User.findOne(req.params.id);
if (!user) return res.status(404).json({ error: '用户不存在' });
res.json(user);
});
// POST /users
router.post('/', async (req, res) => {
const user = await User.create(req.body);
res.status(201).json(user);
});
// PUT /users/:id
router.put('/:id', async (req, res) => {
const user = await User.findOne(req.params.id);
if (!user) return res.status(404).json({ error: '用户不存在' });
await user.update(req.body);
res.json(user);
});
// DELETE /users/:id
router.delete('/:id', async (req, res) => {
const user = await User.findOne(req.params.id);
if (!user) return res.status(404).json({ error: '用户不存在' });
await user.remove();
res.status(204).end();
});
module.exports = router;
```
### 配置选项
#### 数据库连接选项
所有数据库连接选项均通过 Realm 构造函数传入:
```js
const realm = new Realm({
dialect: 'mysql', // 'mysql'、'postgres' 或 'sqlite'
host: 'localhost',
port: 3306,
user: 'root',
password: 'secret',
database: 'my_app',
models: 'models', // 模型文件目录路径
migrations: 'database/migrations',
connectionLimit: 10, // 连接池大小
});
```
SQLite 使用 `database` 选项(或 `storage`)指定文件路径:
```js
const realm = new Realm({
dialect: 'sqlite',
database: './database.sqlite3',
models: 'models',
});
```
PostgreSQL 配置:
```js
const realm = new Realm({
dialect: 'postgres',
host: 'localhost',
port: 5432,
user: 'postgres',
password: 'secret',
database: 'my_app',
models: 'models',
});
```
#### 直接传入模型类
除了提供目录路径,也可以直接传入模型类数组:
```js
const User = require('./models/user');
const Post = require('./models/post');
const realm = new Realm({
dialect: 'mysql',
database: 'my_app',
models: [User, Post],
});
```
### 中间件模式
对于较大的应用,可以创建一个中间件来管理数据库连接:
```js
// middleware/database.js
const { Realm } = require('leoric');
const realm = new Realm({
dialect: 'mysql',
host: process.env.DB_HOST || 'localhost',
user: process.env.DB_USER || 'root',
password: process.env.DB_PASSWORD || '',
database: process.env.DB_NAME || 'my_app',
models: 'models',
});
let connected = false;
async function database(req, res, next) {
if (!connected) {
await realm.connect();
connected = true;
}
req.realm = realm;
next();
}
module.exports = { realm, database };
```
```js
// app.js
const express = require('express');
const { realm, database } = require('./middleware/database');
const app = express();
app.use(express.json());
app.use(database);
app.use('/users', require('./routes/users'));
realm.connect().then(() => {
app.listen(3000);
});
```
### 事务
使用 `Bone.transaction()` 将多个操作包装在事务中:
```js
router.post('/transfer', async (req, res) => {
const { fromId, toId, amount } = req.body;
await User.transaction(async ({ connection }) => {
const from = await User.findOne(fromId, { connection });
const to = await User.findOne(toId, { connection });
await from.update({ balance: from.balance - amount }, { connection });
await to.update({ balance: to.balance + amount }, { connection });
});
res.json({ success: true });
});
```
### 迁移任务
通过 Realm 实例创建和执行迁移任务:
```js
// scripts/migrate.js
const { realm } = require('../middleware/database');
(async () => {
await realm.connect();
await realm.migrate();
await realm.disconnect();
console.log('迁移完成');
})();
```
```js
// scripts/create-migration.js
const { realm } = require('../middleware/database');
const name = process.argv[2];
if (!name) {
console.error('用法: node scripts/create-migration.js ');
process.exit(1);
}
(async () => {
await realm.createMigrationFile(name);
console.log(`迁移文件已创建: ${name}`);
})();
```
在 `package.json` 中添加脚本:
```json
{
"scripts": {
"migrate": "node scripts/migrate.js",
"migrate:create": "node scripts/create-migration.js"
}
}
```
### 错误处理
添加错误处理中间件来捕获数据库错误:
```js
// app.js
app.use((err, req, res, next) => {
if (err.code === 'ER_DUP_ENTRY') {
return res.status(409).json({ error: '数据重复' });
}
if (err.name === 'LeoricValidateError') {
return res.status(400).json({ error: err.message });
}
console.error(err);
res.status(500).json({ error: '服务器内部错误' });
});
```
### 优雅关闭
在进程退出时断开数据库连接:
```js
process.on('SIGTERM', async () => {
await realm.disconnect();
process.exit(0);
});
process.on('SIGINT', async () => {
await realm.disconnect();
process.exit(0);
});
```
### TypeScript 支持
Leoric 在 Express 应用中支持 TypeScript。可以使用装饰器或静态属性定义模型:
```typescript
// models/user.ts
import { Bone, Column, DataTypes } from 'leoric';
class User extends Bone {
@Column({ primaryKey: true, autoIncrement: true })
id: bigint;
@Column()
name: string;
@Column()
email: string;
}
export default User;
```
```typescript
// app.ts
import express from 'express';
import { Realm } from 'leoric';
import User from './models/user';
import Post from './models/post';
const app = express();
const realm = new Realm({
dialect: 'mysql',
database: 'my_app',
models: [User, Post],
});
app.get('/users', async (req, res) => {
const users = await User.find();
res.json(users);
});
realm.connect().then(() => {
app.listen(3000);
});
```
## 在 Midway 应用中使用
### 使用指南
首先在 src/configuration.ts 启用 leoric 组件:
```ts
// src/configuration.ts
import { Configuration, ILifeCycle } from '@midwayjs/core';
import * as leoric from '@midwayjs/leoric';
@Configuration({
imports: [
leoric,
],
})
export class ContainerLifeCycle implements ILifeCycle {}
```
然后在配置文件(例如 src/config/config.default.ts)增加对应的数据源配置,下面这个例子配置了一个默认的数据源,使用 sqlite 数据库,在所有目录的 model 子目录中查找并加载数据模型定义:
```ts
// src/config/config.default.ts
export default () => {
return {
leoric: {
dataSource: {
default: {
dialect: 'sqlite',
database: path.join(__dirname, '../../', 'database.sqlite'),
sync: true,
models: [
'**/models/*{.ts,.js}'
]
},
},
},
}
}
```
然后就可以在 controller 或者 service 中按需使用数据模型,使用 `@InjectModel()` 装饰器注入对应的数据模型即可:
```ts
// src/controller/user.ts
import { Controller } from '@midwayjs/core';
import { InjectModel } from '@midwayjs/leoric';
import User from '../model/user';
@Controller('/api/users')
export class UserController {
@InjectModel(User)
User: typeof User;
@Get('/')
async index() {
return await this.User.order('id', 'desc').limit(10);
}
}
```
### 装饰器
#### @InjectModel()
可以在需要使用 Model 的地方使用 `@InjectModel()` 注入模型到类属性,例如:
```ts
// src/service/user.ts
import { Provide } from '@midwayjs/core';
import { InjectModel } from '@midwayjs/leoric';
import User from '../model/user';
@Provide()
export class UserService {
@InjectModel(User)
User: typeof User;
}
```
#### @InjectDataSource()
也可以使用 `@InjectDataSource()` 注入数据源实例:
```ts
// src/service/user.ts
import { Provide } from '@midwayjs/core';
import { InjectDataSource, Realm } from '@midwayjs/leoric';
@Provide()
export class UserService {
@InjectDataSource()
realm: Realm;
async findAll() {
const { rows, fields, ...etc } = this.realm.query('SELECT * FROM users');
return rows;
}
}
```
如果配置有多个实例,可以给装饰器传数据源名称来获得对应的数据源。
### 多数据源配置
midway 给数据模型组件提供基础的多数据源配置规则,无论是使用 leoric 组件还是其他 ORM 库,使用方式大致是相同的,下面仍然以 leoric 组件为例:
```ts
// src/config/config.default.ts
export default () => {
return {
leoric: {
dataSource: {
main: {
dialect: 'sqlite',
database: path.join(__dirname, '../../', 'database.sqlite'),
models: [
'models/*{.ts,.js}'
]
},
backup: {
dialect: 'sqlite',
database: path.join(__dirname, '../../', 'backup.sqlite'),
models: [
'backup/models/*{.ts,.js}'
]
},
},
// 如果想要在 @InjectModel() 时省略数据源名称,那就需要在这里指定缺省值
defaultDataSourceName: 'main',
},
};
}
```
然后在使用的时候需要传入对应的数据源名称,如果省略,则使用 `defaultDataSourceName` 配置项所指定的数据源:
```ts
// src/controller/user.ts
import { Controller, Get } from '@midwayjs/core';
import Realm, { InjectDataSource, InjectModel } from '@midwayjs/leoric';
import User from '../model/user';
@Controller('/api/users')
export class UserController {
@InjectModel(User, 'backup')
User: typeof User;
@InjectDataSource('backup')
backupRealm: Realm
@Get('')
async index() {
const users = await this.User.find();
return users.toJSON();
}
}
```
## MySQL 配置说明
### 快速上手
Leoric 默认支持 MySQL,可以通过如下方式快速配置:
```js
const Realm = require('leoric');
const realm = new Realm({
host: 'localhost',
user: 'test',
database: 'test',
models: 'app/models',
});
await realm.connect();
```
默认使用 [mysqljs/mysql](https://github.com/mysqljs/mysql) 作为访问 MySQL 数据库的客户端,需要将 `mysql` 和 `leoric` 一起添加到依赖列表中:
```diff
diff --git a/package.json b/package.json
index cf91c34..7ae144d 100644
--- a/package.json
+++ b/package.json
@@ -45,6 +45,8 @@
"dependencies": {
+ "leoric": "^1.10.0",
+ "mysql": "^2.18.1",
```
### 配置项
#### `host`
需要连接的数据库服务主机名,默认为 `localhost`。
#### `port`
需要链接的数据库服务端口,默认为 `3306`。
#### `user`
有权限访问对应数据库的用户名。
#### `password`
有权限访问对应数据库的用户密码。
#### `database`
应用对应的数据库名称。
#### `appName`
PolarDB 是一款与 MySQL 协议兼容的云端关系型数据库,前身是 TDDL。在 PolarDB 中有两个数据库名,一个是用来指引相关数据表路径的数据库名称,在 PolarDB 中这个名称和 `appName` 相同;另一个是实际表结构设计时所用的数据酷名称,也就是 `information_schema.columns.table_schema`。
举个例子,如果在迁移到 PolarDB 之前,你的数据库名称是 `foo`,迁移到 PolarDB 之后 `information_schema.columns.table_schema` 仍然会是 `foo`,但是需要提供对应的 `appName` 来告诉 PolarDB 你的表都在哪个数据库下面,大致配置如下:
```js
const realm = new Realm({
host: 'polardb.host',
user: 'FOO_APP',
appName: 'FOO_APP',
database: 'foo',
});
```
如果不熟悉 PolarDB,也不打算使用,就不需要用到这个配置。
#### `charset`
#### `connectionLimit`
Leoric 使用客户端提供的连接池功能,更多连接池配置项可以参考 [mysqljs/mysql#pool-options](https://github.com/mysqljs/mysql#pool-options)。
可以通过 `connectionLimit` 配置连接池大小,默认为 `10`。
#### `idleTimeout`
理论上这项功能应该由客户端模块提供,在客户端已经实现的连接池中加上即可,但目前并没有,可以通过 [#148](https://github.com/cyjake/leoric/issues/148) 了解相关进展。
#### `stringifyObjects`
如果不小心给查询语句传了对象字面量,例如:
```js
await Post.where({ name: { id: 1, name: 'Untitled' } });
```
将会生成如下结构的 SQL(语法上并不通):
```sql
SELECT * FROM `articles` WHERE `name` = `id` = 1 AND `name` = `Untitled`;
```
为了缓解这个问题,可以将 `stringifyObjects` 设置为 `true` 来告诉客户端遇到对象字面量一律直接按 JSON 序列化,避免产生结构诡异的 SQL 查询。
## SQLite 配置说明
### 快速上手
可以按如下方式快速配置使用 SQLite 数据库:
```js
const Realm = require('leoric');
const realm = new Realm({
dialect: 'sqlite',
database: 'database/development.sqlite3',
models: 'app/models',
});
await realm.connect();
```
Leoric 默认使用 [mapbox/node-sqlite3](https://github.com/mapbox/node-sqlite3) 操作 SQLite 数据库,需要将 `leoric` 和 `sqlite3` 两个包都添加到依赖列表中:
```diff
diff --git a/package.json b/package.json
index cf91c34..7ae144d 100644
--- a/package.json
+++ b/package.json
@@ -45,6 +45,8 @@
"dependencies": {
+ "leoric": "^1.10.0",
+ "sqlite3": "^5.0.2",
```
### 配置项
#### `client`
可以通过 `client` 配置访问 SQLite 数据的客户端。例如,如果需要使用 sqlcipher 加密数据库文件,可以选择将客户端修改为 `@journeyapps/sqlcipher`:
```js
const realm = new Realm({
client: '@journeyapps/sqlcipher',
dialect: 'sqlite',
database: 'database/development.sqlite3',
models: 'app/models',
});
```
记得添加 `@journeyapps/sqlcipher` 到依赖列表。目前 `sqlite3` 和 `@journeyapps/sqlcipher` 都是默认支持的,两者也都在 Leoric 的持续集成测试中。
#### `trace`
Leoric 默认会尝试调用 `client.verbose()` 开启调用栈跟踪,从而在查询出现异常时更加清晰地反应到原始调用位置。这个辅助方法是 `sqlite3` 默认提供的,会对每次查询有一点点性能损耗,因为每次查询的时候都需要调用 `new Error()` 来记录异步调用发生前的调用栈。
```
1) => SQLite driver.query()
should support async stack trace:
Error: SQLITE_ERROR: no such table: missing
--> in Database#all('SELECT * FROM missing', undefined, [Function: Leoric_all])
at /Users/nil/Projects/cyjake/leoric/src/drivers/sqlite/connection.js:48:21
at new Promise ()
at Connection.all (src/drivers/sqlite/connection.js:47:12)
at Connection.query (src/drivers/sqlite/connection.js:39:33)
at SqliteDriver.query (src/drivers/sqlite/index.js:46:33)
at async Context. (test/unit/drivers/sqlite/index.test.js:181:7)
```
如果想要了解更多有关这个优化项的信息,可以访问 [!175](https://github.com/cyjake/leoric/pull/175).
也可以通过将 `trace` 设置为 `false` 来关闭这一行为。
#### `connectionLimit`
SQLite 本身是单文件的数据库,也没有服务端架构,因此没有提供连接池。为了优化数据读写,Leoric 在外层包装了连接池,可以通过 `connectionLimit` 设置连接数,默认连接数为 `10`。
通过多个具有读写能力的数据库连接来操作数据容易出现 `SQLITE_BUSY`,因为没有服务端来解决并发。有两种避免这种情况的办法,一种是将 `connectionLimit` 设置 `1` 来关闭多个数据库连接访问,另一种是配置 `busyTimeout` 让 `sqlite3` 客户端继续重试,直到等候时间超过 `busyTimeout`。
```js
const realm = new Realm({
dialect: 'sqlite',
database: 'database/development.sqlite3',
models: 'app/models',
connectionLimit: 1,
});
```
#### `busyTimeout`
`busyTimeout` 的单位是毫秒,默认设置为 `30000`。
```js
const realm = new Realm({
dialect: 'sqlite',
database: 'database/development.sqlite3',
models: 'app/models',
busyTimeout: 30000,
});
```
可以访问如下链接了解更多有关 `SQLITE_BUSY` 异常:
-
-
### 使用 SQLCipher
SQLCipher 和 SQLite 最主要的区别是,前者可以使用一个密钥来加密整个数据库文件。对前者来说,需要在所有数据库操作之前先设置密钥,不然会打不开数据库文件,报 `SQLITE_ERROR: file is not a database` 异常。
为了确保密钥会在第一时间设置,尤其是考虑到可能有多个数据库连接的情况,我们可以监听数据库连接池的 `connection` 事件:
```js
realm.driver.pool.on('connection', function(connection) {
connection.query('PRAGMA key = "Riddikulus!"');
});
```
## PostgreSQL 配置说明
### 快速上手
Leoric 支持 PostgreSQL,可以通过如下方式快速配置:
```js
const Realm = require('leoric');
const realm = new Realm({
dialect: 'postgres',
host: 'localhost',
user: 'test',
database: 'test',
models: 'app/models',
});
await realm.connect();
```
默认使用 [pg](https://node-postgres.com/) 访问 PostgreSQL 数据库,需要将 `pg` 和 `leoric` 一起添加到依赖列表中:
```diff
diff --git a/package.json b/package.json
index cf91c34..7ae144d 100644
--- a/package.json
+++ b/package.json
@@ -45,6 +45,8 @@
"dependencies": {
+ "leoric": "^1.10.0",
+ "pg": "^8.5.1",
```
### 配置项
#### `host`
需要连接的数据库服务主机名,默认为 `localhost`。
#### `port`
需要链接的数据库服务端口,默认为 `5432`。
#### `user`
有权限访问对应数据库的用户名。
#### `password`
有权限访问对应数据库的用户密码。
#### `database`
应用对应的数据库名称。
## 数据类型
### 概述
Leoric 通过 `DataTypes` 对象提供一组数据类型,用于在静态属性或装饰器中定义模型字段。
```js
import { Bone, DataTypes } from 'leoric';
const { STRING, BIGINT, TEXT, BOOLEAN } = DataTypes;
class User extends Bone {
static attributes = {
id: { type: BIGINT, primaryKey: true },
name: { type: STRING(100), allowNull: false },
bio: TEXT,
active: BOOLEAN,
}
}
```
### 字符串类型
#### `STRING(length)`
变长字符串,映射到 SQL 的 `VARCHAR`。
| 参数 | 默认值 | 说明 |
|---------|--------|---------------|
| `length`| `255` | 最大字符串长度 |
```js
STRING // VARCHAR(255)
STRING(100) // VARCHAR(100)
```
#### `CHAR(length)`
定长字符串。
```js
CHAR // CHAR(255)
CHAR(10) // CHAR(10)
```
#### `TEXT(length)`
长文本类型。`length` 参数控制大小变体。
| 变体 | SQL 类型 |
|--------------------|---------------|
| `TEXT` | `TEXT` |
| `TEXT('tiny')` | `TINYTEXT` |
| `TEXT('medium')` | `MEDIUMTEXT` |
| `TEXT('long')` | `LONGTEXT` |
```js
import { DataTypes, LENGTH_VARIANTS } from 'leoric';
TEXT // TEXT
TEXT(LENGTH_VARIANTS.tiny) // TINYTEXT
TEXT(LENGTH_VARIANTS.medium) // MEDIUMTEXT
TEXT(LENGTH_VARIANTS.long) // LONGTEXT
```
### 数值类型
#### `INTEGER(length)`
32 位整数。支持 `UNSIGNED` 和 `ZEROFILL` 修饰符。
```js
INTEGER // INTEGER
INTEGER(10) // INTEGER(10)
INTEGER.UNSIGNED // INTEGER UNSIGNED
```
#### `TINYINT(length)`
8 位整数。
```js
TINYINT // TINYINT
TINYINT(1) // TINYINT(1) - MySQL 中常用作布尔值
TINYINT.UNSIGNED // TINYINT UNSIGNED
```
#### `SMALLINT(length)`
16 位整数。
```js
SMALLINT // SMALLINT
SMALLINT.UNSIGNED // SMALLINT UNSIGNED
```
#### `MEDIUMINT(length)`
24 位整数。
```js
MEDIUMINT // MEDIUMINT
MEDIUMINT.UNSIGNED // MEDIUMINT UNSIGNED
```
#### `BIGINT(length)`
64 位整数。常用于主键。
```js
BIGINT // BIGINT
BIGINT.UNSIGNED // BIGINT UNSIGNED
```
> **注意**:JavaScript 无法安全表示大于 `Number.MAX_SAFE_INTEGER`(2^53 - 1)的整数。对于超大数值,返回值可能是字符串。
#### `DECIMAL(precision, scale)`
定点小数类型,适用于金融数据。
```js
DECIMAL // DECIMAL
DECIMAL(10, 2) // DECIMAL(10,2) - 共 10 位,小数点后 2 位
DECIMAL.UNSIGNED // DECIMAL UNSIGNED
```
#### `BOOLEAN`
布尔类型,映射到 SQL 的 `BOOLEAN`。
```js
BOOLEAN // BOOLEAN
```
### 日期与时间类型
#### `DATE(precision, timezone)`
日期时间类型,映射到 SQL 的 `DATETIME` 或 `TIMESTAMP`。
| 参数 | 默认值 | 说明 |
|------------|--------|----------------------------------------|
| `precision`| — | 小数秒精度(0-6) |
| `timezone` | `true` | 启用时区支持(仅 PostgreSQL) |
```js
DATE // DATETIME
DATE(3) // DATETIME(3) - 毫秒精度
DATE(6) // DATETIME(6) - 微秒精度
```
#### `DATEONLY`
仅日期类型,不含时间部分。映射到 SQL 的 `DATE`。
```js
DATEONLY // DATE
```
### 二进制类型
#### `BINARY(length)`
定长二进制数据。
```js
BINARY // BINARY(255)
BINARY(16) // BINARY(16)
```
#### `VARBINARY(length)`
变长二进制数据。
```js
VARBINARY // VARBINARY
VARBINARY(255) // VARBINARY(255)
```
#### `BLOB(length)`
二进制大对象。
| 变体 | SQL 类型 |
|----------------------|---------------|
| `BLOB` | `BLOB` |
| `BLOB('tiny')` | `TINYBLOB` |
| `BLOB('medium')` | `MEDIUMBLOB` |
| `BLOB('long')` | `LONGBLOB` |
### JSON 类型
#### `JSON`
JSON 文本类型。在数据库中存储为 `TEXT`,但自动进行序列化/反序列化。
```js
import { DataTypes } from 'leoric';
class Post extends Bone {
static attributes = {
meta: DataTypes.JSON,
}
}
```
#### `JSONB`
原生 JSON 二进制类型。在 PostgreSQL 和 MySQL 5.7+ 中可用,以原生 `JSON` 类型存储。
```js
class Post extends Bone {
static attributes = {
extra: DataTypes.JSONB,
}
}
```
更多关于查询和更新 JSON 数据的内容,请参阅 [JSON 字段]({{ '/zh/json' | relative_url }})。
### 虚拟类型
#### `VIRTUAL`
虚拟列,不会持久化到数据库。适用于计算属性。
```js
class User extends Bone {
static attributes = {
firstName: STRING,
lastName: STRING,
fullName: {
type: VIRTUAL,
get() {
return `${this.firstName} ${this.lastName}`;
},
},
}
}
```
### LENGTH_VARIANTS
`LENGTH_VARIANTS` 枚举为 `TEXT` 和 `BLOB` 类型提供命名大小变体:
```js
import { LENGTH_VARIANTS } from 'leoric';
LENGTH_VARIANTS.tiny // 'tiny'
LENGTH_VARIANTS.empty // ''(默认)
LENGTH_VARIANTS.medium // 'medium'
LENGTH_VARIANTS.long // 'long'
```
### 配合 TypeScript 装饰器使用
使用 TypeScript 时,数据类型可以通过 `@Column` 装饰器指定:
```ts
import { Bone, Column, DataTypes } from 'leoric';
const { TEXT, SMALLINT, JSONB } = DataTypes;
class User extends Bone {
@Column({ primaryKey: true })
id: bigint;
@Column()
name: string; // 推断为 STRING
@Column({ type: SMALLINT })
age: number; // 覆盖:使用 SMALLINT 而非 INTEGER
@Column(TEXT)
bio: string; // 覆盖:使用 TEXT 而非 STRING
@Column(JSONB)
meta: Record;
@Column()
createdAt: Date; // 推断为 DATE
}
```
更多类型推断详情请参阅 [TypeScript 支持]({{ '/zh/types' | relative_url }})。
### 数据库方言差异
| Leoric 类型 | MySQL | PostgreSQL | SQLite |
|-------------|--------------------|--------------------|-----------|
| `STRING` | `VARCHAR` | `VARCHAR` | `TEXT` |
| `TEXT` | `TEXT` | `TEXT` | `TEXT` |
| `INTEGER` | `INT` | `INTEGER` | `INTEGER` |
| `BIGINT` | `BIGINT` | `BIGINT` | `INTEGER` |
| `BOOLEAN` | `TINYINT(1)` | `BOOLEAN` | `INTEGER` |
| `DATE` | `DATETIME` | `TIMESTAMP` | `TEXT` |
| `DATEONLY` | `DATE` | `DATE` | `TEXT` |
| `JSONB` | `JSON` | `JSONB` | `TEXT` |
| `BLOB` | `BLOB` | `BYTEA` | `BLOB` |
| `DECIMAL` | `DECIMAL` | `DECIMAL`/`NUMERIC` | `REAL` |
## 事务
### 概述
事务确保一组数据库操作要么全部成功,要么全部失败回滚。Leoric 通过 `Bone.transaction()` 和 `realm.transaction()` 支持事务,同时兼容异步函数和生成器函数。
### 基本用法
#### 使用异步函数
最常见的事务用法是传入异步函数。如果函数正常完成,事务会自动提交;如果抛出异常,事务会自动回滚。
```js
import { Bone } from 'leoric';
await Bone.transaction(async ({ connection }) => {
const post = await Post.create({ title: '新文章' }, { connection });
await Comment.create({ postId: post.id, content: '沙发!' }, { connection });
});
```
> **重要**:在事务内的每个查询都必须传入 `{ connection }`,以确保它们使用同一个数据库连接。否则查询会在事务之外执行。
#### 使用生成器函数
生成器函数提供了一种更便捷的方式,连接会自动传递给 yield 的 Spell 查询:
```js
await Bone.transaction(function* () {
const post = yield Post.create({ title: '新文章' });
yield Comment.create({ postId: post.id, content: '沙发!' });
});
```
使用生成器函数时,Leoric 会自动拦截 yield 的 `Spell` 实例,并将事务连接赋给它们。这样就无需手动给每个查询传递 `{ connection }`。
### 使用 `realm.transaction()`
如果你有 `Realm` 实例,也可以通过它来开启事务:
```js
const realm = new Realm({ /* 配置项 */ });
await realm.connect();
await realm.transaction(async ({ connection }) => {
await Post.create({ title: '你好' }, { connection });
await User.update({ id: 1 }, { lastPostAt: new Date() }, { connection });
});
```
### 错误处理与回滚
如果事务回调内抛出任何异常,整个事务将自动回滚:
```js
try {
await Bone.transaction(async ({ connection }) => {
await Post.create({ title: '新文章' }, { connection });
// 这将导致整个事务回滚
throw new Error('出了点问题');
});
} catch (err) {
console.error('事务失败:', err.message);
// Post 和其他操作都不会被创建
}
```
### 手动提交和回滚
事务回调还接收 `commit` 和 `rollback` 函数,用于高级控制:
```js
await Bone.transaction(async ({ connection, commit, rollback }) => {
await Post.create({ title: '新文章' }, { connection });
const result = await someExternalService();
if (!result.ok) {
await rollback();
return;
}
// 如果没有手动提交或回滚,函数结束时仍会自动提交
});
```
### 事务与钩子
模型钩子(如 `beforeCreate`、`afterUpdate`)在事务内触发时,会在同一个连接上下文中执行。这确保了钩子中的数据库操作也是同一事务的一部分。
```js
class Post extends Bone {
static afterCreate(post, result) {
// 如果 Post.create 是在事务内调用的,这里也在事务内执行
return AuditLog.create({
action: 'create',
modelName: 'Post',
modelId: post.id,
});
}
}
```
### 最佳实践
1. **使用异步函数时务必传递 `connection`**。不传的话查询会在事务之外运行。
2. **优先使用生成器函数**——当所有操作都是 Leoric 查询时,代码更简洁。
3. **保持事务简短**。长时间运行的事务可能导致锁竞争和性能问题。
4. **妥善处理错误**。需要优雅处理失败时,用 try-catch 包裹事务。
5. **避免嵌套事务**。Leoric 目前不支持 savepoint。如果需要嵌套事务行为,请重构代码使用单个事务。
## 原始查询
### 概述
虽然 Leoric 的查询接口覆盖了大部分场景,但有时你需要直接执行原始 SQL。Leoric 提供了几种使用原始 SQL 的方式:`realm.query()`、`Model.query()`、`raw()` 函数以及 `heresql` 模板辅助函数。
### `realm.query(sql, values, options)`
通过 `Realm` 实例执行原始 SQL 查询:
```js
const result = await realm.query('SELECT * FROM posts WHERE id = ?', [1]);
console.log(result.rows);
// => [{ id: 1, title: 'Hello', content: '...' }]
```
#### 返回值
返回对象包含:
| 属性 | 类型 | 说明 |
|---------------|----------|----------------------------------------------|
| `rows` | `Array` | 查询结果行 |
| `fields` | `Array` | 列元数据(table, name) |
| `affectedRows`| `number` | 受影响的行数(INSERT/UPDATE/DELETE) |
| `insertId` | `number` | 自动生成的 ID(INSERT) |
#### 参数化查询
始终使用参数化查询来防止 SQL 注入:
```js
// 正确 - 参数化
const result = await realm.query(
'SELECT * FROM posts WHERE title = ? AND author_id = ?',
['Hello', 42]
);
// 错误 - SQL 注入风险!
const result = await realm.query(
`SELECT * FROM posts WHERE title = '${title}'`
);
```
#### 命名替换
可以使用 `:name` 语法进行命名替换:
```js
const result = await realm.query(
'SELECT * FROM posts WHERE title = :title AND author_id = :authorId',
{
replacements: {
title: 'Hello',
authorId: 42,
},
}
);
```
#### 返回模型实例
传入 `model` 选项可以将结果作为模型实例返回,而非普通对象:
```js
const result = await realm.query(
'SELECT * FROM posts WHERE id = ?',
{ model: Post, replacements: {} }
);
// result.rows 现在是 Post 实例
const post = result.rows[0];
console.log(post instanceof Post); // true
console.log(post.title);
```
#### 在事务中使用
```js
await realm.transaction(async ({ connection }) => {
await realm.query(
'UPDATE posts SET title = ? WHERE id = ?',
['新标题', 1],
{ connection }
);
});
```
### `Model.query(sql, values)`(v2.14+)
从 v2.14 开始,可以直接从模型类执行原始查询:
```js
const result = await Post.query('SELECT * FROM posts WHERE id = ?', [1]);
```
### `raw()` 函数
`raw()` 函数创建一个不会被转义的 `Raw` SQL 表达式。适用于在查询中使用 SQL 函数或表达式:
```js
import { raw } from 'leoric';
// 使用 SQL 函数
await Post.update({ id: 1 }, { updatedAt: raw('NOW()') });
// UPDATE posts SET updated_at = NOW() WHERE id = 1
// 在 where 子句中使用
const posts = await Post.find({
createdAt: raw('NOW() - INTERVAL 7 DAY'),
});
```
也可以通过 `Realm` 实例访问 `raw()`:
```js
await Post.update({ id: 1 }, { updatedAt: realm.raw('NOW()') });
```
> **警告**:`raw()` 会绕过转义。永远不要将用户输入直接传给 `raw()`,否则会导致 SQL 注入漏洞。
### `Raw` 类
`Raw` 是底层实现类。可以直接使用或通过 `Raw.build()` 创建:
```js
import { Raw } from 'leoric';
const expr = new Raw('COUNT(*)');
const expr2 = Raw.build('COUNT(*)');
```
### `heresql` 辅助函数
`heresql` 函数将多行 SQL 字符串格式化为单行查询,便于日志输出和提高源码可读性:
```js
import { heresql } from 'leoric';
const sql = heresql(`
SELECT *
FROM posts
WHERE author_id = ?
ORDER BY created_at DESC
LIMIT 10
`);
// => 'SELECT * FROM posts WHERE author_id = ? ORDER BY created_at DESC LIMIT 10'
```
它会修剪每行的空白并用单个空格连接,使多行 SQL 在源码中更易读,同时生成干净的单行 SQL 用于执行。
### 安全注意事项
1. **始终使用参数化查询**处理用户提供的值。永远不要将用户输入拼接到 SQL 字符串中。
2. **谨慎使用 `raw()`**。仅用于 SQL 函数和表达式,绝不用于用户输入。
3. 在确实需要插值时**使用 `realm.escape()`**,但参数化查询始终是首选。
```js
// 推荐:参数化
await realm.query('SELECT * FROM posts WHERE title = ?', [userInput]);
// 如果必须手动转义
const escaped = realm.escape(userInput);
```
## 软删除
### 概述
软删除(也称为"paranoid"模式)允许你标记记录为已删除,而不是真正从数据库中移除。系统不会执行 `DELETE` 语句,而是将记录的 `deletedAt` 列设置为当前时间戳。
适用场景:
- 保留数据用于审计或合规
- 允许用户恢复误删记录
- 在隐藏记录的同时维护引用完整性
### 启用软删除
要在模型上启用软删除,只需添加 `deletedAt` 属性:
#### JavaScript
```js
import { Bone, DataTypes } from 'leoric';
class Post extends Bone {
static attributes = {
id: { type: DataTypes.BIGINT, primaryKey: true },
title: DataTypes.STRING,
deletedAt: DataTypes.DATE, // 启用软删除
}
}
```
#### TypeScript
```ts
import { Bone, Column } from 'leoric';
class Post extends Bone {
@Column({ primaryKey: true })
id: bigint;
@Column()
title: string;
@Column()
deletedAt: Date; // 启用软删除
}
```
#### 基于表结构(不显式定义属性)
如果你没有显式定义属性,而是让 Leoric 从数据库表结构推断,当表中存在 `deleted_at` 列时会自动启用软删除。
### 工作原理
#### 删除记录
启用软删除后,调用 `.remove()` 会更新 `deletedAt` 列而非删除行:
```js
const post = await Post.findOne({ id: 1 });
await post.remove();
// SQL: UPDATE posts SET deleted_at = '2026-03-26 00:00:00' WHERE id = 1
```
静态方法:
```js
await Post.remove({ id: 1 });
// SQL: UPDATE posts SET deleted_at = '2026-03-26 00:00:00' WHERE id = 1
```
#### 查询
默认情况下,所有查询会自动排除已软删除的记录:
```js
const posts = await Post.find();
// SQL: SELECT * FROM posts WHERE deleted_at IS NULL
const post = await Post.findOne({ id: 1 });
// SQL: SELECT * FROM posts WHERE id = 1 AND deleted_at IS NULL LIMIT 1
```
#### 强制删除(硬删除)
要从数据库中永久删除记录,传入 `true` 给 `.remove()`:
```js
// 实例方法
const post = await Post.findOne({ id: 1 });
await post.remove(true);
// SQL: DELETE FROM posts WHERE id = 1
// 静态方法
await Post.remove({ id: 1 }, true);
// SQL: DELETE FROM posts WHERE id = 1
```
### 查询已软删除的记录
#### `unscoped`
使用 `.unscoped` 在查询中包含已软删除的记录:
```js
const allPosts = await Post.unscoped.find();
// SQL: SELECT * FROM posts(不添加 WHERE deleted_at IS NULL 过滤)
```
#### `paranoid: false`
也可以在特定查询中传入 `paranoid: false`:
```js
await Post.update({ title: '已更新' }, { where: { id: 1 }, paranoid: false });
```
### 恢复已软删除的记录
#### 实例方法
```js
// 先通过 unscoped 找到已软删除的记录
const post = await Post.findOne({ id: 1 }).unparanoid;
await post.restore();
// SQL: UPDATE posts SET deleted_at = NULL WHERE id = 1 AND deleted_at IS NOT NULL
```
#### 静态方法
```js
await Post.restore({ id: 1 });
// SQL: UPDATE posts SET deleted_at = NULL WHERE id = 1 AND deleted_at IS NOT NULL
```
> **注意**:如果模型未启用软删除(即没有 `deletedAt` 属性),`restore()` 会抛出错误。
### 软删除与关联
启用软删除的模型,其关联也会遵守 `deletedAt` 作用域。通过 `include()` 或 `with()` 加载关联记录时,已软删除的关联记录会被自动过滤。
```js
class Post extends Bone {
static initialize() {
this.hasMany('comments');
}
}
class Comment extends Bone {
static attributes = {
deletedAt: DataTypes.DATE,
}
}
const post = await Post.findOne({ id: 1 }).with('comments');
// deletedAt 非空的评论会被排除
```
### 时间戳
软删除与 Leoric 的自动时间戳管理协同工作。当记录被软删除时:
- `deletedAt` 设置为当前日期/时间
- `updatedAt` 在软删除操作期间**不会**自动更新
当记录被恢复时:
- `deletedAt` 设置为 `null`
## 索引提示
### 概述
索引提示允许你建议或强制数据库引擎在执行查询时使用哪些索引。Leoric 支持 MySQL 索引提示(`USE INDEX`、`FORCE INDEX`、`IGNORE INDEX`)和优化器提示。
> **注意**:索引提示主要是 MySQL 特性。PostgreSQL 和 SQLite 有不同的查询优化机制。
### Use Index
建议数据库使用指定索引。优化器可能会选择忽略此建议。
```js
Post.find().useIndex('idx_title')
// SELECT * FROM posts USE INDEX (idx_title)
// 多个索引
Post.find().useIndex('idx_title', 'idx_created_at')
// SELECT * FROM posts USE INDEX (idx_title,idx_created_at)
```
### Force Index
强制数据库使用指定索引。除非没有匹配的行,否则优化器不会考虑全表扫描。
```js
Post.find().forceIndex('idx_title')
// SELECT * FROM posts FORCE INDEX (idx_title)
```
### Ignore Index
告诉数据库不要使用指定索引。
```js
Post.find().ignoreIndex('idx_title')
// SELECT * FROM posts IGNORE INDEX (idx_title)
```
### 带作用域的索引提示
可以使用作用域对象将索引提示限制在特定查询阶段:
#### 用于 JOIN
```js
Post.find().useIndex({ join: 'idx_user_id' })
// SELECT * FROM posts USE INDEX FOR JOIN (idx_user_id)
```
#### 用于 ORDER BY
```js
Post.find().useIndex({ orderBy: 'idx_created_at' })
// SELECT * FROM posts USE INDEX FOR ORDER BY (idx_created_at)
```
#### 用于 GROUP BY
```js
Post.find().useIndex({ groupBy: 'idx_author_id' })
// SELECT * FROM posts USE INDEX FOR GROUP BY (idx_author_id)
```
#### 组合多个作用域提示
```js
Post.find().useIndex(
'idx_id',
{ orderBy: ['idx_title', 'idx_org_id'] },
{ groupBy: 'idx_type' }
)
```
### 对象语法
如需更精细的控制,可以传入包含 `index`、`type` 和 `scope` 属性的对象:
```js
import { INDEX_HINT_TYPE, INDEX_HINT_SCOPE } from 'leoric';
Post.find().useIndex({
index: 'idx_title',
type: INDEX_HINT_TYPE.force,
scope: INDEX_HINT_SCOPE.orderBy,
})
// SELECT * FROM posts FORCE INDEX FOR ORDER BY (idx_title)
```
### 优化器提示
MySQL 优化器提示嵌入在 `/*+ ... */` 注释中:
```js
Post.find().optimizerHints('SET_VAR(foreign_key_checks=OFF)')
// SELECT /*+ SET_VAR(foreign_key_checks=OFF) */ * FROM posts
Post.find().optimizerHints(
'SET_VAR(foreign_key_checks=OFF)',
'MAX_EXECUTION_TIME(1000)'
)
// SELECT /*+ SET_VAR(foreign_key_checks=OFF) MAX_EXECUTION_TIME(1000) */ * FROM posts
```
### 与其他查询方法链式调用
索引提示可以与所有其他查询方法链式调用:
```js
Post
.find({ authorId: 1 })
.forceIndex('idx_author_id')
.order('createdAt', 'desc')
.limit(10)
```
## Realm
### 概述
`Realm` 是 Leoric 的核心入口类,负责管理数据库连接、模型注册、表结构同步,并提供原始查询和事务等方法。
```js
import Realm from 'leoric';
const realm = new Realm({
dialect: 'mysql',
host: 'localhost',
user: 'root',
database: 'my_app',
models: 'app/models',
});
await realm.connect();
```
### 构造函数选项
`Realm` 构造函数接受以下配置项:
| 选项 | 类型 | 默认值 | 说明 |
|--------------------|-------------------------------|------------|-----------------------------------------------------------------------------|
| `dialect` | `string` | `'mysql'` | 数据库方言:`'mysql'`、`'postgres'` 或 `'sqlite'` |
| `client` | `string` | — | 客户端模块名:`'mysql'`、`'mysql2'`、`'pg'`、`'sqlite3'`、`'@journeyapps/sqlcipher'` |
| `dialectModulePath`| `string` | — | `client` 的别名 |
| `host` | `string` | — | 数据库主机地址 |
| `port` | `number \| string` | — | 数据库端口 |
| `user` | `string` | — | 数据库用户名 |
| `password` | `string` | — | 数据库密码 |
| `database` | `string` | — | 数据库名(别名:`db`、`storage`) |
| `models` | `Array \| string` | — | 模型类数组,或模型文件目录路径 |
| `subclass` | `boolean` | `false` | 是否创建 `Bone` 的子类来隔离模型 |
| `driver` | `AbstractDriver` | — | 自定义驱动类 |
| `define` | `object` | — | 默认模型定义选项,如 `{ underscored: true }` |
| `logger` | `object` | — | 自定义日志,详见[日志]({{ '/zh/logging' | relative_url }}) |
| `charset` | `string` | — | 数据库字符集 |
| `idleTimeout` | `number` | — | 连接空闲超时时间(毫秒) |
| `sequelize` | `boolean` | `false` | 启用 Sequelize 兼容适配器 |
| `skipCloneValue` | `boolean` | `false` | 跳过属性值克隆以提升性能(v2.14+) |
#### models 为目录路径
当 `models` 为字符串时,Leoric 会扫描该目录下所有 `.js`、`.mjs` 和 `.ts` 文件,自动加载导出了 `Bone` 子类的模型:
```js
const realm = new Realm({
dialect: 'mysql',
host: 'localhost',
database: 'my_app',
models: 'app/models', // 扫描此目录
});
```
#### models 为数组
也可以直接传入模型类数组:
```js
import Post from './models/post';
import User from './models/user';
const realm = new Realm({
dialect: 'mysql',
host: 'localhost',
database: 'my_app',
models: [Post, User],
});
```
### 连接数据库
#### `realm.connect()`
连接数据库并初始化所有模型。此方法会从数据库获取表结构信息,映射到已注册的模型上。
```js
await realm.connect();
// 模型已就绪
const posts = await Post.find();
```
#### `realm.disconnect()`
断开数据库连接并释放连接池。
```js
await realm.disconnect();
```
也可以传入一个回调函数,在释放连接前执行:
```js
await realm.disconnect(async () => {
console.log('正在清理...');
});
```
### 使用 `connect()` 快捷方式
对于简单场景,可以直接使用 `leoric` 导出的 `connect()` 函数,无需显式创建 `Realm` 实例:
```js
import { Bone, connect } from 'leoric';
class Post extends Bone {}
await connect({
host: 'localhost',
database: 'my_app',
models: [Post],
});
// Post 已就绪
const posts = await Post.find();
```
> **注意**:默认 `Bone` 只能调用一次 `connect()`。如需连接多个数据库,请使用独立的 `Realm` 实例。
### 动态定义模型
#### `realm.define(name, attributes, options, descriptors)`
在运行时动态定义模型,无需创建单独的类文件。
```js
const { BIGINT, STRING, TEXT } = realm.DataTypes;
const Post = realm.define('Post', {
id: { type: BIGINT, primaryKey: true },
title: STRING,
content: TEXT,
});
await realm.sync();
// 现在可以使用模型了
await Post.create({ title: '你好', content: '世界' });
```
**参数说明:**
| 参数 | 类型 | 说明 |
|---------------|----------|------------------------------------|
| `name` | `string` | 模型名称(将用于推断表名) |
| `attributes` | `object` | 列定义 |
| `options` | `object` | 可选的模型初始化选项 |
| `descriptors` | `object` | 可选的属性描述符 |
### 表结构同步
#### `realm.sync(options)`
将模型定义同步到数据库。会创建不存在的表,并可选地修改已有表以匹配模型定义。
```js
await realm.sync();
```
**选项:**
| 选项 | 类型 | 默认值 | 说明 |
|---------|-----------|---------|--------------------------------------------------|
| `force` | `boolean` | `false` | 先删除已有表再创建(破坏性操作!) |
| `alter` | `boolean` | `false` | 修改已有表以匹配模型定义 |
```js
// 创建不存在的表
await realm.sync();
// 删除并重建所有表(警告:会丢失数据!)
await realm.sync({ force: true });
// 修改已有表以匹配模型
await realm.sync({ alter: true });
```
> **警告**:`realm.sync({ force: true })` 会删除所有已有表,请谨慎使用,切勿在生产环境中使用!
### 原始查询
#### `realm.query(sql, values, options)`
执行原始 SQL 查询。
```js
const result = await realm.query('SELECT * FROM posts WHERE id = ?', [1]);
console.log(result.rows); // => [{ id: 1, title: '...', ... }]
```
详见[原始查询]({{ '/zh/raw-query' | relative_url }})。
#### `realm.raw(sql)`
创建一个不会被转义的 `Raw` SQL 表达式。
```js
await Post.update({ title: '新标题' }, {
updatedAt: realm.raw('NOW()'),
});
```
#### `realm.escape(value)`
转义一个值以安全地用于 SQL 查询。
```js
const safe = realm.escape("O'Reilly");
// => "'O\\'Reilly'"
```
### 事务
#### `realm.transaction(callback)`
开启一个事务。回调函数会接收一个 `{ connection }` 对象,确保事务内所有查询使用同一个连接。
```js
await realm.transaction(async ({ connection }) => {
await Post.create({ title: '你好' }, { connection });
await Comment.create({ postId: 1, content: '世界' }, { connection });
});
```
详见[事务]({{ '/zh/transactions' | relative_url }})。
### 多数据库实例
可以创建多个 `Realm` 实例来连接不同的数据库:
```js
const realmA = new Realm({
dialect: 'mysql',
database: 'app_primary',
models: [User, Post],
subclass: true, // 隔离模型
});
const realmB = new Realm({
dialect: 'postgres',
database: 'app_analytics',
models: [Event, Metric],
subclass: true, // 隔离模型
});
await realmA.connect();
await realmB.connect();
```
> **重要**:使用多个 `Realm` 实例时,请设置 `subclass: true`,以确保不同 realm 的模型不共享同一个 `Bone` 基类内部状态。
### 属性
| 属性 | 类型 | 说明 |
|------------------|-----------|-------------------------------|
| `realm.Bone` | `class` | 此 realm 的基础模型类 |
| `realm.models` | `object` | 已注册模型名到类的映射 |
| `realm.driver` | `object` | 数据库驱动实例 |
| `realm.connected`| `boolean` | 是否已连接 |
| `realm.DataTypes`| `object` | 数据类型构造器 |
## 最佳实践
### 避免 N+1 查询问题
当你加载一组记录,然后为每条记录的关联分别发起查询时,就会产生 N+1 查询问题。
#### 问题
```js
// 差:1 次查询文章 + N 次查询评论
const posts = await Post.find({ authorId: 1 });
for (const post of posts) {
post.comments = await Comment.find({ postId: post.id });
}
```
#### 解决方案:预加载
使用 `.with()` 或 `.include()` 在单次查询中加载关联:
```js
// 好:1 次 JOIN 查询
const posts = await Post.find({ authorId: 1 }).with('comments');
for (const post of posts) {
console.log(post.comments); // 已加载
}
```
可以同时加载多个关联:
```js
const posts = await Post.find().with('author', 'comments');
```
### 只查询需要的列
默认情况下,Leoric 会查询所有列(`SELECT *`)。当只需要特定列时,使用 `.select()`:
```js
// 差:加载所有列,包括大文本字段
const posts = await Post.find();
// 好:只加载需要的
const posts = await Post.find().select('id', 'title', 'createdAt');
```
对于有大 `TEXT` 或 `BLOB` 列的表尤其重要。
### 大表的批量处理
处理大表时,避免一次性加载所有记录到内存。使用分页:
```js
// 差:全部加载到内存
const allPosts = await Post.find();
// 好:分批处理
const pageSize = 100;
let offset = 0;
while (true) {
const posts = await Post.find().limit(pageSize).offset(offset);
if (posts.length === 0) break;
for (const post of posts) {
// 处理每条记录
}
offset += pageSize;
}
```
### 连接池管理
#### 配置空闲超时
对于长时间运行的应用,配置空闲超时以防止过期连接:
```js
const realm = new Realm({
host: 'localhost',
database: 'my_app',
idleTimeout: 30000, // 30 秒
});
```
#### 关闭时断开连接
应用关闭时务必断开连接:
```js
process.on('SIGTERM', async () => {
await realm.disconnect();
process.exit(0);
});
```
### 事务最佳实践
#### 保持事务简短
```js
// 差:事务内调用外部 API 会长时间占用连接
await Bone.transaction(async ({ connection }) => {
const user = await User.create({ name: 'Alice' }, { connection });
const result = await fetch('https://api.example.com/notify'); // 慢!
await AuditLog.create({ action: 'user_created' }, { connection });
});
// 好:将外部调用移到事务之外
const user = await Bone.transaction(async ({ connection }) => {
const user = await User.create({ name: 'Alice' }, { connection });
await AuditLog.create({ action: 'user_created' }, { connection });
return user;
});
await fetch('https://api.example.com/notify');
```
#### 使用生成器函数简化代码
```js
// 生成器函数自动传递 connection
await Bone.transaction(function* () {
const user = yield User.create({ name: 'Alice' });
yield AuditLog.create({ action: 'user_created', userId: user.id });
});
```
### 索引策略
#### 为常见查询模式使用复合索引
如果你经常使用多条件查询:
```js
// 如果这是常见的查询模式:
Post.find({ authorId: 1, status: 'published' }).order('createdAt', 'desc')
```
考虑添加复合索引:`(author_id, status, created_at)`。
#### 需要时使用索引提示
当查询优化器做出次优选择时:
```js
Post.find({ authorId: 1 }).forceIndex('idx_author_created')
```
详见[索引提示]({{ '/zh/index-hints' | relative_url }})。
### 模型组织
#### 使用目录方式加载模型
```js
const realm = new Realm({
models: 'app/models', // 自动从目录加载所有模型
});
```
#### 在 `initialize()` 中定义关联
```js
class Post extends Bone {
static initialize() {
this.belongsTo('author', { Model: 'User' });
this.hasMany('comments');
this.hasMany('tags', { through: 'tagMaps' });
}
}
```
#### 尽可能使用 TypeScript 装饰器
```ts
class Post extends Bone {
@Column({ primaryKey: true })
id: bigint;
@BelongsTo()
author: User;
@HasMany()
comments: Comment[];
}
```
### 安全
#### 永远不要在原始 SQL 中使用用户输入
```js
// 差:SQL 注入漏洞
await realm.query(`SELECT * FROM posts WHERE title = '${userInput}'`);
// 好:参数化查询
await realm.query('SELECT * FROM posts WHERE title = ?', [userInput]);
// 好:使用 ORM 查询接口
await Post.find({ title: userInput });
```
#### 谨慎使用 `raw()`
`raw()` 函数绕过转义。只用于 SQL 函数和表达式,绝不用于用户提供的值:
```js
// 好:SQL 函数
await Post.update({ id: 1 }, { viewCount: raw('view_count + 1') });
// 差:在 raw() 中使用用户输入
await Post.find({ title: raw(userInput) }); // SQL 注入!
```
## 错误排查
### 连接问题
#### `Error: connect ECONNREFUSED ::1:3306`
这是 macOS 上的常见问题,`localhost` 解析为 IPv6 的 `::1`,但 MySQL 只监听 `127.0.0.1`。
**解决方案**:更新 MySQL 配置,同时绑定 IPv6:
```diff
# /usr/local/etc/my.cnf (Homebrew MySQL)
[mysqld]
-bind-address = 127.0.0.1
+bind-address = 127.0.0.1,::1
```
然后重启 MySQL:
```bash
brew services mysql restart
```
或者在连接配置中使用 `127.0.0.1` 代替 `localhost`:
```js
const realm = new Realm({
host: '127.0.0.1', // 使用 IP 而非 'localhost'
database: 'my_app',
});
```
#### `Error: connected already`
在默认 `Bone` 类上多次调用 `connect()` 时会出现此错误。
**解决方案**:
- 在应用生命周期中只调用一次 `connect()`
- 使用独立的 `Realm` 实例并设置 `subclass: true` 来管理多个连接
```js
// 错误:两次调用 connect
await connect({ models: [Post], database: 'db1' });
await connect({ models: [User], database: 'db2' }); // 报错!
// 正确:使用独立 Realm 实例
const realm1 = new Realm({ models: [Post], database: 'db1', subclass: true });
const realm2 = new Realm({ models: [User], database: 'db2', subclass: true });
await realm1.connect();
await realm2.connect();
```
#### `Error: DriverClass must be a subclass of AbstractDriver`
这通常发生在直接使用 `BaseRealm` 而非完整的 `Realm` 类时,或者 `dialect` 选项没有匹配到可用的驱动。
**解决方案**:确保从 `leoric` 导入 `Realm`(而非 `BaseRealm`),并安装了正确的数据库客户端:
```bash
# MySQL
npm install mysql2
# PostgreSQL
npm install pg
# SQLite
npm install sqlite3
```
### 模型问题
#### `Error: Model is not paranoid`
在未启用软删除的模型上调用 `restore()` 时出现此错误。
**解决方案**:为模型添加 `deletedAt` 属性。详见[软删除]({{ '/zh/soft-delete' | relative_url }})。
#### 列名未映射到属性
默认情况下,Leoric 将 `snake_case` 列名映射为 `camelCase` 属性。如果你的列名不遵循此约定,使用 `name` 选项:
```ts
@Column({ name: 'gmt_create' })
createdAt: Date;
```
#### `createdAt` / `updatedAt` 未自动更新
如果表中存在 `created_at` 和 `updated_at` 列,Leoric 会自动管理这些时间戳。确保你的表有这些列。
要在特定操作中禁止自动更新时间戳,传入 `{ silent: true }`:
```js
await post.update({ title: '已更新' }, { silent: true });
```
### 查询问题
#### 软删除导致的意外结果
如果你看不到预期的记录,它们可能已被软删除。使用 `.unscoped` 包含所有记录:
```js
// 排除已软删除的记录
const posts = await Post.find();
// 包含所有记录
const allPosts = await Post.unscoped.find();
```
#### N+1 查询问题
如果你在循环中加载关联,很可能遇到了 N+1 问题:
```js
// 差:N+1 查询
const posts = await Post.find();
for (const post of posts) {
const comments = await Comment.find({ postId: post.id }); // N 次查询!
}
// 好:预加载
const posts = await Post.find().with('comments'); // 1 次 JOIN 查询
```
详见[最佳实践]({{ '/zh/best-practices' | relative_url }})。
### 调试
#### 开启调试日志
Leoric 使用 `debug` 模块。通过以下方式开启 SQL 日志:
```bash
DEBUG=leoric node app.js
```
#### 自定义日志
可以提供自定义日志器来查看所有查询:
```js
const realm = new Realm({
logger: {
logQuery(sql, duration) {
console.log(`[${duration}ms] ${sql}`);
},
logQueryError(err, sql, duration) {
console.error(`[${duration}ms] ${sql}\n Error: ${err.message}`);
},
logMigration(name) {
console.log(`Migration: ${name}`);
},
},
});
```
详见[日志]({{ '/zh/logging' | relative_url }})。
### TypeScript 问题
#### `emitDecoratorMetadata` 错误
如果装饰器类型推断不工作,确保 `tsconfig.json` 中有:
```json
{
"compilerOptions": {
"experimentalDecorators": true,
"emitDecoratorMetadata": true
}
}
```
#### `bigint` 类型错误
JavaScript 的 `bigint` 类型需要特殊处理:
```ts
// 正确:使用 bigint 类型
@Column({ primaryKey: true })
id: bigint;
// 创建时,bigint 字面量使用 'n' 后缀
const post = await Post.create({ title: '你好' });
console.log(typeof post.id); // 'bigint' 或 'number',取决于值
```
### 迁移问题
#### 表已存在
运行 `realm.sync()` 时,如果表已存在且需要更新:
```js
// 修改已有表(添加新列等)
await realm.sync({ alter: true });
// 警告:删除并重建(数据丢失!)
await realm.sync({ force: true });
```
#### 迁移回滚
如果迁移中途失败,可能需要手动回滚:
```js
module.exports = {
async up(driver, DataTypes) {
// 前进迁移
},
async down(driver, DataTypes) {
// 回滚迁移 - 确保完整
},
};
```
## 如何参与
### 快速上手
三个步骤
1. 安装我们目前需要支持的数据库,MySQL、PostgreSQL、以及 SQLite
2. 克隆仓库代码并安装依赖
3. 愉快地开始编码
#### 准备开发环境
首先需要安装 HomeBrew 和 Git,然后安装并启动数据库:
```bash
$ brew install mysql postgres sqlite
$ brew service start mysql
$ brew service start postgres
```
#### 执行测试
```bash
$ npm install
# 初始化表结构,运行所有测试
$ npm run test
# 仅运行单元测试
$ npm run test:unit
# 仅运行集成测试
$ npm run test:integration
# TypeScript 定义
$ npm run test:dts
```
还可以执行单个测试文件,或者使用 `--grep` 选项进一步限定执行范围:
```bash
$ npm run test -- test/unit/test.connect.js --grep "should work"
$ npm run test:unit -- --grep "=> Sequelize adapter"
$ npm run test:mysql -- --grep "bone.toJSON()"
```
如果 `--grep [pattern]` 不够直观,也可以随时改成用 `.only` 来指定用例:
```js
describe('=> Spell', function() {
it.only('supports error convention with nodeify', async function() {
// asserts
});
});
```
提交代码之前记得将 `.only` 移除掉。
### 编写帮助文档
Leoric 的帮助文档使用 Github Pages 服务,后者依赖 Jekyll 构建。Jekyll 是一个使用 Ruby 编写的静态站点生成工具,具体安装方式参考[macOS 安装 Ruby](https://mac.install.guide/ruby/index.html),或者参考 Moncef Belyamani 的 [Ruby 安装脚本](https://www.moncefbelyamani.com/ruby-script/)。如果你只想要安装 Jekyll,也可以[使用 HomeBrew 安装 Ruby](https://mac.install.guide/ruby/13.html),然后再[安装 Jekyll](https://jekyllrb.com/docs/installation/macos/) 即可:
```bash
$ brew install ruby
$ echo 'export PATH="/usr/local/opt/ruby/bin:$PATH"' >> ~/.zshrc
$ cd docs
$ bundle install
```
如果遇到连接 https://rubygems.org 超时的问题,考虑切换 `docs/Gemfile` 中使用的 Ruby Gems 源:
```diff
diff --git a/docs/Gemfile b/docs/Gemfile
index 4382725..b4dba82 100644
--- a/docs/Gemfile
+++ b/docs/Gemfile
@@ -1,4 +1,4 @@
-source "https://rubygems.org"
+source "https://gems.ruby-china.com"
```
完成 `bundle install` 即可在本地使用 Jekyll 构建帮助文档:
```bash
$ cd docs # 如果还在项目根路径的话,记得先切换到 docs 目录
$ jekyll serve
Configuration file: leoric/docs/_config.yml
Source: leoric/docs
Destination: leoric/docs/_site
Incremental build: disabled. Enable with --incremental
Generating...
GitHub Metadata: No GitHub API authentication could be found. Some fields may be missing or have incorrect data.
done in 3.73 seconds.
Auto-regeneration: enabled for 'leoric/docs'
Server address: http://127.0.0.1:4000/
Server running... press ctrl-c to stop.
```
访问 即可。
### 代码是如何组织的
可以将 Leoric 的代码划分为如下几层(从底层往顶层):
- SQL 解析器 `lib/expr.js`
- SQL 中间表示层 `lib/spell.js`,提供查找、修改 SQL 相关方法
- SQL 驱动层 `lib/drivers/*.js`,将中间表示层转换为实际可执行的 SQL 语法,并提供执行 SQL 获取返回结果的相关方法
- 数据模型基类 Bone `lib/bone.js`
- [可选] Sequelize 适配器 `lib/sequelize.js`
#### SQL 驱动层
SQL 驱动层主要包含如下模块:
- 定义数据模型所需的属性描述 `lib/drivers/*/attribute.js`
- 定义数据模型所需的字段类型描述 `lib/drivers/*/data_types.js`
- 用来处理表结构的相关 SQL 方法 `lib/drivers/*/schema.js`
- 用来将 SQL 中间表示层转换为实际可执行的 SQL 的转换工具 `lib/drivers/*/spellbook.js`
- 组装以上模块并提供对应驱动器 `lib/drivers/*/index.js`
## AI 代码手册
本页是为 AI 编码助手(以及人类开发者)准备的 Leoric 模式库。以下所有代码片段
均可直接复制,且已经过真实数据库验证。如果你是 AI 代理,请优先照抄这些模式,
而不是自行发明 API 写法。英文版见 [AI Cookbook](https://leoric.js.org/ai-cookbook.html)。
### 最小可运行骨架
```js
import Realm, { Bone, DataTypes } from 'leoric';
const { BIGINT, STRING, TEXT } = DataTypes;
class Post extends Bone {
static attributes = {
id: { type: BIGINT, primaryKey: true },
title: { type: STRING, allowNull: false },
content: { type: TEXT },
};
}
const realm = new Realm({
dialect: 'sqlite', // 'mysql' | 'postgres' | 'sqlite'
storage: ':memory:', // MySQL/PostgreSQL 用 host/user/database
models: [Post], // 顶层类声明的模型需通过 models 选项注册
});
async function main() {
await realm.connect(); // 查询前必须先 connect
await realm.sync(); // 由模型定义建表
const post = await Post.create({ title: 'New Post', content: 'Hello' });
post.title = 'Untitled';
await post.save();
const found = await Post.findOne({ title: 'Untitled' });
console.log(found.id, found.content);
await Post.update({ title: 'Untitled' }, { content: 'Updated' });
await Post.remove({ title: 'Untitled' });
}
main();
```
### 模型定义模式
#### 属性定义
属性通过 `static attributes` 声明。类型使用 `DataTypes` 常量或其字符串名;
常用元选项有 `allowNull`、`primaryKey`、`unique`、`defaultValue`、`autoIncrement`。
```js
import Realm, { Bone, DataTypes } from 'leoric';
const { STRING, INTEGER, BIGINT, DECIMAL, BOOLEAN, DATE, JSON, TEXT } = DataTypes;
class User extends Bone {
static attributes = {
id: { type: BIGINT, primaryKey: true, autoIncrement: true },
nickname: { type: STRING, allowNull: false, unique: true },
age: { type: INTEGER, defaultValue: 0 },
balance: { type: DECIMAL(10, 2), allowNull: false, defaultValue: 0 },
active: { type: BOOLEAN, defaultValue: true },
lastLoginAt: { type: DATE },
profile: { type: JSON },
};
}
```
#### 关联定义
关联在 `static initialize()` 中声明。目标模型名按约定(目标模型名的驼峰形式)
解析;无法推断时用 `className` 选项指定。
```js
class Shop extends Bone {
static initialize() {
this.hasMany('items');
}
}
class Item extends Bone {
static initialize() {
this.belongsTo('shop');
// 自定义类名:this.belongsTo('seller', { className: 'User' })
}
}
// 预加载
const shops = await Shop.find().with('items');
console.log(shops[0].items); // => [ Item, ... ]
// 通过中间表的 hasMany
class Post extends Bone {
static initialize() {
this.hasMany('comments');
this.hasMany('commenters', { through: 'comments' });
}
}
```
#### TypeScript 装饰器
```ts
import { Bone, BelongsTo, HasMany } from 'leoric';
class Shop extends Bone {
@HasMany()
items: Item[];
}
class Item extends Bone {
@BelongsTo()
shop: Shop;
}
```
### 查询模式
#### 条件对象
普通对象条件映射为 `WHERE` 子句。当嵌套对象的每个键都是 `$eq, $gt, $gte, $lt,
$lte, $ne, $in, $nin, $notIn, $like, $notLike, $between, $notBetween` 之一时,
视为操作符条件。
```js
Post.find({ title: 'New Post' }); // WHERE title = 'New Post'
Post.find({ title: { $like: '%Post%' } }); // WHERE title LIKE '%Post%'
Post.find({ id: { $gt: 0, $lt: 999999 } }); // WHERE id > 0 AND id < 999999
Post.find({ id: { $in: [1, 2, 3] } }); // WHERE id IN (1, 2, 3)
Post.find({ id: { $between: [1, 10] } }); // WHERE id BETWEEN 1 AND 10
```
#### 链式查询
`find()`/`findOne()` 返回 `Spell`——一个惰性的、可链式调用的查询对象,只有
await 或迭代时才真正访问数据库。
```js
const posts = await Post.find({ title: { $like: '%Post%' } })
.with('comments')
.order('id', 'desc')
.limit(10)
.offset(20);
const count = await Post.find({ active: true }).count();
const sum = await Post.sum('views');
const first = await Post.find().order('id').first;
```
#### 原始查询
```js
const { rows } = await realm.query('SELECT * FROM posts WHERE id = ?', [42]);
const posts = await Post.find(raw('title = "x"')); // 或 new Raw(...)
```
#### 字符串条件
```js
Post.find('title = ? OR title = ?', 'a', 'b');
```
### 事务与批量操作
```js
import { Bone } from 'leoric';
// async 回调——事务内每个查询都必须传 { connection }
await Bone.transaction(async ({ connection }) => {
const post = await Post.create({ title: 'New Post' }, { connection });
await Comment.create({ postId: post.id, content: 'First!' }, { connection });
});
// generator——connection 自动注入到 yield 的查询中
await Bone.transaction(function* () {
const post = yield Post.create({ title: 'New Post' });
yield Comment.create({ postId: post.id, content: 'First!' });
});
// 从 realm 实例发起
await realm.transaction(async ({ connection }) => {
await Post.create({ title: 'Hello' }, { connection });
});
// 批量创建 / upsert
await Post.bulkCreate([{ title: 'a' }, { title: 'b' }, { title: 'c' }]);
await Post.upsert({ title: 'a' }); // 唯一键冲突时执行 upsert
```
### Sequelize 兼容模式
开启 `sequelize: true` 激活 Sequelize 适配层,获得类 Sequelize 的 API,便于从
Sequelize 迁移:
```js
const realm = new Realm({
dialect: 'sqlite',
storage: '/tmp/leoric.sqlite3',
sequelize: true, // 开启 sequelize 适配
});
await realm.connect();
// sequelize 模式下,模型用 名字 + attributes 定义(或继承 realm.Bone)
const Shop = realm.define('Shop', {
id: { type: BIGINT, primaryKey: true, autoIncrement: true },
name: { type: STRING, allowNull: false },
credit: { type: INTEGER, defaultValue: 0 },
});
await realm.sync();
```
#### CRUD
```js
// 创建
await Shop.create({ name: 'MILL' });
await Shop.bulkCreate([{ name: 'wagas' }, { name: 'family mart' }]);
await new Shop({ name: "McDonald's" }).save();
// 查询
const shop = await Shop.findOne({ where: { name: 'MILL' } });
const shops = await Shop.findAll({
attributes: [ 'id', 'name' ],
where: { name: { $like: '%M%' } },
order: [[ 'id', 'desc' ]],
limit: 10,
});
const byPk = await Shop.findByPk(1);
// 先查后建——返回 [instance, created]
const [brewhouse, created] = await Shop.findOrCreate({
where: { name: 'Shanghai Brewhouse' },
});
// 更新——sequelize 语义:Model.update(values, { where }),返回受影响行数
const affected = await Shop.update({ credit: 10 }, { where: { name: 'MILL' } });
// 删除 / 聚合
await Shop.destroy({ where: { name: 'wagas' } });
await Shop.increment({ credit: 5 }, { where: { name: 'MILL' } }); // 或 increment('credit', { where }) 每次 +1
const { count, rows } = await Shop.findAndCountAll({ where: { name: { $like: '%M%' } } });
const total = await Shop.count();
```
注意:
- sequelize 模式下 `update` 是 sequelize 语义(`values`, `{ where }`),与 leoric 原生参数顺序不同。
- sequelize 模式 + SQLite 时建议用文件库而非 `:memory:`——内存库按连接隔离,并发查询
(如 `findAndCountAll`)可能命中无表的新连接。
- 完整兼容对照见 [Sequelize 适配](https://leoric.js.org/sequelize.html)。
### 常见错误与修复
| 现象 | 原因 | 修复 |
|---|---|---|
| `model X is not connected yet` | `realm.connect()` 之前就查询 | 先 `await realm.connect()` |
| `ER_NO_SUCH_TABLE` | 表尚未创建 | `await realm.sync()`(`{ force: true }` 可重建) |
| 事务内查询实际在事务外执行 | 缺少 `{ connection }` 选项 | 回调内每个查询都传 `{ connection }`,或改用 generator 函数 |
| N+1 查询 | 循环里惰性访问关联 | 用 `.with('assoc')` 预加载 |
| `X must extend this realm's Bone` | 模型类来自其他 realm/实例 | 使用同一个 `Realm` 实例的 `realm.define()` |
| 类字段遮蔽属性访问器 | ES class field 遮蔽了 Leoric 访问器 | 用 `declare`、`@Model()`,或通过 `realm.define(Model, attributes)` 定义属性 |
### 给 AI 助手的提示词模板
向 AI 助手请求编写 Leoric 代码时,请包含三要素:
1. 数据库方言与连接信息(或说明"用 sqlite 内存库")。
2. 模型定义(从你的代码原样粘贴)。
3. 用数据语义描述期望行为,而非 API 术语。
示例提示词:
> 使用 Leoric + MySQL,给定以下模型:
> ```js
> class Post extends Bone {
> static initialize() {
> this.belongsTo('author', { className: 'User' });
> this.hasMany('comments');
> }
> }
> ```
> 请编写代码:获取最新 10 篇文章及其作者与评论数,避免 N+1 查询。
也可以把本页或 [llms-full.txt](https://leoric.js.org/llms-full.txt)
(中文:llms-full-zh.txt)链接提供给助手,获取完整 API 上下文。
`hasOne()` 方法也可以用来配置与其他数据模型的一对一关联。乍一看可能与 `belongsTo()` 甚至 `hasMany()` 都有些像,但在细节或者语义上存在稍许差别。
`hasOne()` 与 `belongsTo()` 的区别主要在外键的归属。在这一点上 `hasOne()` 和 `hasMany()` 比较像,它需要外键放在目标数据模型中。而 `belongsTo()` 需要外键留在发起关联的数据模型中。
`hasOne()` 与 `hasMany()` 的差别很小。当数据模型 `hasOne()` 另一个数据模型,目标数据模型会以单数挂载,即使查询结果存在多个。当数据模型`hasMany()` 另一个数据模型,则挂载关联数据模型的属性所包含的值永远是一个集合,即使查询结果中只有一条甚至一条都没有。
在这个例子中,用户拥有一家店铺:
```js
class User extends Bone {
static initialize() {
this.hasOne('shop', { foreignKey: 'ownerId' })
}
}
```
使用对应的装饰器:
```ts
class User extends Bone {
@HasOne({ foreignKey: 'ownerId' })
shop: Shop;
}
```
而店铺与用户也是一对一的关系:
```js
class Shop extends Bone {
static initialize() {
this.belongsTo('owner', { className: 'User' })
}
}
```
使用对应的装饰器:
```ts
class Shop extends Bone {
@BelongsTo({ className: 'User' })
owner: User;
}
```
#### 在 `belongsTo()` 和 `hasOne()` 之间选择
正如 `hasOne()` 章节所讨论的,`belongsTo()` 和 `hasOne()` 之间的区别主要在外键应该在哪个数据模型。持有相应外键的数据模型应当是发起 `belongsTo()` 关联关系的一方。
例如,一个用户应当拥有 `hasOne()` 一家店铺,而一家店铺应当属于 `belongsTo()` 一个店主(也就是某类用户)。那么店铺就应该包含一个名为 `owner_id` 的字段,用作 `this.hasOne('shop', { foreignKey: 'ownerId' })` 的外键。
厘清这种关联关系是有额外好处的。如果某一天业务逻辑有变,我们的用户突然又可以开多家店铺了,彼时我们把 `hasOne()` 改成 `hasMany()`,把对应的处理逻辑包在一个 `for (const shop of user.shops)` 循环里,就万事大吉了。都不需要修改 `Shop` 数据模型。
## 查询接口
本文涵盖使用 Leoric 从数据库读取数据的各种方式。读完本文后你将了解如下内容:
- 如何使用一系列方法和条件过滤数据记录;
- 如何指定查询结果的排序方式、所需获取的字段、分组、以及其他。
- 如何使用 `.include()` 来一次性读取当前数据模型以及模型的关联关系。
### 从数据库读取数据
Leoric 提供两种主要的查询方式,`.find()` 和 `.findOne()`。`.findOne()` 除了仅返回一条记录或者返回 `null`,其他方面跟 `.find()` 没有差别。
#### 读取一条数据
##### `.findOne()`
```js
const post = await Post.findOne(1)
// => Post { id: 1, ... }
```
上例对应的 SQL 如下:
```sql
SELECT * FROM posts WHERE id = 1 LIMIT 1;
```
`.findOne()` 被称作 `.find()` 的孪生兄弟,是因为它和 `.find()` API 完全一样,只是它会追加一个 `.limit(1)` 到当前查询。所以我们也可以使用 `.findOne()` 执行相对复杂的条件查询:
```js
const post = await Post.findOne({
title: ['New Post', 'Untitled'],
createdAt: new Date(2012, 4, 15)
})
// => Post { id: 1, title: 'New Post', ... }
```
上例对应的 SQL 如下:
```sql
SELECT * FROM posts WHERE title IN ('New Post', 'Untitled') AND created_at = '2012-04-15 00:00:00' LIMIT 1;
```
如果查无记录,`.findOne()` 会返回 `null` 而不是像 `.find()` 一样返回空集合。
##### `.first`
可以通过 `.first` 属性获取 id 最小的记录。例如:
```js
const post = await Post.first
// => Post { id: 1, ... }
```
上例对应的 SQL 如下:
```sql
SELECT * FROM posts ORDER BY id LIMIT 1;
```
##### `.last`
可以通过 `.last` 属性获取 id 最大的记录。例如:
```js
const post = await Post.last
// => Post { id: 42, ... }
```
上例对应的 SQL 如下:
```sql
SELECT * FROM posts ORDER BY id DESC LIMIT 1;
```
#### 读取多条数据
要读取多条数据,把 `.findOne()` 改为 `.find()` 即可。它接收的参数与 `.findOne()` 一样,但会返回集合。如果查无记录,集合会是空的。例如:
```js
const posts = await Post.find({ id: [1, 10] })
// => Collection [ Post { id: 1, ... },
// Post { id: 10, ... } ]
```
上例对应的 SQL 如下:
```sql
SELECT * FROM posts WHERE id in (1, 10);
```
#### 批量读取多条数据
要遍历较大的数据集时,我们的第一反应可能是:
```js
for (const post of (await Post.all)) {
// handle post
}
```
但假如 `Post` 表所包含的数据条数过多,这种遍历方式会变得耗时,因此不切实际。有很多种避免这种情况的方法,而转 `.all` 为批量查询是其中最方便的一个:
```js
for await (const post of Post.all.batch()) {
// handle post
}
```
The SQL equivalent of the above is:
```sql
-- 假设 posts 表包含 2000 条记录,默认查询 LIMIT 1000
SELECT * FROM posts LIMIT 1000;
SELECT * FROM posts LIMIT 1000 OFFSET 1000;
SELECT * FROM posts LIMIT 1000 OFFSET 2000;
```
可以给 `.batch()` 传参来设置批量查询时每批查询的个数:
```js
// 将以每批 100 个逐批查询 Post
for await (const post of Post.all.batch(100)) {
// handle post
}
```
### 查询条件
`.find()` 和 `.findOne()` 都支持传入查询条件来过滤数据库中的记录。查询条件可以是:
- 纯字符串;
- 带占位符的字符串;
- 或者对象。
出于简洁以及安全考虑,我们最为推荐使用带占位符的字符串,并将外部输入作为参数传入。
#### 纯字符串的查询条件
需要查询确定值的时候,纯字符串的查询条件会很合适:
```js
Post.find('title != "New Post"')
// => SELECT * FROM posts WHERE title != 'New Post';
```
但如果使用时不加注意,这种使用方式也很危险:
```js
Post.find(`title != ${title}`)
// 假设 title 值为 "'' or 1 = 1"
// => SELECT * FROM posts WHERE title != '' OR 1 = 1;
```
为避免这种极易被 SQL 注入的查询方式,当条件判断的左操作数并非 identifier 时,Leoric 将抛出异常。但这并不能完全避免被注入的情况,所以在查询条件中需要包含外部输入时,请使用对象查询条件或者带占位符的字符串查询条件,比如:
```js
Post.find('title != ?', title);
```
#### 对象查询条件
由于对象查询条件在 JavaScript 世界里(不管是关系型数据库还是 MongoDB 这种 NoSQL)是比较常用的查询方式,你可能会觉得它有些眼熟。使用对象查询条件,以属性名为键,查询条件为值,绝大多数简单的查询条件都可以实现。对象中的值可以是简单值,也可以是一个键为操作符(`$operator`)的对象,用来传入对比条件。以下是一些使用简单值的对象查询条件示例:
```js
Post.find({ id: 1 })
// => SELECT * FROM posts WHERE id = 1;
Post.find({ title: 'New Post' })
// => SELECT * FROM posts WHERE title = 'New Post';
Post.find({ title: undefined })
Post.find({ title: null })
// => SELECT * FROM posts WHERE title IS NULL;
```
以下是一些使用数组或者其他非简单值的对象查询条件示例:
```js
Post.find({ title: ['New Post', 'Untitled'] })
// => SELECT * FROM posts WHERE title IN ('New Post', 'Untitled');
Post.find({
title: { toSqlString: () => "'New Post'" }
})
// 如果传入的是个包含 toSqlString() 方法的对象,将会使用 toSqlString() 的返回值。
// => SELECT * FROM posts WHERE title = 'New Post';
```
#### 包含操作符的对象查询条件
可能在之前的示例中你已经注意到了,对象查询条件中的值也可以是一个对象。如果这个对象的所有属性都是 `($eq, $gt, $gte, $lt, $lte, $ne, $in, $nin, $notIn, $like, $notLike, $between, $notBetween)` 的其中一个,这个对象将被映射为 SQL 查询条件:
```js
Post.find({ title: { $ne: 'New Post' } })
// => SELECT * FROM posts WHERE title != 'New Post';
Post.find({ title: { $like: '%King%' } })
// => SELECT * FROM posts WHERE title LIKE '%King%';
Post.find({ createdAt: { $lt: new Date(2017, 10, 11) } })
// => SELECT * FROM posts WHERE gmt_create < '2017-11-11 00:00:00';
Post.find({ createdAt: { $notBetween: [new Date(2017, 10, 11), new Date(2017, 11, 12)] } })
// => SELECT * FROM posts WHERE gmt_create NOT BETWEEN '2017-11-11 00:00:00' AND '2017-12-12 00:00:00';
```
如果对象包含多个操作符,相关查询条件将以 `AND` 逻辑合并:
```js
Post.find({ id: { $gt: 0, $lt: 999999 }})
// => SELECT * FROM posts WHERE id >= 0 AND id <= 999999
```
目前对象查询条件所支持的操作符还不包含逻辑操作符(比如 `AND`、`OR`、或者 `!`),可以改用纯字符串的查询条件实现。
#### 字符串查询条件
需要组合查询条件的时候,带占位符的字符串查询条件通常是比对象查询条件更合适的选择。上文中有关对象查询条件的示例使用带占位符的字符串查询条件可以写成:
```js
Post.find('title != ?', 'New Post')
// => SELECT * FROM posts WHERE title != 'New Post';
Post.find('title like ?', '%King%')
// => SELECT * FROM posts WHERE title LIKE '%King%';
Post.find('createdAt < ?', new Date(2017, 10, 11))
// => SELECT * FROM posts WHERE gmt_create < '2017-11-11 00:00:00'
Post.find('createdAt < ? or createdAt > ?', new Date(2017, 10, 11), new Date(2017, 11, 12))
// => SELECT * FROM posts WHERE gmt_create < '2017-11-11 00:00:00'
```
带占位符的字符串查询会自动处理各种类型的 JavaScript 变量:
```js
Post.find('title = ?', null)
Post.find('title = ?', undefined)
// => SELECT * FROM posts WHERE title IS NULL;
Post.find('title = ?', ['New Post', 'Untitled'])
// => SELECT * FROM posts WHERE title in ('New Post', 'Untitled');
```
需要组合多个查询条件时,使用带占位符的字符串查询条件是最方便的:
```js
Post.find('title != ? and createdAt > ?', 'New Post', new Date(2017, 10, 11))
// => SELECT * FROM posts WHERE title != 'New Post' AND gmt_create > '2017-10-11';
```
### 排序
我们可以使用 `.order()` 方法让从数据库获取的数据按一定顺序排序。例如,要获取最近更新的文章列表,我们可以将文章按 `updatedAt` 降序排序:
```js
Post.order('updatedAt', 'desc')
```
`.order()` 还接收如下几种参数形式:
```js
Post.order('updatedAt desc')
Post.order({ updatedAt: 'desc' })
```
上例对应的 SQL 如下:
```sql
SELECT * FROM posts ORDER BY updated_at DESC;
```
默认的排序方式是 `asc` 升序。因此 `Post.order('updatedAt')` 和 `Post.order('updatedAt asc')` 的效果是一样的。
要按多个字段排序时,我们可以:
```js
Post.order({ updatedAt: 'desc', title: 'asc' })
// 或者
Post.order('updatedAt desc').order('title')
```
上例中的两个查询对应的 SQL 都是:
```sql
SELECT * FROM posts ORDER BY updated_at DESC, title ASC;
```
### 选取特定字段
默认情况下,`.find()` 会使用 `*` 选择表中所有字段。如果需要仅选择某些字段,可以使用 `.select()` 方法:
```js
Post.select('id', 'title', 'createdAt')
// or
Post.select('id, title, createdAt')
```
上例对应的 SQL 如下:
```sql
SELECT id, title, created_at FROM posts;
```
### Limit 与 Offset
我们推荐保持给查询条件加 LIMIT 的习惯,除非能确保查询结果不会很膨胀。LIMIT 与 OFFSET 最为常用的场景之一,就是分页。例如,获取 20 篇最近更新的文章:
```js
const posts = await Post.order('updatedAt desc').limit(20)
```
要获取第二批 20 篇最近更新的文章,也就是说用户翻到了第二页,每页文章篇数为 20:
```js
const posts = await Post.order('updatedAt desc').limit(20).offset(20)
```
上例对应的 SQL 如下:
```sql
SELECT * FROM posts ORDER BY updated_at DESC LIMIT 20 OFFSET 20;
```
### 分组
`GROUP BY` 是关系型数据中最为重要的特性之一。将分组与 `COUNT()` 和 `SUM()` 之类的计算函数相结合,是一个非常方便的从数据库中获取有效信息的方式。
例如,假设你想知道哪一天发表的文章最多:
```js
Post.group('DATE(createdAt)').count().order('count desc')
```
上例对应的 SQL 如下:
```sql
SELECT COUNT(*) as count, DATE(created_at) FROM posts GROUP BY DATE(created_at) ORDER BY count DESC;
```
分组查询的返回值和普通的查询有所区别,因为没办法将查询结果交给某个数据模型实例化。上例返回的查询结果类似:
```js
[ { count: 1, 'DATE(created_at)': '2017-12-12' },
{ count: 5, 'DATE(created_at)': '2017-11-11' },
... ]
```
不过分组查询仍然是可以 join 其他数据模型的,我们将在 join 章节深入讨论。
### Having
只有在需要按计算字段过滤结果的时候才需要使用 `HAVING`。尽可能将过滤条件放到 `WHERE` 中,只将计算字段放到 `HAVING` 中过滤,是比较推荐的做法。因为数据库会用 `WHERE` 过滤的结果建立临时结果集,继而给 `HAVING` 过滤,这样可以让临时结果集维持在一个较小的体量。
再以上文中的例子为例,我们可以把发布文章数少于 5 的日期过滤出来:
```js
Post.group('DATE(createdAt)').count().order('count desc').having('count < 5')
```
上例对应的 SQL 如下:
```sql
SELECT COUNT(*) as count, DATE(created_at) FROM posts GROUP BY DATE(created_at) HAVING count < 5 ORDER BY count DESC;
```
查询结果类似:
```js
[ { count: 4, 'DATE(created_at)': '2017-11-11' },
... ]
```
### Transactions
> 由于缺乏 `LOCK` 支持,当前的事务实现还比较初级。希望我们可以尽快解决这个问题。
可以使用 `Model.transaction()` 执行事务,执行这个方法时会从数据库连接池获取连接,再通过所获取的连接执行 `BEGIN` 和 `COMMIT`/`ROLLBACK`。`Model.transaction()` 支持传入 `AsyncFunction` 或者 `GeneratorFunction`,以前者为例:
```js
Post.transaction(async function({ connection }) {
await Comment.create({ content: 'tl;dr', articleId: 1 }, { connection });
await Post.findOne({ id: 1 }).increment('commentCount', { connection });
});
```
若以后者为例,使用方式则是:
```js
Post.transaction(function* () {
yield Comment.create({ content: 'tl;dr', articleId: 1 });
yield Post.findOne({ id: 1 }).increment('commentCount');
});
```
后者省却了 `connection` 显式传递,其余大同小异,对应的 SQL 都是:
```sql
BEGIN
INSERT INTO comments (content, article_id) VALUES ('tl;dr', 1);
UPDATE posts SET comment_count = comment_count + 1 WHERE id = 1;
COMMIT
```
如果回调函数抛出异常,`Model.transaction()` 将执行 `ROLLBACK` 回滚事务并将异常继续向上抛出。
使用生成器可以省却 `connection` 传递是因为 generator 可以控制执行过程:
1. 从数据库连接池获取连接;
2. `BEGIN`
3. 执行回调函数,获取 Generator;
4. 使用 `generator.next()` 推动执行进度;
5. 如果 `generator.next()` 的返回值是个 Spell 实例,设置 `spell.connection` 为当前连接;
6. 如此迭代直到异步流程结束;
7. `COMMIT`
如果不太习惯,使用默认的 `AsyncFunction` 格式,确保 `connection` 准确传入即可。
### Joining Tables
Leoric 提供两种构建 JOIN 查询的方式:
- 使用 `.with(relationName)` 或者 `.include(relationName)` JOIN 预定义的关联关系,
- 使用 `.join(Model, onConditions)` JOIN 其他任意数据模型。
#### 预定义的关联关系
可以通过 `Model.relations` 查看当前数据模型预定义的关联关系,这些关系都是在 Leoric 内部调用 `Model.describe()` 方法时生成的。我们可以在这个方法里调用 `.hasMany()`、`.hasOne()`、以及 `.belongsTo()` 来定义关联关系,例如:
```js
class Post extends Bone {
static initialize() {
this.hasMany('comments')
this.belongsTo('author', { foreignKey: 'authorId', Model: 'User' })
}
}
```
在查询时可以使用 `.include(name)` JOIN 预定义的关联关系:
```js
Post.include('comments')
// or
Post.find().with('comments')
```
上例对应的 SQL 如下:
```sql
SELECT * FROM posts LEFT JOIN comments ON posts.id = comments.post_id;
```
为保证主表的值不会被关联条件过滤,默认采用 LEFT JOIN。关联条件表达式 ON 是根据关联关系的配置信息自动生成的。我们在 [关联关系]({{ '/associations' | relative_url }}) 一文中有详细讨论。
要 JOIN 多个关联关系时,可以给 `.include()` 传入多个参数,或者重复调用 `.with()` 方法:
```js
Post.include('comments', 'author')
// or
Post.find().with('comments').with('author')
```
注意,链式调用 `.with()` 产生的作用会跟调用顺序有关系,下面两个写法是不等价的:
```js
Post.findOne().with('comments')
// 不等同于
Post.find().with('comments').first
```
虽然从接口定义来看,两者都会返回 Post 实例或者 null,但是两者所执行的 SQL 会有差别:
```sql
SELECT * FROM (SELECT * FROM posts LIMIT 1) AS posts LEFT JOIN comments ON comments.post_id = posts.id
-- 不等同于
SELECT * FROM posts AS posts LEFT JOIN comments ON comments.post_id = posts.id LIMIT 1
```
可以看到区别在于 LIMIT 所在的位置,前者会返回第一条 Post 及其所有的 Comment,后者则只会返回第一条 Post 及其第一条 Comment。
使用第一种查询时,如果需要限制返回的评论数量,可以直接写:
```js
Post.findOne().with('comments').limit(10)
```
等价于下面的 SQL:
```sql
SELECT * FROM (SELECT * FROM posts LIMIT 1) AS posts LEFT JOIN comments ON comments.post_id = posts.id LIMIT 10
```
#### 任意 JOIN
如果需要 JOIN 未在 `Model.describe()` 预先定义的关联关系,可以使用 `.join()` 方法:
```js
Post
.join(Comment, 'posts.id = comments.postId')
.join(User, 'posts.authorId = users.id')
```
上例对应的 SQL 如下:
```sql
SELECT * FROM posts LEFT JOIN comments ON posts.id = comments.post_id LEFT JOIN users ON posts.author_id = users.id;
```
和预定义的 JOIN 类似,为保留主表结果,默认采用 LEFT JOIN。
查询中所有表的别名都是按 `pluralize(camelCase(Model.name))` 规则计算。在上例中涉及转换的数据模型名称、别名如下:
| 数据模型 | 表别名 |
|------------|-------------|
| Post | posts |
| Comment | comments |
| User | users |
我们可以在 `.join()` 之后使用这些别名,在 `.where()` 或者 `.order()` 等查询方法中引用字段:
```js
Post.join(Comment, 'posts.id = comments.postId').where('comments.id = 1')
Post.join(Comment, 'posts.id = comments.postId').where({ 'comments.id': 1 })
```
### 查询限定
如果数据模型有 `deletedAt` 属性,`Model.remove()` 并不会实际删除对应的记录,而是更新 `deleteAt` 的值为最新时间。这一特性被称作伪删除(soft delete)。
伪删除逻辑对数据模型的用户来说是透明的,Leoric 默认会在每次查询生成 SQL 之前补上一个默认的查询条件。例如,如果 `Post` 数据模型有 `deletedAt` 属性,那么 `Post.find()` 对应的 SQL 实际上是:
```sql
SELECT * FROM posts WHERE deleted_at IS NULL;
```
但假如查询条件中已经涉及 `deletedAt` 属性,那么默认的 `.where({ deletedAt: null })` 就不会被添加。例如,`Post.find('deletedAt != null')` 对应的 SQL 是:
```sql
SELECT * FROM posts WHERE deleted_at IS NOT NULL;
```
Leoric 将这一行为按查询限定形式实现,后者其实是 Leoric 从 Active Record 抄袭过来的诸多概念之一。目前仅有 `.where({ deletedAt: null })` 这一个默认的查询限定。
#### unscoped
要移除所有默认的限定条件,可以访问 `unscoped` 属性:
```js
Post.find({ id: [1, 10] }).unscoped
```
无论 `Post` 是否有 `deletedAt` 属性,上例对应的 SQL 如下:
```sql
SELECT * FROM posts WHERE id IN (1, 10)
```
### 理解链式调用
Leoric 支持[链式调用](http://en.wikipedia.org/wiki/Method_chaining),允许在编写查询条件时连续各种方法。实现这一特性的原理是,每个查询方法,例如 `.find()` 或者 `.order()`,被调用时都会返回一个 `Spell` 实例。
```js
Post.find() // => Spell { Model: Post }
```
`Spell` 类提供 `.where()`、`.order()`、`.group()`、`.having()`、`limit()`、以及 `.join()` 等方法。绝大多数会返回一个 `Spell` 实例,因此可以往后追加方法。在这些方法被调用的时候,SQL 不是马上生成的。我们可以在结尾手动调用 `.toSqlString()` 方法来生成 SQL。要获取查询结果,把 `Spell` 实例当作 `Promise` 来用就可以了。例如:
```js
// ES5 风格
const spell = Post.find()
spell
.then(posts => { ... })
.catch(err => console.error(err.stacak))
// ES6 使用 co 和 generator function
co(function* () {
const posts = yield Post.find()
})
// ES2016 使用 async await
async function() {
const posts = await Post.find()
}
```
因为 Leoric 采用 ES2016 编写,其中大多数标准已经在最新的 Node.js LTS 版本中实现,所以我们推荐使用 async/await。
书归正传,我们可以往查询对象后面追加任意方法,直到完成查询构建为止:
```js
const query = Post.where('title LIKE ?', '%King%')
const posts = await query.order('updatedAt desc').limit(10)
const [{ count }] = await query.count() // 没有排序、LIMIT
this.body = { posts, count }
```
### 查询或者创建一条记录
查找记录,如果找不到就创建一条,是个很常见的需求。我们所借鉴的 Active Record 还专门提供 `find_or_create_by` 方法。虽然实现起来很简单,但这个方法实在是太容易和 `upsert` 行为混淆了。
> MongoDB 里有 [`db.collection.update({ upsert: true })`](https://docs.mongodb.com/manual/reference/method/db.collection.update/#mongodb30-upsert-id),PostgreSQL 里则有 [`INSERT ... ON CONFLICT ... DO UPDATE`](https://www.postgresql.org/docs/9.5/static/sql-insert.html#SQL-ON-CONFLICT), 而 MySQL(以及 MariaDB 等衍生数据库)里则有 [`INSERT ... ON DUPLICATE KEY UPDATE`](https://dev.mysql.com/doc/refman/5.7/en/insert-on-duplicate.html)。大致来说,都是寻找重复主键,如果存在就更新对应记录。如果不存在重复主键,则插入这条数据。
Leoric 使用 `upsert` 来创建或者更新记录,例如:
```js
const post = new Post({ id: 1, title: 'New Post' })
await post.save()
```
如果 `Post { id: 1 }` 已经存在,就把它的标题更新为 `New Post`。
不过 `upsert` 的特性跟“查询或者创建对象”的逻辑是有区别的。例如,如果用户是以 `email` 区分的,我们可以先按 `email` 查找用户,如果找不到,就创建一个新用户:
```js
const user = (await User.findOne({ email: 'john@example.com' })) ||
await User.create({ email: 'john@example.com' })
```
简而言之,如果需要判断的主键是已知的,用 `model.save()` 就够了,因为它底层会走 `upsert` 逻辑。如果主键不明确,就需要自己手动查找或者创建一条记录了。
### 计算函数
计算函数可以在数据模型上直接调用:
```js
const results = await Post.count()
```
也可以在查询条件后:
```js
const results = await Post.where('name like ?', '%King%').count()
```
#### Count 计数
可以使用 `Model.count()` 统计数据模型对应表中存储的数据条数。如果要统计特定数据的条数,比如寻找店铺中所销售的商品数量,你也可以执行:
```js
Shop.find(1).with('items').count('items.*')
```
上例对应的 SQL 如下:
```sql
SELECT COUNT(items.*) AS count FROM (SELECT * FROM shops WHERE id = 1) AS shops LEFT JOIN items ON items.shop_id = shops.id;
```
#### Average
可以使用 `Model.average()` 计算数据模型对应表中某个数字字段的平均数,比如查找网站订阅用户的平均年龄:
```js
User.where({ subscribed: true }).average('age')
```
上例对应的 SQL 如下:
```sql
SELECT AVG(age) FROM users WHERE subscribed = 1;
```
#### Minimum
可以使用 `Model.minimum()` 计算数据模型对应表中某个字段的最小值,比如寻找用户的最小年龄:
```js
User.minimum('age')
```
上例对应的 SQL 如下:
```sql
SELECT MIN(age) AS minimum FROM users;
```
#### Maximum
可以使用 `Model.maximum()` 计算数据模型对应表中某个字段的最大值,比如寻找用户的最大年龄:
```js
User.maximum('age')
```
上例对应的 SQL 如下:
```sql
SELECT MAX(age) AS maximum FROM users;
```
#### Sum
可以使用 `Model.sum()` 计算数据模型对应表中某个字段的和,比如计算某个店铺所销售的商品总价格:
```js
Shop.find(42).with('items').sum('items.price')
```
上例对应的 SQL 如下:
```sql
SELECT SUM(items.price) FROM (SELECT * FROM shops WHERE id = 42) AS shops LEFT JOIN items ON items.shop_id = shops.id;
```
## JSON 字段
### 字段声明
```typescript
import { Bone, DataTypes } from 'leoric';
class Post extends Bone {
@Column(DataTypes.JSONB)
extra: Record;
}
```
### 查询
可以使用 JSON 函数来自定义过滤条件:
```typescript
const post = await Post.find('JSON_EXTRACT(extra, "$.foo") = ?', 1);
```
MySQL 中的 `column->path`简写方式(比如 `extra->"$.foo"`)暂时不支持。
### 更新
下面这种更新方式容易遇到并发问题,导致数据彼此覆盖:
```typescript
const post = await Post.first;
// 假设在这个时间间隔内,同时有其他进程更新 post.extra,更新的数据就会被覆盖
await post.update('extra', { ...post.extra, foo: 1 });
```
MySQL 里面有两个函数可以用来解决这一情况:
- [JSON_MERGE_PATCH()](https://dev.mysql.com/doc/refman/8.4/en/json-modification-functions.html#function_json-merge-patch) // 覆盖更新
- [JSON_MERGE_PRESERVE()](https://dev.mysql.com/doc/refman/8.4/en/json-modification-functions.html#function_json-merge-preserve) // 遇到重名属性时会保留两者的值
#### JSON_MERGE_PATCH()
Leoric 里面提供了相应的封装:
```typescript
const post = await Post.first;
await post.jsonMerge('extra', { foo: 1 });
```
第二行语句实际执行的 SQL 类似这样:
```sql
UPDATE posts SET extra = JSON_MERGE_PATCH('extra', '{"foo":1}')
```
需要注意的是 JSON_MERGE_PATCH() 函数只会对 object 做属性合并,如果是数组、字符串、布尔类型,会直接覆盖。
> 由于 JSON_MERGE_PATCH() 更接近 JavaScript 中的 merge 行为(`Object.assign()`、lodash/merge),因此默认的 bone.jsonMerge() 方法并没有和 MySQL 中已经不被鼓励使用 JSON_MERGE() 函数对应,后者效果等同于 JSON_MERGE_PRESERVE()。
#### JSON_MERGE_PRESERVE()
JSON_MERGE_PRESERVE() 的逻辑则有所不同,如果是数组、字符串等类型,会返回合并结果:
```sql
JSON_MERGE_PRESERVE('[1, 2]', '[true, false]') // -> [1, 2, true, false]
JSON_MERGE_PRESERVE('1', 'true'); // -> [1, true]
JSON_MERGE_PRESERVE('{ "a": 1 }', '{ "a": 2 }'); // -> { "a": [1, 2] }
```
Leoric 里面也有提供相应的封装:
```typescript
const post = await Post.first;
await post.jsonMergePreserve('extra', { foo: 1 });
```
由于 JSON_MERGE_PRESERVE() 会改变值的类型,如果原始属性值并不是数组,更新的时候就需要谨慎。
### 变更检查
Leoric 默认会在查询结果返回的时候拷贝一份模型的属性值,从而实现以下特性:
```typescript
const post = await Post.first;
post.extra.foo = 2;
post.changes();
// -> { extra: [ { foo: 1 }, { foo: 2 } ] }
await post.save();
// -> UPDATE posts SET extra = JSON_MERGE_PATCH('extra', '{"foo":1}');
```
JavaScript 中的对象深拷贝操作非常重,原生的 `structuredClone(value)` 比 `JSON.parse(JSON.stringify(value))` 还要慢。如果使用的是 mysql2,查询结果返回的时候已经是对象了,这也进一步导致这里可以优化的空间非常有限。
如果数据库中有比较大或者多的 JSON 数据,并且并不依赖上面这种自动标记更新的特性,可以考虑跳过对象深拷贝:
```typescript
new Realm({
skipCloneValue: true,
});
```
然后在需要保存对象的地方手动处理:
```typescript
const post = await Post.first;
post.extra.foo = 2;
post.changes();
// -> {}
post.extra = { ...post.extra, foo, 2 };
post.changes();
// -> { extra: [ { foo: 1 }, { foo: 2 } ] }
await post.save();
// -> UPDATE posts SET extra = JSON_MERGE_PATCH('extra', '{"foo":1}');
```
## 钩子
钩子(hooks)支持在执行查询的特定时机插入根据上下文所做的特殊操作,本文将介绍 Leoric 支持的钩子函数以及如何使用它们
### 声明钩子
可通过以下方式声明:
```javascript
// class syntax
class User extends Bone {
static beforeCreate() {}
static afterUpdate() {}
});
// define
Realm.define('User', attrs, {
hooks: {
beforeCreate() {},
afterUpdate() {},
}
});
```
### 支持的钩子函数
> 其中 `Model.method` 表示直接通过模型类调用方法,`instance.method` 表示通过模型实例调用方法,针对不同的调用方式其 hook 的入参和都略有不同
#### create
`create` 支持以下几个钩子函数:
```javascript
// create hooks,其中 args 为函数本身调用时的参数
Model.beforeCreate(args) // 函数上下文为将要创建的实例
Model.afterCreate(instance, createResult)
instance.beforeCreate(args)
instance.afterCreate(instance, createResult) // 函数上下文为将要创建的实例
```
**需要注意的是,`create` 的钩子函数的函数上下文 `context` 皆为将要创建的实例**
#### bulkCreate
`bulkCreate` 支持以下两个钩子函数,其函数上下文为模型类:
```javascript
// bulkCreate hooks
Model.beforeBulkCreate(records, queryOptions) // 函数上下文为 Model
Model.afterBulkCreate(instances, Model) // instances 为批量创建的实例
```
#### update
`update` 支持以下几个钩子函数:
```javascript
// update hooks
Model.beforeUpdate(args) // 函数上下文为 Model
Model.afterUpdate(updateResult, Model) // 函数上下文为 Model
instance.beforeUpdate(args) // 函数上下文为 instance
instance.afterUpdate(instance, updateResult) // 函数上下文为 instance, updateResult 为 `update` 函数的更新结果。
```
#### save
`save` 支持以下两个钩子函数:
```javascript
Instance.beforeSave(options)
Instance.afterSave(instance, options)
```
需要注意的是, `save` 属于保存操作,模型实例调用 `save` 时会根据实际情况再触发 `create` 、 `update` 或 `upsert` 的钩子函数。
- 当实例是未持久化且主键未设值的数据时会触发 `create` 的钩子函数
- 当实例是未持久化且主键已经设值的数据时 `upsert` 的钩子函数被触发
- 当实例是已持久化的数据时会触发 `upsert` 的钩子函数
#### upsert
`upsert` 支持以下两个钩子函数:
```javascript
instance.beforeUpsert(opts) // 函数上下文为 instance
instance.bafterUpsert(instance, upsertResult) // upsertResult 为 `upsert` 执行结果。
```
#### remove
`remove` 支持以下四个钩子函数:
```javascript
Model.beforeRemove(args)
Model.afterRemove(removeResult, Model) // removeResult 为函数执行结果
instance.beforeRemove(args)
instance.afterRemove(instance, removeResult)
```
### 汇总
```javascript
// create hooks,其中 args 为函数本身调用时的参数
Model.beforeCreate(args) // 函数上下文为将要创建的实例
Model.afterCreate(instance, createResult)
instance.beforeCreate(args)
instance.afterCreate(instance, createResult) // 函数上下文为将要创建的实例
// bulkCreate hooks
Model.beforeBulkCreate(records, queryOptions) // 函数上下文为 Model
Model.afterBulkCreate(instances, Model) // instances 为批量创建的实例
// update hooks
Model.beforeUpdate(args) // 函数上下文为 Model
Model.afterUpdate(updateResult, Model) // 函数上下文为 Model
instance.beforeUpdate(args) // 函数上下文为 instance
instance.afterUpdate(instance, updateResult) // 函数上下文为 instance
// save hooks
instance.beforeSave(options)
instance.afterSave(instance, options)
// upsert hooks
instance.beforeUpsert(opts) // 函数上下文为 instance
instance.bafterUpsert(instance, upsertResult)
// remove hooks
Model.beforeRemove(args)
Model.afterRemove(removeResult, Model)
instance.beforeRemove(args)
instance.afterRemove(instance, removeResult)
```
## 日志
可以通过 `logger` 配置项覆盖相关方法来指定日志输出方式:
```js
const realm = new Realm({
dialect: 'mysql',
host: 'localhost',
logger: {
logQuery(sql, duration, opts) {}, // 数据库查询
logQueryError(err, sql, duration, opts) {}, // 数据库查询失败
logMigration(name) {}, // 迁移任务
},
});
```
### `logQuery`
完成一次数据库查询即调用 `logQuery(sql, duration, opts)` 方法,相关参数说明如下:
| 参数 | 类型 | 描述 |
|-----|------|------|
| `sql` | `string` | 执行的 SQL 语句 |
| `duration` | `number` | 执行耗时,从执行查询到返回结果,不包含连接池等候时间 |
| `opts.command` | `string` | 执行 SQL 查询指令 |
| `opts.connection` | `Connection` | 执行本次查询的数据库连接 |
| `opts.Model` | `Model` | 关联的数据模型 |
#### 执行 SQL
默认按原文输出实际执行的 SQL 语句,如果配置了 `hideKeys` 参数来隐藏部分字段的输出,则相关字段的值会被隐藏。
#### 执行耗时
从调用者的视角来看,数据模型的查询耗时可能比执行耗时要更长,例如执行 `await User.findOne()` 时包含如下步骤:
1. 从数据库连接池获取连接,如果请求并发量太高,此时可能需要等候
2. 在获取到的连接上调用查询方法,执行查询
3. 等待数据库返回执行结果,将结果处理成对应格式
`logQuery` 中的执行耗时即步骤二到步骤三所消耗的时间,主要用来评估数据库执行查询时性能表现。如果应用并发量比较高,建议通过调大连接池或者增加一层业务缓存来降低数据库负载。
#### 关联的数据模型
可以通过 `opts.Model` 获取到本次查询相关的数据模型,如果存在多个数据模型的联表查询或者查询子句,`opts.Model` 仅代表发起查询的主数据模型。
#### 其他参数
通过数据模型的查询方法执行数据库查询时,`opts` 还可能包含额外信息,包括但不限于:
| 参数 | 类型 | 描述 |
|-----|------|-----|
| `opts.hints` | `Hint[]` | 优化提示 |
| `opts.columns` | `string[]` | 查询的字段列表 |
| `opts.whereConditions` | `object[]` | 查询限定条件 |
### `logQueryError`
`logQueryError(err, sql, duration, opts)` 接收的参数与 `logQuery()` 大致相仿,唯一的区别是第一个参数为 `err`,仅在数据库查询出现异常时被调用,比如 SQL 语法错误、数据库校验不通过等情况。
| 参数 | 类型 | 描述 |
|-----|-----|------|
| `err` | `Error` | 数据库查询失败时的异常信息 |
### `logMigration`
执行迁移任务时,除了常规的 `logQuery()` 或者 `logQueryError()` 日志,还会额外执行 `logMigration(name)` 来记录当前执行的数据迁移任务。
### `hideKeys`
可以使用 `hideKeys` 参数隐藏敏感数据,避免敏感信息被记录到日志服务中:
```js
const realm = new Realm({
logger: {
hideKeys: [ 'users.password', 'docs.content' ],
},
});
```
相关 SQL 语句将会被替换,效果大致如下:
```sql
INSERT INTO users (name, password) VALUES ('John', '***');
```
## TypeScript 支持
### 装饰器
#### Column
```ts
import { Bone, DataTypes: { SMALLINT } } from 'leoric';
class User extends Bone {
@Column({ primaryKey: true })
id: bigint;
@Column({ allowNull: false })
name: string;
@Column()
createdAt: Date;
@Column()
updatedAt: Date;
@Column({ type: SMALLINT })
age: number;
}
```
下面是 `@Column()` 支持的配置项列表:
| 配置项 | 功能描述 |
|-----------------------|-------------|
| primaryKey = false | 声明主键 |
| autoIncrement = false | 启用自增字段,字段类型必须是数值类型 |
| allowNull = true | 允许字段存储空值 NULL |
| type = typeof field | 自定义字段类型 |
| name = string | 原始字段名 |
如果省略 `type` 配置项,`@Column()` 会尝试按照如下映射关系推导当前字段类型:
| ts type | data type |
|---------|-----------|
| number | INTEGER |
| string | STRING / VARCHAR(255) |
| Date | DATE |
| bigint | BIGINT |
| boolean | BOOLEAN / TINYINT(1) |
一个比较复杂的例子:
```ts
class User extends Bone {
@Column({ name: 'ssn', primaryKey: true, type: VARCHAR(16) })
ssn: string;
@Column({ name: 'gmt_create', allowNull: false })
createdAt: Date;
}
```
#### BelongsTo
```ts
import User from './user';
class Post extends Bone {
@BelongsTo()
user: User;
}
const post = await Post.include('user').first;
assert.ok(post.user.id);
```
如果关联字段的命名不符合命名约定,需要按如下方式手动配置:
```ts
class Post extends Bone {
@BelongsTo({ foreignKey: 'authorId' })
user: User;
}
```
#### HasMany
```ts
import Post from './post';
class User extends Bone {
@HasMany()
posts: Post[];
}
```
如果关联字段的命名不符合命名约定,需要按如下方式手动配置:
```ts
class User extends Bone {
@HasMany({ foreignKey: 'authorId' })
posts: Post[];
}
```
在一个 `hasMany` 关联关系中(也叫一对多关联),用来创建关联关系的字段应该在外表上面,在上述示例中,也就是需要 `posts.user_id` 或者 `posts.author_id`。推荐阅读《[关联关系]({% link zh/associations.md %})》文档了解更多使用细节。
#### HasOne
```ts
import Profile from './profile';
class User extends Bone {
@HasOne()
profile: Profile;
}
```
如果关联字段的命名不符合命名约定,需要按如下方式手动配置:
```ts
import Profile from './profile';
class User extends Bone {
@HasOne({ foreignKey: 'ownerId' })
profile: Profile;
}
```
`hasOne` 的配置方式和 `hasMany` 几乎相同,同样需要在外表中添加关联字段。
虽然 `hasOne` 和 `belongsTo` 都可以被用来配置一对一关联,但两者之间有个比较大的差别在于关联字段所属的表。如果是 `belongsTo`,需要关联字段添加到主表中,如果是 `hasOne`,则需要放到外表。推荐阅读《[关联关系]({% link zh/associations.md %})》文档了解更多使用细节。
#### 通过中间表的 HasMany 关联
对于多对多关联,可以使用 `through` 选项:
```ts
import Tag from './tag';
import TagMap from './tag_map';
class Post extends Bone {
@HasMany({ through: 'tagMaps' })
tags: Tag[];
@HasMany()
tagMaps: TagMap[];
}
```
### Validate 校验
可以在 `@Column()` 中添加 `validate` 选项来启用字段校验:
```ts
class User extends Bone {
@Column({
allowNull: false,
validate: {
isEmail: true,
},
})
email: string;
@Column({
validate: {
isUrl: true,
},
})
website: string;
}
```
### 完整 TypeScript 模型示例
以下是一个完整的 TypeScript 模型定义示例:
```ts
import { Bone, Column, BelongsTo, HasMany, DataTypes } from 'leoric';
const { TEXT, JSONB } = DataTypes;
import User from './user';
import Comment from './comment';
export default class Post extends Bone {
@Column({ primaryKey: true, autoIncrement: true })
id: bigint;
@Column({ allowNull: false })
title: string;
@Column(TEXT)
content: string;
@Column(JSONB)
extra: Record;
@Column()
userId: bigint;
@Column()
createdAt: Date;
@Column()
updatedAt: Date;
@Column()
deletedAt: Date;
@BelongsTo()
user: User;
@HasMany()
comments: Comment[];
}
```
### TypeScript 4.9 兼容性
Leoric 通过 `package.json` 中的 `typesVersions` 配置为 TypeScript 4.9 及更早版本提供向后兼容的类型声明。这是自动处理的,无需额外配置。
如果你使用的是 TypeScript <= 4.9,会自动使用 `types/ts4.9/` 目录下的类型声明。
### 查询中的类型推断
TypeScript 集成支持类型安全的查询:
```ts
// 返回类型推断为 Post | null
const post = await Post.findOne({ title: 'Hello' });
// 返回类型推断为 Post[]
const posts = await Post.find({ userId: 1 });
// 属性会进行类型检查
await Post.create({
title: '新文章', // OK
content: '你好', // OK
// unknown: 'value', // TypeScript 错误:未知属性
});
```
### 配置
要在 TypeScript 中使用装饰器,需要在 `tsconfig.json` 中启用以下编译选项:
```json
{
"compilerOptions": {
"experimentalDecorators": true,
"emitDecoratorMetadata": true
}
}
```
`emitDecoratorMetadata` 选项是 `@Column()` 自动类型推断所必需的。你还需要安装 `reflect-metadata`(它是 Leoric 的依赖项)。
## Sequelize 适配器
为了降低 Sequelize 用户的迁移成本,Leoric 也提供兼容 Sequelize API 的适配器,打开 `sequelize` 开关即可:
```js
const Realm = require('leoric');
const realm = new Realm({
sequelize: true, // 开启 sequelize 适配器
host: 'localhost',
});
await realm.connect();
```
开启 Sequelize 适配器之后,数据模型的 API 将和 [Sequelize Model](https://sequelize.org/master/class/lib/model.js~Model.html) 基本保持一致,具体异同见下文。
### 读取与写入数据
#### 创建
Sequelize 适配器支持三种常见的数据插入方式:
```js
await Shop.create({ name: 'MILL' });
await Shop.bulkCreate([
{ name: 'wagas' },
{ name: 'family mart' },
]);
await (new Shop({ name: "McDonald's" })).save();
```
同时也支持一些相对复杂的数据插入方式:
```js
// 有点类似 upsert 的查找或者插入
await Shop.findOrCreate({
where: { name: 'Shanghai Brewhouse' },
});
// 查找,插入,如果插入失败就再次查找
await Shop.findCreateFind({
where: { name: 'Shanghai Brewhouse' },
});
```
#### 读取
Sequelize 中 `Model.find()` 和 `Model.findOne()` 均返回一条记录,前者只是后者的别名,下文使用后者展示开启 Sequelize 适配器时,如何从数据库获取一条数据:
```js
const shop = await Shop.findOne({
where: { name: 'Free Mori' },
});
```
返回类型为 `Shop|null`,如果有对应记录就返回 `Shop` 实例,如果没有就返回 `null`。
如果需要返回多条数据,则需要使用 `Model.findAll()` 方法,参数格式与 `Model.findOne()` 一致,支持如下几种:
```js
const shops = await Shop.findAll({
attributes: [ 'id', 'name', 'created_at', 'updated_at' ],
where: {
name: { $like: '%Mori%' },
},
order: [[ 'id', 'desc' ]],
});
```
Leoric 默认提供的查询相关辅助方法比较多,如果 Sequelize 没有对应版本,就会切换到 Leoric 默认实现,包括但不限于:
```js
const shops = await Shop.all;
const shop = await Shop.first;
const top10 = await Shop.order('credit', 'desc').limit(10);
```
#### 更新
可以在数据模型实例上发起更新,持久化相关改动到数据库,比如:
```js
const shop = await Shop.findOne({ name: '85℃' });
shop.name = 'Bread Talk';
await shop.save();
// 也可以简化成
await shop.update({ name: 'Nayuki' });
```
也可以调用数据模型上的静态方法来批量更新:
```js
await Shop.update({ status: STATUS.open }, {
where: { category_id: CATEGORY.food },
});
```
一些便于对数据做增量更新的辅助方法也有支持,比如:
```js
const shop = await Shop.findOne({ name: 'Nayuki' });
await shop.increment('price');
await shop.increment({ price: 0.5 });
// 或者批量更新
await Shop.increment({ price: 1.5 });
```
#### 删除
Sequelize 适配器支持批量删除:
```js
// TRUNCATE TABLE `shops`
await Shop.truncate({});
// 不需要处理钩子时可以直接批量删除
await Shop.bulkDestroy();
// 会触发钩子的批量删除
await Shop.destroy();
```
其中触发钩子的 `Model.destroy()` 方法有两种情况:
| 方法 | 对应的钩子 |
|------|------------|
| `Model.destroy()` | 仅触发 `bulkDestroy` 钩子|
| `Model.destroy({ individualHooks: true })` | 逐一查找相关记录执行删除然后触发 `destroy` 钩子 |
也支持单条记录的删除:
```js
const shop = await Post.first;
// 如果有 deletedAt,默认软删除
await shop.destroy();
// 忽略 deletedAt 字段,强制删除
await shop.destory({ force: true });
```
### 表结构变更与数据迁移
Leoric 用来处理表结构变更和数据迁移的迁移任务与 Sequelize 基本一致,并没有做额外兼容,参考《[迁移任务]({{ '/zh/migrations' | relative_url }})》一文即可。下文是对迁移任务的配置及使用方式的简单说明,首选需要在初始化数据库时配置迁移任务文件的存储目录:
```js
const realm = new Realm({
migrations: 'path/to/migrations', // 一般推荐 database/migrations
});
```
创建迁移任务:
```js
await realm.createMigrationFile('create-shops');
```
迁移任务的写法也基本一致:
```js
// 20210718140000-create-shops.js
'use strict';
module.exports = {
async up(driver, { STRING, NUMBER }) {
await driver.createTable('shops', {
name: { type: STRING, allowNull: false },
price: { type: NUMBER },
});
},
async down(driver) {
await driver.dropTable('shops');
},
};
```
调用对应方法执行或者回滚迁移任务:
```js
await realm.migrate(); // 执行
await realm.rollback(); // 回滚
```
### 属性方法
#### 读取与更新属性
支持通过 `instance.get(name)` 和 `instance.set(name, value)` 读取或者更新实例上的属性值,这两个的方法的作用和直接用 `instance[name]` 和 `instance[name] = value` 是一样的,支持这对方法主要目的是为了和 Sequelize 原有使用习惯兼容,推荐使用后者,更加直观。
`instance.get(name)` 和 `instance.set(name, value)` 会受数据模型上自定义的 getter 和 setter 影响,返回的可能是加工过的数据。如果需要读取数据库中存储的原始数据,或者绕开 setter 设置数据,可以使用下文中的这对方法。
#### 读取与更新字段
支持通过 `instance.getDataValue(name)` 和 `instance.setDataValue(name, value)` 来操作原始数据,此方法为底层方法,会绕开数据模型上自定义的 getter 和 setter,例如:
```js
class Shop extends Bone {
static attributes = {
name: STRING,
}
get name() {
return this.getDataValue('name').replace(/^([a-z])/, function(m, chr) {
return chr.toUpperCase();
});
}
set name(value) {
this.setDataValue('name', value == null ? '' : value);
}
}
const shop = new Shop({ name: 'yakitori' });
assert.equal(shop.name, 'Yakitori');
assert.equal(shop.getDataValue('name'), 'yakitori');
```
如果传入的属性名并非对应表中实际存在的字段,则会走默认的 `instance[name]` 和 `instance[name] = value` 逻辑,确保相互兼容。
### 数据校验
Leoric 的数据校验方案与 Sequelize 的没有太大出入,因此没有额外的兼容层,详见《[数据校验]({{ '/zh/validations' }})》一文。
### 关联关系
没有对 Sequelize 的关联关系 API 做深度兼容,Leoric 原有实现已经足够强大,大致对应关系:
| Sequelize | Leoric |
|-----------------|----------------------|
| belongsTo() | belongsTo() |
| hasMany() | hasMany() |
| hasOne() | hasOne() |
| belongsToMany() | hasMany({ through }) |
由于存在数据模型之间相互引用的关系,推荐将关联关系声明放到专门的数据模型初始化环节:
```js
class Shop extends Bone {
static initialize() {
this.hasMany('items');
this.belongsTo('owner');
this.hasMany('memberships');
this.hasMany('members', { through: 'memberships' });
}
}
```
支持一对一、一对多、以及多对多的关联关系声明,具体参数用法会有出入,详见《[关联关系]({{ '/zh/associations' | relative_url }})》一文。
### 高级查询
#### 覆盖查询条件
## 快速配置
### Web 框架
- [在 Egg / Chair 应用中配置]({{ '/zh/setup/egg' | relative_url }})
- [在 Express 应用中配置]({{ '/zh/setup/express' | relative_url }})
- [在 Midway 应用中配置]({{ '/zh/setup/midway' | relative_url }})
### 数据库
Leoric 支持通过 `options.dialect` 切换数据库,还可以通过 `options.client` 切换具体访问数据库的客户端,目前支持的数据库类型如下:
- [配置 MySQL]({{ '/setup/mysql' | relative_url }})
- [配置 SQLite]({{ '/setup/sqlite' | relative_url }})
- [配置 PostgreSQL]({{ '/setup/postgres' | relative_url }})
## 在 Egg 应用中使用
我们为 Egg 准备了专门的插件 [egg-orm](https://github.com/eggjs/egg-orm),使用 egg-orm 即可快速搞定 Egg 应用中的数据模型定义以及消费。
### 安装
```bash
$ npm i --save egg-orm
$ npm install --save mysql2 # MySQL 或者其他兼容 MySQL 的数据库
# 其他数据库类型
$ npm install --save pg # PostgreSQL
$ npm install --save sqlite3 # SQLite
```
### 使用
开启 egg-orm 插件即可在 `app/model` 中定义数据模型:
```js
// app/model/user.js
module.exports = function(app) {
const { STRING } = app.model.DataTypes;
return app.model.define('User', {
name: STRING,
password: STRING,
avatar: STRING(2048),
}, {
tableName: 'users',
});
}
```
在 Controller 调用:
```js
// app/controller/home.js
const { Controller } = require('egg');
module.exports = class HomeController extends Controller {
async index() {
const users = await ctx.model.User.find({
corpId: ctx.model.Corp.findOne({ name: 'tyrael' }),
});
ctx.body = users;
}
};
```
### 配置
首先开启(并安装) egg-orm 插件
```js
// config/plugin.js
exports.orm = {
enable: true,
package: 'egg-orm',
};
```
然后按需配置数据库:
```js
// config/config.default.js
exports.orm = {
client: 'mysql',
database: 'temp',
host: 'localhost',
baseDir: 'app/model',
};
```
在上面这个例子中,我们将数据模型定义文件放在 `app/model` 目录,通过 `localhost` 访问 MySQL 中的 `temp` 数据库。
#### opts.baseDir
egg-orm 默认会加载 `app/model` 目录下的 js 文件并将对应的数据模型定义挂载应用中,可以使用 `opts.baseDir` 自定义加载目录:
```js
// config/config.default.js
exports.orm = {
bsaeDir: 'app/bone',
};
```
#### opts.delegate
egg-orm 默认会挂载到 `app.model` 和 `ctx.model` 上,如果已经有插件使用同名挂载属性名,可以使用 `opts.delegate` 自定义挂载属性名:
```js
// config/config.default.js
exports.orm = {
delegate: 'bone',
};
```
如此配置,egg-orm 就会挂载到 `app.bone` 而不是默认的 `app.model` 了。
#### opts.sequelize
如果应用原先已经使用 Sequelize 实现数据模型层,可以通过 `opts.sequelize` 配置项开启 egg-orm 的 Sequelize 模式来减少迁移工作:
```js
// config/config.default.js
exports.orm = {
client: 'mysql',
sequelize: true,
};
```
可以参考 [Sequelize 适配器]({{ '/zh/sequelize' | relative_url }})一文了解更多有关内容。
### 示例代码
#### 使用 TypeScript 编写
参考 [eggjs/egg-orm!examples/typescript](https://github.com/eggjs/egg-orm/tree/master/examples/typescript) 中的示例代码,使用 TypeScript 编写数据模型时,可以使用 Leoric 提供的 Column、BelongsTo、HasMany、HasOne 等装饰器:
```ts
// app/model/user.ts
import { Application } from 'egg';
import PostFactory from './post';
export default function(app: Application) {
const { Bone, Column, DataTypes: { STRING } } = app.model;
class User extends Bone {
@Column({ allowNull: false })
nickname: string;
@Column()
email: string;
@Column()
createdAt: Date;
@HasMany();
posts: ReturnType[];
}
return User;
};
```
在 Controller 或者 Service 中调用数据模型层时,就可以利用到 TypeScript 类型系统:
```ts
// app/controller/users.ts
import { Application } from 'egg';
import { strict as assert } from 'assert';
export default function(app: Application) {
return class UsersController extends app.Controller {
async show() {
const user = await this.ctx.model.User.findOne(this.ctx.params.id).with('posts');
assert(user);
assert(Array.isArray(user.posts));
this.ctx.body = user;
}
async create() {
const user = await app.model.User.create({
nickname: this.ctx.request.body.nickname,
email: this.ctx.request.body.email,
});
this.ctx.body = user;
}
};
}
```
#### 使用 JavaScript 编写
参考 [eggjs/egg-orm!examples/basic](https://github.com/eggjs/egg-orm/tree/master/examples/basic) 中的示例代码。
## 在 Express 应用中使用
### 安装
```bash
$ npm i --save leoric
$ npm i --save mysql2 # MySQL 或兼容数据库
# 其他数据库
$ npm i --save pg # PostgreSQL
$ npm i --save better-sqlite3 # SQLite
```
### 快速开始
#### 项目结构
典型的 Express + Leoric 项目结构:
```text
my-app/
├── app.js # Express 应用入口
├── models/
│ ├── user.js
│ ├── post.js
│ └── comment.js
├── routes/
│ ├── users.js
│ └── posts.js
├── database/
│ └── migrations/ # 迁移任务文件
└── package.json
```
#### 定义数据模型
```js
// models/user.js
const { Bone, DataTypes } = require('leoric');
const { STRING, BIGINT, INTEGER } = DataTypes;
class User extends Bone {
static attributes = {
id: { type: BIGINT, primaryKey: true, autoIncrement: true },
name: STRING,
email: STRING,
age: INTEGER,
}
}
module.exports = User;
```
```js
// models/post.js
const { Bone, DataTypes } = require('leoric');
const { STRING, TEXT, BIGINT } = DataTypes;
class Post extends Bone {
static attributes = {
id: { type: BIGINT, primaryKey: true, autoIncrement: true },
title: STRING,
content: TEXT,
userId: BIGINT,
}
static initialize() {
this.belongsTo('user');
}
}
module.exports = Post;
```
#### 连接数据库
创建 Realm 实例并在启动 Express 服务之前完成连接:
```js
// app.js
const express = require('express');
const { Realm } = require('leoric');
const app = express();
app.use(express.json());
const realm = new Realm({
dialect: 'mysql',
host: 'localhost',
user: 'root',
database: 'my_app',
models: 'models',
});
// 将 realm 挂载到 app 上,便于在路由中访问
app.set('realm', realm);
// 路由
app.use('/users', require('./routes/users'));
app.use('/posts', require('./routes/posts'));
// 先连接数据库,再启动服务
realm.connect().then(() => {
app.listen(3000, () => {
console.log('Server running on http://localhost:3000');
});
}).catch(err => {
console.error('数据库连接失败:', err);
process.exit(1);
});
```
如果数据模型中没有显式声明 `static attributes`,Leoric 会在 `connect()` 时自动从 `information_schema.columns` 加载表结构信息:
```js
// models/user.js
const { Bone } = require('leoric');
class User extends Bone {
static initialize() {
this.hasMany('posts');
}
}
module.exports = User;
```
#### 在路由中使用模型
```js
// routes/users.js
const express = require('express');
const User = require('../models/user');
const router = express.Router();
// GET /users
router.get('/', async (req, res) => {
const users = await User.find().order('id', 'desc').limit(20);
res.json(users);
});
// GET /users/:id
router.get('/:id', async (req, res) => {
const user = await User.findOne(req.params.id);
if (!user) return res.status(404).json({ error: '用户不存在' });
res.json(user);
});
// POST /users
router.post('/', async (req, res) => {
const user = await User.create(req.body);
res.status(201).json(user);
});
// PUT /users/:id
router.put('/:id', async (req, res) => {
const user = await User.findOne(req.params.id);
if (!user) return res.status(404).json({ error: '用户不存在' });
await user.update(req.body);
res.json(user);
});
// DELETE /users/:id
router.delete('/:id', async (req, res) => {
const user = await User.findOne(req.params.id);
if (!user) return res.status(404).json({ error: '用户不存在' });
await user.remove();
res.status(204).end();
});
module.exports = router;
```
### 配置选项
#### 数据库连接选项
所有数据库连接选项均通过 Realm 构造函数传入:
```js
const realm = new Realm({
dialect: 'mysql', // 'mysql'、'postgres' 或 'sqlite'
host: 'localhost',
port: 3306,
user: 'root',
password: 'secret',
database: 'my_app',
models: 'models', // 模型文件目录路径
migrations: 'database/migrations',
connectionLimit: 10, // 连接池大小
});
```
SQLite 使用 `database` 选项(或 `storage`)指定文件路径:
```js
const realm = new Realm({
dialect: 'sqlite',
database: './database.sqlite3',
models: 'models',
});
```
PostgreSQL 配置:
```js
const realm = new Realm({
dialect: 'postgres',
host: 'localhost',
port: 5432,
user: 'postgres',
password: 'secret',
database: 'my_app',
models: 'models',
});
```
#### 直接传入模型类
除了提供目录路径,也可以直接传入模型类数组:
```js
const User = require('./models/user');
const Post = require('./models/post');
const realm = new Realm({
dialect: 'mysql',
database: 'my_app',
models: [User, Post],
});
```
### 中间件模式
对于较大的应用,可以创建一个中间件来管理数据库连接:
```js
// middleware/database.js
const { Realm } = require('leoric');
const realm = new Realm({
dialect: 'mysql',
host: process.env.DB_HOST || 'localhost',
user: process.env.DB_USER || 'root',
password: process.env.DB_PASSWORD || '',
database: process.env.DB_NAME || 'my_app',
models: 'models',
});
let connected = false;
async function database(req, res, next) {
if (!connected) {
await realm.connect();
connected = true;
}
req.realm = realm;
next();
}
module.exports = { realm, database };
```
```js
// app.js
const express = require('express');
const { realm, database } = require('./middleware/database');
const app = express();
app.use(express.json());
app.use(database);
app.use('/users', require('./routes/users'));
realm.connect().then(() => {
app.listen(3000);
});
```
### 事务
使用 `Bone.transaction()` 将多个操作包装在事务中:
```js
router.post('/transfer', async (req, res) => {
const { fromId, toId, amount } = req.body;
await User.transaction(async ({ connection }) => {
const from = await User.findOne(fromId, { connection });
const to = await User.findOne(toId, { connection });
await from.update({ balance: from.balance - amount }, { connection });
await to.update({ balance: to.balance + amount }, { connection });
});
res.json({ success: true });
});
```
### 迁移任务
通过 Realm 实例创建和执行迁移任务:
```js
// scripts/migrate.js
const { realm } = require('../middleware/database');
(async () => {
await realm.connect();
await realm.migrate();
await realm.disconnect();
console.log('迁移完成');
})();
```
```js
// scripts/create-migration.js
const { realm } = require('../middleware/database');
const name = process.argv[2];
if (!name) {
console.error('用法: node scripts/create-migration.js ');
process.exit(1);
}
(async () => {
await realm.createMigrationFile(name);
console.log(`迁移文件已创建: ${name}`);
})();
```
在 `package.json` 中添加脚本:
```json
{
"scripts": {
"migrate": "node scripts/migrate.js",
"migrate:create": "node scripts/create-migration.js"
}
}
```
### 错误处理
添加错误处理中间件来捕获数据库错误:
```js
// app.js
app.use((err, req, res, next) => {
if (err.code === 'ER_DUP_ENTRY') {
return res.status(409).json({ error: '数据重复' });
}
if (err.name === 'LeoricValidateError') {
return res.status(400).json({ error: err.message });
}
console.error(err);
res.status(500).json({ error: '服务器内部错误' });
});
```
### 优雅关闭
在进程退出时断开数据库连接:
```js
process.on('SIGTERM', async () => {
await realm.disconnect();
process.exit(0);
});
process.on('SIGINT', async () => {
await realm.disconnect();
process.exit(0);
});
```
### TypeScript 支持
Leoric 在 Express 应用中支持 TypeScript。可以使用装饰器或静态属性定义模型:
```typescript
// models/user.ts
import { Bone, Column, DataTypes } from 'leoric';
class User extends Bone {
@Column({ primaryKey: true, autoIncrement: true })
id: bigint;
@Column()
name: string;
@Column()
email: string;
}
export default User;
```
```typescript
// app.ts
import express from 'express';
import { Realm } from 'leoric';
import User from './models/user';
import Post from './models/post';
const app = express();
const realm = new Realm({
dialect: 'mysql',
database: 'my_app',
models: [User, Post],
});
app.get('/users', async (req, res) => {
const users = await User.find();
res.json(users);
});
realm.connect().then(() => {
app.listen(3000);
});
```
## 在 Midway 应用中使用
### 使用指南
首先在 src/configuration.ts 启用 leoric 组件:
```ts
// src/configuration.ts
import { Configuration, ILifeCycle } from '@midwayjs/core';
import * as leoric from '@midwayjs/leoric';
@Configuration({
imports: [
leoric,
],
})
export class ContainerLifeCycle implements ILifeCycle {}
```
然后在配置文件(例如 src/config/config.default.ts)增加对应的数据源配置,下面这个例子配置了一个默认的数据源,使用 sqlite 数据库,在所有目录的 model 子目录中查找并加载数据模型定义:
```ts
// src/config/config.default.ts
export default () => {
return {
leoric: {
dataSource: {
default: {
dialect: 'sqlite',
database: path.join(__dirname, '../../', 'database.sqlite'),
sync: true,
models: [
'**/models/*{.ts,.js}'
]
},
},
},
}
}
```
然后就可以在 controller 或者 service 中按需使用数据模型,使用 `@InjectModel()` 装饰器注入对应的数据模型即可:
```ts
// src/controller/user.ts
import { Controller } from '@midwayjs/core';
import { InjectModel } from '@midwayjs/leoric';
import User from '../model/user';
@Controller('/api/users')
export class UserController {
@InjectModel(User)
User: typeof User;
@Get('/')
async index() {
return await this.User.order('id', 'desc').limit(10);
}
}
```
### 装饰器
#### @InjectModel()
可以在需要使用 Model 的地方使用 `@InjectModel()` 注入模型到类属性,例如:
```ts
// src/service/user.ts
import { Provide } from '@midwayjs/core';
import { InjectModel } from '@midwayjs/leoric';
import User from '../model/user';
@Provide()
export class UserService {
@InjectModel(User)
User: typeof User;
}
```
#### @InjectDataSource()
也可以使用 `@InjectDataSource()` 注入数据源实例:
```ts
// src/service/user.ts
import { Provide } from '@midwayjs/core';
import { InjectDataSource, Realm } from '@midwayjs/leoric';
@Provide()
export class UserService {
@InjectDataSource()
realm: Realm;
async findAll() {
const { rows, fields, ...etc } = this.realm.query('SELECT * FROM users');
return rows;
}
}
```
如果配置有多个实例,可以给装饰器传数据源名称来获得对应的数据源。
### 多数据源配置
midway 给数据模型组件提供基础的多数据源配置规则,无论是使用 leoric 组件还是其他 ORM 库,使用方式大致是相同的,下面仍然以 leoric 组件为例:
```ts
// src/config/config.default.ts
export default () => {
return {
leoric: {
dataSource: {
main: {
dialect: 'sqlite',
database: path.join(__dirname, '../../', 'database.sqlite'),
models: [
'models/*{.ts,.js}'
]
},
backup: {
dialect: 'sqlite',
database: path.join(__dirname, '../../', 'backup.sqlite'),
models: [
'backup/models/*{.ts,.js}'
]
},
},
// 如果想要在 @InjectModel() 时省略数据源名称,那就需要在这里指定缺省值
defaultDataSourceName: 'main',
},
};
}
```
然后在使用的时候需要传入对应的数据源名称,如果省略,则使用 `defaultDataSourceName` 配置项所指定的数据源:
```ts
// src/controller/user.ts
import { Controller, Get } from '@midwayjs/core';
import Realm, { InjectDataSource, InjectModel } from '@midwayjs/leoric';
import User from '../model/user';
@Controller('/api/users')
export class UserController {
@InjectModel(User, 'backup')
User: typeof User;
@InjectDataSource('backup')
backupRealm: Realm
@Get('')
async index() {
const users = await this.User.find();
return users.toJSON();
}
}
```
## MySQL 配置说明
### 快速上手
Leoric 默认支持 MySQL,可以通过如下方式快速配置:
```js
const Realm = require('leoric');
const realm = new Realm({
host: 'localhost',
user: 'test',
database: 'test',
models: 'app/models',
});
await realm.connect();
```
默认使用 [mysqljs/mysql](https://github.com/mysqljs/mysql) 作为访问 MySQL 数据库的客户端,需要将 `mysql` 和 `leoric` 一起添加到依赖列表中:
```diff
diff --git a/package.json b/package.json
index cf91c34..7ae144d 100644
--- a/package.json
+++ b/package.json
@@ -45,6 +45,8 @@
"dependencies": {
+ "leoric": "^1.10.0",
+ "mysql": "^2.18.1",
```
### 配置项
#### `host`
需要连接的数据库服务主机名,默认为 `localhost`。
#### `port`
需要链接的数据库服务端口,默认为 `3306`。
#### `user`
有权限访问对应数据库的用户名。
#### `password`
有权限访问对应数据库的用户密码。
#### `database`
应用对应的数据库名称。
#### `appName`
PolarDB 是一款与 MySQL 协议兼容的云端关系型数据库,前身是 TDDL。在 PolarDB 中有两个数据库名,一个是用来指引相关数据表路径的数据库名称,在 PolarDB 中这个名称和 `appName` 相同;另一个是实际表结构设计时所用的数据酷名称,也就是 `information_schema.columns.table_schema`。
举个例子,如果在迁移到 PolarDB 之前,你的数据库名称是 `foo`,迁移到 PolarDB 之后 `information_schema.columns.table_schema` 仍然会是 `foo`,但是需要提供对应的 `appName` 来告诉 PolarDB 你的表都在哪个数据库下面,大致配置如下:
```js
const realm = new Realm({
host: 'polardb.host',
user: 'FOO_APP',
appName: 'FOO_APP',
database: 'foo',
});
```
如果不熟悉 PolarDB,也不打算使用,就不需要用到这个配置。
#### `charset`
#### `connectionLimit`
Leoric 使用客户端提供的连接池功能,更多连接池配置项可以参考 [mysqljs/mysql#pool-options](https://github.com/mysqljs/mysql#pool-options)。
可以通过 `connectionLimit` 配置连接池大小,默认为 `10`。
#### `idleTimeout`
理论上这项功能应该由客户端模块提供,在客户端已经实现的连接池中加上即可,但目前并没有,可以通过 [#148](https://github.com/cyjake/leoric/issues/148) 了解相关进展。
#### `stringifyObjects`
如果不小心给查询语句传了对象字面量,例如:
```js
await Post.where({ name: { id: 1, name: 'Untitled' } });
```
将会生成如下结构的 SQL(语法上并不通):
```sql
SELECT * FROM `articles` WHERE `name` = `id` = 1 AND `name` = `Untitled`;
```
为了缓解这个问题,可以将 `stringifyObjects` 设置为 `true` 来告诉客户端遇到对象字面量一律直接按 JSON 序列化,避免产生结构诡异的 SQL 查询。
## SQLite 配置说明
### 快速上手
可以按如下方式快速配置使用 SQLite 数据库:
```js
const Realm = require('leoric');
const realm = new Realm({
dialect: 'sqlite',
database: 'database/development.sqlite3',
models: 'app/models',
});
await realm.connect();
```
Leoric 默认使用 [mapbox/node-sqlite3](https://github.com/mapbox/node-sqlite3) 操作 SQLite 数据库,需要将 `leoric` 和 `sqlite3` 两个包都添加到依赖列表中:
```diff
diff --git a/package.json b/package.json
index cf91c34..7ae144d 100644
--- a/package.json
+++ b/package.json
@@ -45,6 +45,8 @@
"dependencies": {
+ "leoric": "^1.10.0",
+ "sqlite3": "^5.0.2",
```
### 配置项
#### `client`
可以通过 `client` 配置访问 SQLite 数据的客户端。例如,如果需要使用 sqlcipher 加密数据库文件,可以选择将客户端修改为 `@journeyapps/sqlcipher`:
```js
const realm = new Realm({
client: '@journeyapps/sqlcipher',
dialect: 'sqlite',
database: 'database/development.sqlite3',
models: 'app/models',
});
```
记得添加 `@journeyapps/sqlcipher` 到依赖列表。目前 `sqlite3` 和 `@journeyapps/sqlcipher` 都是默认支持的,两者也都在 Leoric 的持续集成测试中。
#### `trace`
Leoric 默认会尝试调用 `client.verbose()` 开启调用栈跟踪,从而在查询出现异常时更加清晰地反应到原始调用位置。这个辅助方法是 `sqlite3` 默认提供的,会对每次查询有一点点性能损耗,因为每次查询的时候都需要调用 `new Error()` 来记录异步调用发生前的调用栈。
```
1) => SQLite driver.query()
should support async stack trace:
Error: SQLITE_ERROR: no such table: missing
--> in Database#all('SELECT * FROM missing', undefined, [Function: Leoric_all])
at /Users/nil/Projects/cyjake/leoric/src/drivers/sqlite/connection.js:48:21
at new Promise ()
at Connection.all (src/drivers/sqlite/connection.js:47:12)
at Connection.query (src/drivers/sqlite/connection.js:39:33)
at SqliteDriver.query (src/drivers/sqlite/index.js:46:33)
at async Context. (test/unit/drivers/sqlite/index.test.js:181:7)
```
如果想要了解更多有关这个优化项的信息,可以访问 [!175](https://github.com/cyjake/leoric/pull/175).
也可以通过将 `trace` 设置为 `false` 来关闭这一行为。
#### `connectionLimit`
SQLite 本身是单文件的数据库,也没有服务端架构,因此没有提供连接池。为了优化数据读写,Leoric 在外层包装了连接池,可以通过 `connectionLimit` 设置连接数,默认连接数为 `10`。
通过多个具有读写能力的数据库连接来操作数据容易出现 `SQLITE_BUSY`,因为没有服务端来解决并发。有两种避免这种情况的办法,一种是将 `connectionLimit` 设置 `1` 来关闭多个数据库连接访问,另一种是配置 `busyTimeout` 让 `sqlite3` 客户端继续重试,直到等候时间超过 `busyTimeout`。
```js
const realm = new Realm({
dialect: 'sqlite',
database: 'database/development.sqlite3',
models: 'app/models',
connectionLimit: 1,
});
```
#### `busyTimeout`
`busyTimeout` 的单位是毫秒,默认设置为 `30000`。
```js
const realm = new Realm({
dialect: 'sqlite',
database: 'database/development.sqlite3',
models: 'app/models',
busyTimeout: 30000,
});
```
可以访问如下链接了解更多有关 `SQLITE_BUSY` 异常:
-
-
### 使用 SQLCipher
SQLCipher 和 SQLite 最主要的区别是,前者可以使用一个密钥来加密整个数据库文件。对前者来说,需要在所有数据库操作之前先设置密钥,不然会打不开数据库文件,报 `SQLITE_ERROR: file is not a database` 异常。
为了确保密钥会在第一时间设置,尤其是考虑到可能有多个数据库连接的情况,我们可以监听数据库连接池的 `connection` 事件:
```js
realm.driver.pool.on('connection', function(connection) {
connection.query('PRAGMA key = "Riddikulus!"');
});
```
## PostgreSQL 配置说明
### 快速上手
Leoric 支持 PostgreSQL,可以通过如下方式快速配置:
```js
const Realm = require('leoric');
const realm = new Realm({
dialect: 'postgres',
host: 'localhost',
user: 'test',
database: 'test',
models: 'app/models',
});
await realm.connect();
```
默认使用 [pg](https://node-postgres.com/) 访问 PostgreSQL 数据库,需要将 `pg` 和 `leoric` 一起添加到依赖列表中:
```diff
diff --git a/package.json b/package.json
index cf91c34..7ae144d 100644
--- a/package.json
+++ b/package.json
@@ -45,6 +45,8 @@
"dependencies": {
+ "leoric": "^1.10.0",
+ "pg": "^8.5.1",
```
### 配置项
#### `host`
需要连接的数据库服务主机名,默认为 `localhost`。
#### `port`
需要链接的数据库服务端口,默认为 `5432`。
#### `user`
有权限访问对应数据库的用户名。
#### `password`
有权限访问对应数据库的用户密码。
#### `database`
应用对应的数据库名称。
## 数据类型
### 概述
Leoric 通过 `DataTypes` 对象提供一组数据类型,用于在静态属性或装饰器中定义模型字段。
```js
import { Bone, DataTypes } from 'leoric';
const { STRING, BIGINT, TEXT, BOOLEAN } = DataTypes;
class User extends Bone {
static attributes = {
id: { type: BIGINT, primaryKey: true },
name: { type: STRING(100), allowNull: false },
bio: TEXT,
active: BOOLEAN,
}
}
```
### 字符串类型
#### `STRING(length)`
变长字符串,映射到 SQL 的 `VARCHAR`。
| 参数 | 默认值 | 说明 |
|---------|--------|---------------|
| `length`| `255` | 最大字符串长度 |
```js
STRING // VARCHAR(255)
STRING(100) // VARCHAR(100)
```
#### `CHAR(length)`
定长字符串。
```js
CHAR // CHAR(255)
CHAR(10) // CHAR(10)
```
#### `TEXT(length)`
长文本类型。`length` 参数控制大小变体。
| 变体 | SQL 类型 |
|--------------------|---------------|
| `TEXT` | `TEXT` |
| `TEXT('tiny')` | `TINYTEXT` |
| `TEXT('medium')` | `MEDIUMTEXT` |
| `TEXT('long')` | `LONGTEXT` |
```js
import { DataTypes, LENGTH_VARIANTS } from 'leoric';
TEXT // TEXT
TEXT(LENGTH_VARIANTS.tiny) // TINYTEXT
TEXT(LENGTH_VARIANTS.medium) // MEDIUMTEXT
TEXT(LENGTH_VARIANTS.long) // LONGTEXT
```
### 数值类型
#### `INTEGER(length)`
32 位整数。支持 `UNSIGNED` 和 `ZEROFILL` 修饰符。
```js
INTEGER // INTEGER
INTEGER(10) // INTEGER(10)
INTEGER.UNSIGNED // INTEGER UNSIGNED
```
#### `TINYINT(length)`
8 位整数。
```js
TINYINT // TINYINT
TINYINT(1) // TINYINT(1) - MySQL 中常用作布尔值
TINYINT.UNSIGNED // TINYINT UNSIGNED
```
#### `SMALLINT(length)`
16 位整数。
```js
SMALLINT // SMALLINT
SMALLINT.UNSIGNED // SMALLINT UNSIGNED
```
#### `MEDIUMINT(length)`
24 位整数。
```js
MEDIUMINT // MEDIUMINT
MEDIUMINT.UNSIGNED // MEDIUMINT UNSIGNED
```
#### `BIGINT(length)`
64 位整数。常用于主键。
```js
BIGINT // BIGINT
BIGINT.UNSIGNED // BIGINT UNSIGNED
```
> **注意**:JavaScript 无法安全表示大于 `Number.MAX_SAFE_INTEGER`(2^53 - 1)的整数。对于超大数值,返回值可能是字符串。
#### `DECIMAL(precision, scale)`
定点小数类型,适用于金融数据。
```js
DECIMAL // DECIMAL
DECIMAL(10, 2) // DECIMAL(10,2) - 共 10 位,小数点后 2 位
DECIMAL.UNSIGNED // DECIMAL UNSIGNED
```
#### `BOOLEAN`
布尔类型,映射到 SQL 的 `BOOLEAN`。
```js
BOOLEAN // BOOLEAN
```
### 日期与时间类型
#### `DATE(precision, timezone)`
日期时间类型,映射到 SQL 的 `DATETIME` 或 `TIMESTAMP`。
| 参数 | 默认值 | 说明 |
|------------|--------|----------------------------------------|
| `precision`| — | 小数秒精度(0-6) |
| `timezone` | `true` | 启用时区支持(仅 PostgreSQL) |
```js
DATE // DATETIME
DATE(3) // DATETIME(3) - 毫秒精度
DATE(6) // DATETIME(6) - 微秒精度
```
#### `DATEONLY`
仅日期类型,不含时间部分。映射到 SQL 的 `DATE`。
```js
DATEONLY // DATE
```
### 二进制类型
#### `BINARY(length)`
定长二进制数据。
```js
BINARY // BINARY(255)
BINARY(16) // BINARY(16)
```
#### `VARBINARY(length)`
变长二进制数据。
```js
VARBINARY // VARBINARY
VARBINARY(255) // VARBINARY(255)
```
#### `BLOB(length)`
二进制大对象。
| 变体 | SQL 类型 |
|----------------------|---------------|
| `BLOB` | `BLOB` |
| `BLOB('tiny')` | `TINYBLOB` |
| `BLOB('medium')` | `MEDIUMBLOB` |
| `BLOB('long')` | `LONGBLOB` |
### JSON 类型
#### `JSON`
JSON 文本类型。在数据库中存储为 `TEXT`,但自动进行序列化/反序列化。
```js
import { DataTypes } from 'leoric';
class Post extends Bone {
static attributes = {
meta: DataTypes.JSON,
}
}
```
#### `JSONB`
原生 JSON 二进制类型。在 PostgreSQL 和 MySQL 5.7+ 中可用,以原生 `JSON` 类型存储。
```js
class Post extends Bone {
static attributes = {
extra: DataTypes.JSONB,
}
}
```
更多关于查询和更新 JSON 数据的内容,请参阅 [JSON 字段]({{ '/zh/json' | relative_url }})。
### 虚拟类型
#### `VIRTUAL`
虚拟列,不会持久化到数据库。适用于计算属性。
```js
class User extends Bone {
static attributes = {
firstName: STRING,
lastName: STRING,
fullName: {
type: VIRTUAL,
get() {
return `${this.firstName} ${this.lastName}`;
},
},
}
}
```
### LENGTH_VARIANTS
`LENGTH_VARIANTS` 枚举为 `TEXT` 和 `BLOB` 类型提供命名大小变体:
```js
import { LENGTH_VARIANTS } from 'leoric';
LENGTH_VARIANTS.tiny // 'tiny'
LENGTH_VARIANTS.empty // ''(默认)
LENGTH_VARIANTS.medium // 'medium'
LENGTH_VARIANTS.long // 'long'
```
### 配合 TypeScript 装饰器使用
使用 TypeScript 时,数据类型可以通过 `@Column` 装饰器指定:
```ts
import { Bone, Column, DataTypes } from 'leoric';
const { TEXT, SMALLINT, JSONB } = DataTypes;
class User extends Bone {
@Column({ primaryKey: true })
id: bigint;
@Column()
name: string; // 推断为 STRING
@Column({ type: SMALLINT })
age: number; // 覆盖:使用 SMALLINT 而非 INTEGER
@Column(TEXT)
bio: string; // 覆盖:使用 TEXT 而非 STRING
@Column(JSONB)
meta: Record;
@Column()
createdAt: Date; // 推断为 DATE
}
```
更多类型推断详情请参阅 [TypeScript 支持]({{ '/zh/types' | relative_url }})。
### 数据库方言差异
| Leoric 类型 | MySQL | PostgreSQL | SQLite |
|-------------|--------------------|--------------------|-----------|
| `STRING` | `VARCHAR` | `VARCHAR` | `TEXT` |
| `TEXT` | `TEXT` | `TEXT` | `TEXT` |
| `INTEGER` | `INT` | `INTEGER` | `INTEGER` |
| `BIGINT` | `BIGINT` | `BIGINT` | `INTEGER` |
| `BOOLEAN` | `TINYINT(1)` | `BOOLEAN` | `INTEGER` |
| `DATE` | `DATETIME` | `TIMESTAMP` | `TEXT` |
| `DATEONLY` | `DATE` | `DATE` | `TEXT` |
| `JSONB` | `JSON` | `JSONB` | `TEXT` |
| `BLOB` | `BLOB` | `BYTEA` | `BLOB` |
| `DECIMAL` | `DECIMAL` | `DECIMAL`/`NUMERIC` | `REAL` |
## 事务
### 概述
事务确保一组数据库操作要么全部成功,要么全部失败回滚。Leoric 通过 `Bone.transaction()` 和 `realm.transaction()` 支持事务,同时兼容异步函数和生成器函数。
### 基本用法
#### 使用异步函数
最常见的事务用法是传入异步函数。如果函数正常完成,事务会自动提交;如果抛出异常,事务会自动回滚。
```js
import { Bone } from 'leoric';
await Bone.transaction(async ({ connection }) => {
const post = await Post.create({ title: '新文章' }, { connection });
await Comment.create({ postId: post.id, content: '沙发!' }, { connection });
});
```
> **重要**:在事务内的每个查询都必须传入 `{ connection }`,以确保它们使用同一个数据库连接。否则查询会在事务之外执行。
#### 使用生成器函数
生成器函数提供了一种更便捷的方式,连接会自动传递给 yield 的 Spell 查询:
```js
await Bone.transaction(function* () {
const post = yield Post.create({ title: '新文章' });
yield Comment.create({ postId: post.id, content: '沙发!' });
});
```
使用生成器函数时,Leoric 会自动拦截 yield 的 `Spell` 实例,并将事务连接赋给它们。这样就无需手动给每个查询传递 `{ connection }`。
### 使用 `realm.transaction()`
如果你有 `Realm` 实例,也可以通过它来开启事务:
```js
const realm = new Realm({ /* 配置项 */ });
await realm.connect();
await realm.transaction(async ({ connection }) => {
await Post.create({ title: '你好' }, { connection });
await User.update({ id: 1 }, { lastPostAt: new Date() }, { connection });
});
```
### 错误处理与回滚
如果事务回调内抛出任何异常,整个事务将自动回滚:
```js
try {
await Bone.transaction(async ({ connection }) => {
await Post.create({ title: '新文章' }, { connection });
// 这将导致整个事务回滚
throw new Error('出了点问题');
});
} catch (err) {
console.error('事务失败:', err.message);
// Post 和其他操作都不会被创建
}
```
### 手动提交和回滚
事务回调还接收 `commit` 和 `rollback` 函数,用于高级控制:
```js
await Bone.transaction(async ({ connection, commit, rollback }) => {
await Post.create({ title: '新文章' }, { connection });
const result = await someExternalService();
if (!result.ok) {
await rollback();
return;
}
// 如果没有手动提交或回滚,函数结束时仍会自动提交
});
```
### 事务与钩子
模型钩子(如 `beforeCreate`、`afterUpdate`)在事务内触发时,会在同一个连接上下文中执行。这确保了钩子中的数据库操作也是同一事务的一部分。
```js
class Post extends Bone {
static afterCreate(post, result) {
// 如果 Post.create 是在事务内调用的,这里也在事务内执行
return AuditLog.create({
action: 'create',
modelName: 'Post',
modelId: post.id,
});
}
}
```
### 最佳实践
1. **使用异步函数时务必传递 `connection`**。不传的话查询会在事务之外运行。
2. **优先使用生成器函数**——当所有操作都是 Leoric 查询时,代码更简洁。
3. **保持事务简短**。长时间运行的事务可能导致锁竞争和性能问题。
4. **妥善处理错误**。需要优雅处理失败时,用 try-catch 包裹事务。
5. **避免嵌套事务**。Leoric 目前不支持 savepoint。如果需要嵌套事务行为,请重构代码使用单个事务。
## 原始查询
### 概述
虽然 Leoric 的查询接口覆盖了大部分场景,但有时你需要直接执行原始 SQL。Leoric 提供了几种使用原始 SQL 的方式:`realm.query()`、`Model.query()`、`raw()` 函数以及 `heresql` 模板辅助函数。
### `realm.query(sql, values, options)`
通过 `Realm` 实例执行原始 SQL 查询:
```js
const result = await realm.query('SELECT * FROM posts WHERE id = ?', [1]);
console.log(result.rows);
// => [{ id: 1, title: 'Hello', content: '...' }]
```
#### 返回值
返回对象包含:
| 属性 | 类型 | 说明 |
|---------------|----------|----------------------------------------------|
| `rows` | `Array` | 查询结果行 |
| `fields` | `Array` | 列元数据(table, name) |
| `affectedRows`| `number` | 受影响的行数(INSERT/UPDATE/DELETE) |
| `insertId` | `number` | 自动生成的 ID(INSERT) |
#### 参数化查询
始终使用参数化查询来防止 SQL 注入:
```js
// 正确 - 参数化
const result = await realm.query(
'SELECT * FROM posts WHERE title = ? AND author_id = ?',
['Hello', 42]
);
// 错误 - SQL 注入风险!
const result = await realm.query(
`SELECT * FROM posts WHERE title = '${title}'`
);
```
#### 命名替换
可以使用 `:name` 语法进行命名替换:
```js
const result = await realm.query(
'SELECT * FROM posts WHERE title = :title AND author_id = :authorId',
{
replacements: {
title: 'Hello',
authorId: 42,
},
}
);
```
#### 返回模型实例
传入 `model` 选项可以将结果作为模型实例返回,而非普通对象:
```js
const result = await realm.query(
'SELECT * FROM posts WHERE id = ?',
{ model: Post, replacements: {} }
);
// result.rows 现在是 Post 实例
const post = result.rows[0];
console.log(post instanceof Post); // true
console.log(post.title);
```
#### 在事务中使用
```js
await realm.transaction(async ({ connection }) => {
await realm.query(
'UPDATE posts SET title = ? WHERE id = ?',
['新标题', 1],
{ connection }
);
});
```
### `Model.query(sql, values)`(v2.14+)
从 v2.14 开始,可以直接从模型类执行原始查询:
```js
const result = await Post.query('SELECT * FROM posts WHERE id = ?', [1]);
```
### `raw()` 函数
`raw()` 函数创建一个不会被转义的 `Raw` SQL 表达式。适用于在查询中使用 SQL 函数或表达式:
```js
import { raw } from 'leoric';
// 使用 SQL 函数
await Post.update({ id: 1 }, { updatedAt: raw('NOW()') });
// UPDATE posts SET updated_at = NOW() WHERE id = 1
// 在 where 子句中使用
const posts = await Post.find({
createdAt: raw('NOW() - INTERVAL 7 DAY'),
});
```
也可以通过 `Realm` 实例访问 `raw()`:
```js
await Post.update({ id: 1 }, { updatedAt: realm.raw('NOW()') });
```
> **警告**:`raw()` 会绕过转义。永远不要将用户输入直接传给 `raw()`,否则会导致 SQL 注入漏洞。
### `Raw` 类
`Raw` 是底层实现类。可以直接使用或通过 `Raw.build()` 创建:
```js
import { Raw } from 'leoric';
const expr = new Raw('COUNT(*)');
const expr2 = Raw.build('COUNT(*)');
```
### `heresql` 辅助函数
`heresql` 函数将多行 SQL 字符串格式化为单行查询,便于日志输出和提高源码可读性:
```js
import { heresql } from 'leoric';
const sql = heresql(`
SELECT *
FROM posts
WHERE author_id = ?
ORDER BY created_at DESC
LIMIT 10
`);
// => 'SELECT * FROM posts WHERE author_id = ? ORDER BY created_at DESC LIMIT 10'
```
它会修剪每行的空白并用单个空格连接,使多行 SQL 在源码中更易读,同时生成干净的单行 SQL 用于执行。
### 安全注意事项
1. **始终使用参数化查询**处理用户提供的值。永远不要将用户输入拼接到 SQL 字符串中。
2. **谨慎使用 `raw()`**。仅用于 SQL 函数和表达式,绝不用于用户输入。
3. 在确实需要插值时**使用 `realm.escape()`**,但参数化查询始终是首选。
```js
// 推荐:参数化
await realm.query('SELECT * FROM posts WHERE title = ?', [userInput]);
// 如果必须手动转义
const escaped = realm.escape(userInput);
```
## 软删除
### 概述
软删除(也称为"paranoid"模式)允许你标记记录为已删除,而不是真正从数据库中移除。系统不会执行 `DELETE` 语句,而是将记录的 `deletedAt` 列设置为当前时间戳。
适用场景:
- 保留数据用于审计或合规
- 允许用户恢复误删记录
- 在隐藏记录的同时维护引用完整性
### 启用软删除
要在模型上启用软删除,只需添加 `deletedAt` 属性:
#### JavaScript
```js
import { Bone, DataTypes } from 'leoric';
class Post extends Bone {
static attributes = {
id: { type: DataTypes.BIGINT, primaryKey: true },
title: DataTypes.STRING,
deletedAt: DataTypes.DATE, // 启用软删除
}
}
```
#### TypeScript
```ts
import { Bone, Column } from 'leoric';
class Post extends Bone {
@Column({ primaryKey: true })
id: bigint;
@Column()
title: string;
@Column()
deletedAt: Date; // 启用软删除
}
```
#### 基于表结构(不显式定义属性)
如果你没有显式定义属性,而是让 Leoric 从数据库表结构推断,当表中存在 `deleted_at` 列时会自动启用软删除。
### 工作原理
#### 删除记录
启用软删除后,调用 `.remove()` 会更新 `deletedAt` 列而非删除行:
```js
const post = await Post.findOne({ id: 1 });
await post.remove();
// SQL: UPDATE posts SET deleted_at = '2026-03-26 00:00:00' WHERE id = 1
```
静态方法:
```js
await Post.remove({ id: 1 });
// SQL: UPDATE posts SET deleted_at = '2026-03-26 00:00:00' WHERE id = 1
```
#### 查询
默认情况下,所有查询会自动排除已软删除的记录:
```js
const posts = await Post.find();
// SQL: SELECT * FROM posts WHERE deleted_at IS NULL
const post = await Post.findOne({ id: 1 });
// SQL: SELECT * FROM posts WHERE id = 1 AND deleted_at IS NULL LIMIT 1
```
#### 强制删除(硬删除)
要从数据库中永久删除记录,传入 `true` 给 `.remove()`:
```js
// 实例方法
const post = await Post.findOne({ id: 1 });
await post.remove(true);
// SQL: DELETE FROM posts WHERE id = 1
// 静态方法
await Post.remove({ id: 1 }, true);
// SQL: DELETE FROM posts WHERE id = 1
```
### 查询已软删除的记录
#### `unscoped`
使用 `.unscoped` 在查询中包含已软删除的记录:
```js
const allPosts = await Post.unscoped.find();
// SQL: SELECT * FROM posts(不添加 WHERE deleted_at IS NULL 过滤)
```
#### `paranoid: false`
也可以在特定查询中传入 `paranoid: false`:
```js
await Post.update({ title: '已更新' }, { where: { id: 1 }, paranoid: false });
```
### 恢复已软删除的记录
#### 实例方法
```js
// 先通过 unscoped 找到已软删除的记录
const post = await Post.findOne({ id: 1 }).unparanoid;
await post.restore();
// SQL: UPDATE posts SET deleted_at = NULL WHERE id = 1 AND deleted_at IS NOT NULL
```
#### 静态方法
```js
await Post.restore({ id: 1 });
// SQL: UPDATE posts SET deleted_at = NULL WHERE id = 1 AND deleted_at IS NOT NULL
```
> **注意**:如果模型未启用软删除(即没有 `deletedAt` 属性),`restore()` 会抛出错误。
### 软删除与关联
启用软删除的模型,其关联也会遵守 `deletedAt` 作用域。通过 `include()` 或 `with()` 加载关联记录时,已软删除的关联记录会被自动过滤。
```js
class Post extends Bone {
static initialize() {
this.hasMany('comments');
}
}
class Comment extends Bone {
static attributes = {
deletedAt: DataTypes.DATE,
}
}
const post = await Post.findOne({ id: 1 }).with('comments');
// deletedAt 非空的评论会被排除
```
### 时间戳
软删除与 Leoric 的自动时间戳管理协同工作。当记录被软删除时:
- `deletedAt` 设置为当前日期/时间
- `updatedAt` 在软删除操作期间**不会**自动更新
当记录被恢复时:
- `deletedAt` 设置为 `null`
## 索引提示
### 概述
索引提示允许你建议或强制数据库引擎在执行查询时使用哪些索引。Leoric 支持 MySQL 索引提示(`USE INDEX`、`FORCE INDEX`、`IGNORE INDEX`)和优化器提示。
> **注意**:索引提示主要是 MySQL 特性。PostgreSQL 和 SQLite 有不同的查询优化机制。
### Use Index
建议数据库使用指定索引。优化器可能会选择忽略此建议。
```js
Post.find().useIndex('idx_title')
// SELECT * FROM posts USE INDEX (idx_title)
// 多个索引
Post.find().useIndex('idx_title', 'idx_created_at')
// SELECT * FROM posts USE INDEX (idx_title,idx_created_at)
```
### Force Index
强制数据库使用指定索引。除非没有匹配的行,否则优化器不会考虑全表扫描。
```js
Post.find().forceIndex('idx_title')
// SELECT * FROM posts FORCE INDEX (idx_title)
```
### Ignore Index
告诉数据库不要使用指定索引。
```js
Post.find().ignoreIndex('idx_title')
// SELECT * FROM posts IGNORE INDEX (idx_title)
```
### 带作用域的索引提示
可以使用作用域对象将索引提示限制在特定查询阶段:
#### 用于 JOIN
```js
Post.find().useIndex({ join: 'idx_user_id' })
// SELECT * FROM posts USE INDEX FOR JOIN (idx_user_id)
```
#### 用于 ORDER BY
```js
Post.find().useIndex({ orderBy: 'idx_created_at' })
// SELECT * FROM posts USE INDEX FOR ORDER BY (idx_created_at)
```
#### 用于 GROUP BY
```js
Post.find().useIndex({ groupBy: 'idx_author_id' })
// SELECT * FROM posts USE INDEX FOR GROUP BY (idx_author_id)
```
#### 组合多个作用域提示
```js
Post.find().useIndex(
'idx_id',
{ orderBy: ['idx_title', 'idx_org_id'] },
{ groupBy: 'idx_type' }
)
```
### 对象语法
如需更精细的控制,可以传入包含 `index`、`type` 和 `scope` 属性的对象:
```js
import { INDEX_HINT_TYPE, INDEX_HINT_SCOPE } from 'leoric';
Post.find().useIndex({
index: 'idx_title',
type: INDEX_HINT_TYPE.force,
scope: INDEX_HINT_SCOPE.orderBy,
})
// SELECT * FROM posts FORCE INDEX FOR ORDER BY (idx_title)
```
### 优化器提示
MySQL 优化器提示嵌入在 `/*+ ... */` 注释中:
```js
Post.find().optimizerHints('SET_VAR(foreign_key_checks=OFF)')
// SELECT /*+ SET_VAR(foreign_key_checks=OFF) */ * FROM posts
Post.find().optimizerHints(
'SET_VAR(foreign_key_checks=OFF)',
'MAX_EXECUTION_TIME(1000)'
)
// SELECT /*+ SET_VAR(foreign_key_checks=OFF) MAX_EXECUTION_TIME(1000) */ * FROM posts
```
### 与其他查询方法链式调用
索引提示可以与所有其他查询方法链式调用:
```js
Post
.find({ authorId: 1 })
.forceIndex('idx_author_id')
.order('createdAt', 'desc')
.limit(10)
```
## Realm
### 概述
`Realm` 是 Leoric 的核心入口类,负责管理数据库连接、模型注册、表结构同步,并提供原始查询和事务等方法。
```js
import Realm from 'leoric';
const realm = new Realm({
dialect: 'mysql',
host: 'localhost',
user: 'root',
database: 'my_app',
models: 'app/models',
});
await realm.connect();
```
### 构造函数选项
`Realm` 构造函数接受以下配置项:
| 选项 | 类型 | 默认值 | 说明 |
|--------------------|-------------------------------|------------|-----------------------------------------------------------------------------|
| `dialect` | `string` | `'mysql'` | 数据库方言:`'mysql'`、`'postgres'` 或 `'sqlite'` |
| `client` | `string` | — | 客户端模块名:`'mysql'`、`'mysql2'`、`'pg'`、`'sqlite3'`、`'@journeyapps/sqlcipher'` |
| `dialectModulePath`| `string` | — | `client` 的别名 |
| `host` | `string` | — | 数据库主机地址 |
| `port` | `number \| string` | — | 数据库端口 |
| `user` | `string` | — | 数据库用户名 |
| `password` | `string` | — | 数据库密码 |
| `database` | `string` | — | 数据库名(别名:`db`、`storage`) |
| `models` | `Array \| string` | — | 模型类数组,或模型文件目录路径 |
| `subclass` | `boolean` | `false` | 是否创建 `Bone` 的子类来隔离模型 |
| `driver` | `AbstractDriver` | — | 自定义驱动类 |
| `define` | `object` | — | 默认模型定义选项,如 `{ underscored: true }` |
| `logger` | `object` | — | 自定义日志,详见[日志]({{ '/zh/logging' | relative_url }}) |
| `charset` | `string` | — | 数据库字符集 |
| `idleTimeout` | `number` | — | 连接空闲超时时间(毫秒) |
| `sequelize` | `boolean` | `false` | 启用 Sequelize 兼容适配器 |
| `skipCloneValue` | `boolean` | `false` | 跳过属性值克隆以提升性能(v2.14+) |
#### models 为目录路径
当 `models` 为字符串时,Leoric 会扫描该目录下所有 `.js`、`.mjs` 和 `.ts` 文件,自动加载导出了 `Bone` 子类的模型:
```js
const realm = new Realm({
dialect: 'mysql',
host: 'localhost',
database: 'my_app',
models: 'app/models', // 扫描此目录
});
```
#### models 为数组
也可以直接传入模型类数组:
```js
import Post from './models/post';
import User from './models/user';
const realm = new Realm({
dialect: 'mysql',
host: 'localhost',
database: 'my_app',
models: [Post, User],
});
```
### 连接数据库
#### `realm.connect()`
连接数据库并初始化所有模型。此方法会从数据库获取表结构信息,映射到已注册的模型上。
```js
await realm.connect();
// 模型已就绪
const posts = await Post.find();
```
#### `realm.disconnect()`
断开数据库连接并释放连接池。
```js
await realm.disconnect();
```
也可以传入一个回调函数,在释放连接前执行:
```js
await realm.disconnect(async () => {
console.log('正在清理...');
});
```
### 使用 `connect()` 快捷方式
对于简单场景,可以直接使用 `leoric` 导出的 `connect()` 函数,无需显式创建 `Realm` 实例:
```js
import { Bone, connect } from 'leoric';
class Post extends Bone {}
await connect({
host: 'localhost',
database: 'my_app',
models: [Post],
});
// Post 已就绪
const posts = await Post.find();
```
> **注意**:默认 `Bone` 只能调用一次 `connect()`。如需连接多个数据库,请使用独立的 `Realm` 实例。
### 动态定义模型
#### `realm.define(name, attributes, options, descriptors)`
在运行时动态定义模型,无需创建单独的类文件。
```js
const { BIGINT, STRING, TEXT } = realm.DataTypes;
const Post = realm.define('Post', {
id: { type: BIGINT, primaryKey: true },
title: STRING,
content: TEXT,
});
await realm.sync();
// 现在可以使用模型了
await Post.create({ title: '你好', content: '世界' });
```
**参数说明:**
| 参数 | 类型 | 说明 |
|---------------|----------|------------------------------------|
| `name` | `string` | 模型名称(将用于推断表名) |
| `attributes` | `object` | 列定义 |
| `options` | `object` | 可选的模型初始化选项 |
| `descriptors` | `object` | 可选的属性描述符 |
### 表结构同步
#### `realm.sync(options)`
将模型定义同步到数据库。会创建不存在的表,并可选地修改已有表以匹配模型定义。
```js
await realm.sync();
```
**选项:**
| 选项 | 类型 | 默认值 | 说明 |
|---------|-----------|---------|--------------------------------------------------|
| `force` | `boolean` | `false` | 先删除已有表再创建(破坏性操作!) |
| `alter` | `boolean` | `false` | 修改已有表以匹配模型定义 |
```js
// 创建不存在的表
await realm.sync();
// 删除并重建所有表(警告:会丢失数据!)
await realm.sync({ force: true });
// 修改已有表以匹配模型
await realm.sync({ alter: true });
```
> **警告**:`realm.sync({ force: true })` 会删除所有已有表,请谨慎使用,切勿在生产环境中使用!
### 原始查询
#### `realm.query(sql, values, options)`
执行原始 SQL 查询。
```js
const result = await realm.query('SELECT * FROM posts WHERE id = ?', [1]);
console.log(result.rows); // => [{ id: 1, title: '...', ... }]
```
详见[原始查询]({{ '/zh/raw-query' | relative_url }})。
#### `realm.raw(sql)`
创建一个不会被转义的 `Raw` SQL 表达式。
```js
await Post.update({ title: '新标题' }, {
updatedAt: realm.raw('NOW()'),
});
```
#### `realm.escape(value)`
转义一个值以安全地用于 SQL 查询。
```js
const safe = realm.escape("O'Reilly");
// => "'O\\'Reilly'"
```
### 事务
#### `realm.transaction(callback)`
开启一个事务。回调函数会接收一个 `{ connection }` 对象,确保事务内所有查询使用同一个连接。
```js
await realm.transaction(async ({ connection }) => {
await Post.create({ title: '你好' }, { connection });
await Comment.create({ postId: 1, content: '世界' }, { connection });
});
```
详见[事务]({{ '/zh/transactions' | relative_url }})。
### 多数据库实例
可以创建多个 `Realm` 实例来连接不同的数据库:
```js
const realmA = new Realm({
dialect: 'mysql',
database: 'app_primary',
models: [User, Post],
subclass: true, // 隔离模型
});
const realmB = new Realm({
dialect: 'postgres',
database: 'app_analytics',
models: [Event, Metric],
subclass: true, // 隔离模型
});
await realmA.connect();
await realmB.connect();
```
> **重要**:使用多个 `Realm` 实例时,请设置 `subclass: true`,以确保不同 realm 的模型不共享同一个 `Bone` 基类内部状态。
### 属性
| 属性 | 类型 | 说明 |
|------------------|-----------|-------------------------------|
| `realm.Bone` | `class` | 此 realm 的基础模型类 |
| `realm.models` | `object` | 已注册模型名到类的映射 |
| `realm.driver` | `object` | 数据库驱动实例 |
| `realm.connected`| `boolean` | 是否已连接 |
| `realm.DataTypes`| `object` | 数据类型构造器 |
## 最佳实践
### 避免 N+1 查询问题
当你加载一组记录,然后为每条记录的关联分别发起查询时,就会产生 N+1 查询问题。
#### 问题
```js
// 差:1 次查询文章 + N 次查询评论
const posts = await Post.find({ authorId: 1 });
for (const post of posts) {
post.comments = await Comment.find({ postId: post.id });
}
```
#### 解决方案:预加载
使用 `.with()` 或 `.include()` 在单次查询中加载关联:
```js
// 好:1 次 JOIN 查询
const posts = await Post.find({ authorId: 1 }).with('comments');
for (const post of posts) {
console.log(post.comments); // 已加载
}
```
可以同时加载多个关联:
```js
const posts = await Post.find().with('author', 'comments');
```
### 只查询需要的列
默认情况下,Leoric 会查询所有列(`SELECT *`)。当只需要特定列时,使用 `.select()`:
```js
// 差:加载所有列,包括大文本字段
const posts = await Post.find();
// 好:只加载需要的
const posts = await Post.find().select('id', 'title', 'createdAt');
```
对于有大 `TEXT` 或 `BLOB` 列的表尤其重要。
### 大表的批量处理
处理大表时,避免一次性加载所有记录到内存。使用分页:
```js
// 差:全部加载到内存
const allPosts = await Post.find();
// 好:分批处理
const pageSize = 100;
let offset = 0;
while (true) {
const posts = await Post.find().limit(pageSize).offset(offset);
if (posts.length === 0) break;
for (const post of posts) {
// 处理每条记录
}
offset += pageSize;
}
```
### 连接池管理
#### 配置空闲超时
对于长时间运行的应用,配置空闲超时以防止过期连接:
```js
const realm = new Realm({
host: 'localhost',
database: 'my_app',
idleTimeout: 30000, // 30 秒
});
```
#### 关闭时断开连接
应用关闭时务必断开连接:
```js
process.on('SIGTERM', async () => {
await realm.disconnect();
process.exit(0);
});
```
### 事务最佳实践
#### 保持事务简短
```js
// 差:事务内调用外部 API 会长时间占用连接
await Bone.transaction(async ({ connection }) => {
const user = await User.create({ name: 'Alice' }, { connection });
const result = await fetch('https://api.example.com/notify'); // 慢!
await AuditLog.create({ action: 'user_created' }, { connection });
});
// 好:将外部调用移到事务之外
const user = await Bone.transaction(async ({ connection }) => {
const user = await User.create({ name: 'Alice' }, { connection });
await AuditLog.create({ action: 'user_created' }, { connection });
return user;
});
await fetch('https://api.example.com/notify');
```
#### 使用生成器函数简化代码
```js
// 生成器函数自动传递 connection
await Bone.transaction(function* () {
const user = yield User.create({ name: 'Alice' });
yield AuditLog.create({ action: 'user_created', userId: user.id });
});
```
### 索引策略
#### 为常见查询模式使用复合索引
如果你经常使用多条件查询:
```js
// 如果这是常见的查询模式:
Post.find({ authorId: 1, status: 'published' }).order('createdAt', 'desc')
```
考虑添加复合索引:`(author_id, status, created_at)`。
#### 需要时使用索引提示
当查询优化器做出次优选择时:
```js
Post.find({ authorId: 1 }).forceIndex('idx_author_created')
```
详见[索引提示]({{ '/zh/index-hints' | relative_url }})。
### 模型组织
#### 使用目录方式加载模型
```js
const realm = new Realm({
models: 'app/models', // 自动从目录加载所有模型
});
```
#### 在 `initialize()` 中定义关联
```js
class Post extends Bone {
static initialize() {
this.belongsTo('author', { Model: 'User' });
this.hasMany('comments');
this.hasMany('tags', { through: 'tagMaps' });
}
}
```
#### 尽可能使用 TypeScript 装饰器
```ts
class Post extends Bone {
@Column({ primaryKey: true })
id: bigint;
@BelongsTo()
author: User;
@HasMany()
comments: Comment[];
}
```
### 安全
#### 永远不要在原始 SQL 中使用用户输入
```js
// 差:SQL 注入漏洞
await realm.query(`SELECT * FROM posts WHERE title = '${userInput}'`);
// 好:参数化查询
await realm.query('SELECT * FROM posts WHERE title = ?', [userInput]);
// 好:使用 ORM 查询接口
await Post.find({ title: userInput });
```
#### 谨慎使用 `raw()`
`raw()` 函数绕过转义。只用于 SQL 函数和表达式,绝不用于用户提供的值:
```js
// 好:SQL 函数
await Post.update({ id: 1 }, { viewCount: raw('view_count + 1') });
// 差:在 raw() 中使用用户输入
await Post.find({ title: raw(userInput) }); // SQL 注入!
```
## 错误排查
### 连接问题
#### `Error: connect ECONNREFUSED ::1:3306`
这是 macOS 上的常见问题,`localhost` 解析为 IPv6 的 `::1`,但 MySQL 只监听 `127.0.0.1`。
**解决方案**:更新 MySQL 配置,同时绑定 IPv6:
```diff
# /usr/local/etc/my.cnf (Homebrew MySQL)
[mysqld]
-bind-address = 127.0.0.1
+bind-address = 127.0.0.1,::1
```
然后重启 MySQL:
```bash
brew services mysql restart
```
或者在连接配置中使用 `127.0.0.1` 代替 `localhost`:
```js
const realm = new Realm({
host: '127.0.0.1', // 使用 IP 而非 'localhost'
database: 'my_app',
});
```
#### `Error: connected already`
在默认 `Bone` 类上多次调用 `connect()` 时会出现此错误。
**解决方案**:
- 在应用生命周期中只调用一次 `connect()`
- 使用独立的 `Realm` 实例并设置 `subclass: true` 来管理多个连接
```js
// 错误:两次调用 connect
await connect({ models: [Post], database: 'db1' });
await connect({ models: [User], database: 'db2' }); // 报错!
// 正确:使用独立 Realm 实例
const realm1 = new Realm({ models: [Post], database: 'db1', subclass: true });
const realm2 = new Realm({ models: [User], database: 'db2', subclass: true });
await realm1.connect();
await realm2.connect();
```
#### `Error: DriverClass must be a subclass of AbstractDriver`
这通常发生在直接使用 `BaseRealm` 而非完整的 `Realm` 类时,或者 `dialect` 选项没有匹配到可用的驱动。
**解决方案**:确保从 `leoric` 导入 `Realm`(而非 `BaseRealm`),并安装了正确的数据库客户端:
```bash
# MySQL
npm install mysql2
# PostgreSQL
npm install pg
# SQLite
npm install sqlite3
```
### 模型问题
#### `Error: Model is not paranoid`
在未启用软删除的模型上调用 `restore()` 时出现此错误。
**解决方案**:为模型添加 `deletedAt` 属性。详见[软删除]({{ '/zh/soft-delete' | relative_url }})。
#### 列名未映射到属性
默认情况下,Leoric 将 `snake_case` 列名映射为 `camelCase` 属性。如果你的列名不遵循此约定,使用 `name` 选项:
```ts
@Column({ name: 'gmt_create' })
createdAt: Date;
```
#### `createdAt` / `updatedAt` 未自动更新
如果表中存在 `created_at` 和 `updated_at` 列,Leoric 会自动管理这些时间戳。确保你的表有这些列。
要在特定操作中禁止自动更新时间戳,传入 `{ silent: true }`:
```js
await post.update({ title: '已更新' }, { silent: true });
```
### 查询问题
#### 软删除导致的意外结果
如果你看不到预期的记录,它们可能已被软删除。使用 `.unscoped` 包含所有记录:
```js
// 排除已软删除的记录
const posts = await Post.find();
// 包含所有记录
const allPosts = await Post.unscoped.find();
```
#### N+1 查询问题
如果你在循环中加载关联,很可能遇到了 N+1 问题:
```js
// 差:N+1 查询
const posts = await Post.find();
for (const post of posts) {
const comments = await Comment.find({ postId: post.id }); // N 次查询!
}
// 好:预加载
const posts = await Post.find().with('comments'); // 1 次 JOIN 查询
```
详见[最佳实践]({{ '/zh/best-practices' | relative_url }})。
### 调试
#### 开启调试日志
Leoric 使用 `debug` 模块。通过以下方式开启 SQL 日志:
```bash
DEBUG=leoric node app.js
```
#### 自定义日志
可以提供自定义日志器来查看所有查询:
```js
const realm = new Realm({
logger: {
logQuery(sql, duration) {
console.log(`[${duration}ms] ${sql}`);
},
logQueryError(err, sql, duration) {
console.error(`[${duration}ms] ${sql}\n Error: ${err.message}`);
},
logMigration(name) {
console.log(`Migration: ${name}`);
},
},
});
```
详见[日志]({{ '/zh/logging' | relative_url }})。
### TypeScript 问题
#### `emitDecoratorMetadata` 错误
如果装饰器类型推断不工作,确保 `tsconfig.json` 中有:
```json
{
"compilerOptions": {
"experimentalDecorators": true,
"emitDecoratorMetadata": true
}
}
```
#### `bigint` 类型错误
JavaScript 的 `bigint` 类型需要特殊处理:
```ts
// 正确:使用 bigint 类型
@Column({ primaryKey: true })
id: bigint;
// 创建时,bigint 字面量使用 'n' 后缀
const post = await Post.create({ title: '你好' });
console.log(typeof post.id); // 'bigint' 或 'number',取决于值
```
### 迁移问题
#### 表已存在
运行 `realm.sync()` 时,如果表已存在且需要更新:
```js
// 修改已有表(添加新列等)
await realm.sync({ alter: true });
// 警告:删除并重建(数据丢失!)
await realm.sync({ force: true });
```
#### 迁移回滚
如果迁移中途失败,可能需要手动回滚:
```js
module.exports = {
async up(driver, DataTypes) {
// 前进迁移
},
async down(driver, DataTypes) {
// 回滚迁移 - 确保完整
},
};
```
## 如何参与
### 快速上手
三个步骤
1. 安装我们目前需要支持的数据库,MySQL、PostgreSQL、以及 SQLite
2. 克隆仓库代码并安装依赖
3. 愉快地开始编码
#### 准备开发环境
首先需要安装 HomeBrew 和 Git,然后安装并启动数据库:
```bash
$ brew install mysql postgres sqlite
$ brew service start mysql
$ brew service start postgres
```
#### 执行测试
```bash
$ npm install
# 初始化表结构,运行所有测试
$ npm run test
# 仅运行单元测试
$ npm run test:unit
# 仅运行集成测试
$ npm run test:integration
# TypeScript 定义
$ npm run test:dts
```
还可以执行单个测试文件,或者使用 `--grep` 选项进一步限定执行范围:
```bash
$ npm run test -- test/unit/test.connect.js --grep "should work"
$ npm run test:unit -- --grep "=> Sequelize adapter"
$ npm run test:mysql -- --grep "bone.toJSON()"
```
如果 `--grep [pattern]` 不够直观,也可以随时改成用 `.only` 来指定用例:
```js
describe('=> Spell', function() {
it.only('supports error convention with nodeify', async function() {
// asserts
});
});
```
提交代码之前记得将 `.only` 移除掉。
### 编写帮助文档
Leoric 的帮助文档使用 Github Pages 服务,后者依赖 Jekyll 构建。Jekyll 是一个使用 Ruby 编写的静态站点生成工具,具体安装方式参考[macOS 安装 Ruby](https://mac.install.guide/ruby/index.html),或者参考 Moncef Belyamani 的 [Ruby 安装脚本](https://www.moncefbelyamani.com/ruby-script/)。如果你只想要安装 Jekyll,也可以[使用 HomeBrew 安装 Ruby](https://mac.install.guide/ruby/13.html),然后再[安装 Jekyll](https://jekyllrb.com/docs/installation/macos/) 即可:
```bash
$ brew install ruby
$ echo 'export PATH="/usr/local/opt/ruby/bin:$PATH"' >> ~/.zshrc
$ cd docs
$ bundle install
```
如果遇到连接 https://rubygems.org 超时的问题,考虑切换 `docs/Gemfile` 中使用的 Ruby Gems 源:
```diff
diff --git a/docs/Gemfile b/docs/Gemfile
index 4382725..b4dba82 100644
--- a/docs/Gemfile
+++ b/docs/Gemfile
@@ -1,4 +1,4 @@
-source "https://rubygems.org"
+source "https://gems.ruby-china.com"
```
完成 `bundle install` 即可在本地使用 Jekyll 构建帮助文档:
```bash
$ cd docs # 如果还在项目根路径的话,记得先切换到 docs 目录
$ jekyll serve
Configuration file: leoric/docs/_config.yml
Source: leoric/docs
Destination: leoric/docs/_site
Incremental build: disabled. Enable with --incremental
Generating...
GitHub Metadata: No GitHub API authentication could be found. Some fields may be missing or have incorrect data.
done in 3.73 seconds.
Auto-regeneration: enabled for 'leoric/docs'
Server address: http://127.0.0.1:4000/
Server running... press ctrl-c to stop.
```
访问 即可。
### 代码是如何组织的
可以将 Leoric 的代码划分为如下几层(从底层往顶层):
- SQL 解析器 `lib/expr.js`
- SQL 中间表示层 `lib/spell.js`,提供查找、修改 SQL 相关方法
- SQL 驱动层 `lib/drivers/*.js`,将中间表示层转换为实际可执行的 SQL 语法,并提供执行 SQL 获取返回结果的相关方法
- 数据模型基类 Bone `lib/bone.js`
- [可选] Sequelize 适配器 `lib/sequelize.js`
#### SQL 驱动层
SQL 驱动层主要包含如下模块:
- 定义数据模型所需的属性描述 `lib/drivers/*/attribute.js`
- 定义数据模型所需的字段类型描述 `lib/drivers/*/data_types.js`
- 用来处理表结构的相关 SQL 方法 `lib/drivers/*/schema.js`
- 用来将 SQL 中间表示层转换为实际可执行的 SQL 的转换工具 `lib/drivers/*/spellbook.js`
- 组装以上模块并提供对应驱动器 `lib/drivers/*/index.js`
## AI 代码手册
本页是为 AI 编码助手(以及人类开发者)准备的 Leoric 模式库。以下所有代码片段
均可直接复制,且已经过真实数据库验证。如果你是 AI 代理,请优先照抄这些模式,
而不是自行发明 API 写法。英文版见 [AI Cookbook](https://leoric.js.org/ai-cookbook.html)。
### 最小可运行骨架
```js
import Realm, { Bone, DataTypes } from 'leoric';
const { BIGINT, STRING, TEXT } = DataTypes;
class Post extends Bone {
static attributes = {
id: { type: BIGINT, primaryKey: true },
title: { type: STRING, allowNull: false },
content: { type: TEXT },
};
}
const realm = new Realm({
dialect: 'sqlite', // 'mysql' | 'postgres' | 'sqlite'
storage: ':memory:', // MySQL/PostgreSQL 用 host/user/database
models: [Post], // 顶层类声明的模型需通过 models 选项注册
});
async function main() {
await realm.connect(); // 查询前必须先 connect
await realm.sync(); // 由模型定义建表
const post = await Post.create({ title: 'New Post', content: 'Hello' });
post.title = 'Untitled';
await post.save();
const found = await Post.findOne({ title: 'Untitled' });
console.log(found.id, found.content);
await Post.update({ title: 'Untitled' }, { content: 'Updated' });
await Post.remove({ title: 'Untitled' });
}
main();
```
### 模型定义模式
#### 属性定义
属性通过 `static attributes` 声明。类型使用 `DataTypes` 常量或其字符串名;
常用元选项有 `allowNull`、`primaryKey`、`unique`、`defaultValue`、`autoIncrement`。
```js
import Realm, { Bone, DataTypes } from 'leoric';
const { STRING, INTEGER, BIGINT, DECIMAL, BOOLEAN, DATE, JSON, TEXT } = DataTypes;
class User extends Bone {
static attributes = {
id: { type: BIGINT, primaryKey: true, autoIncrement: true },
nickname: { type: STRING, allowNull: false, unique: true },
age: { type: INTEGER, defaultValue: 0 },
balance: { type: DECIMAL(10, 2), allowNull: false, defaultValue: 0 },
active: { type: BOOLEAN, defaultValue: true },
lastLoginAt: { type: DATE },
profile: { type: JSON },
};
}
```
#### 关联定义
关联在 `static initialize()` 中声明。目标模型名按约定(目标模型名的驼峰形式)
解析;无法推断时用 `className` 选项指定。
```js
class Shop extends Bone {
static initialize() {
this.hasMany('items');
}
}
class Item extends Bone {
static initialize() {
this.belongsTo('shop');
// 自定义类名:this.belongsTo('seller', { className: 'User' })
}
}
// 预加载
const shops = await Shop.find().with('items');
console.log(shops[0].items); // => [ Item, ... ]
// 通过中间表的 hasMany
class Post extends Bone {
static initialize() {
this.hasMany('comments');
this.hasMany('commenters', { through: 'comments' });
}
}
```
#### TypeScript 装饰器
```ts
import { Bone, BelongsTo, HasMany } from 'leoric';
class Shop extends Bone {
@HasMany()
items: Item[];
}
class Item extends Bone {
@BelongsTo()
shop: Shop;
}
```
### 查询模式
#### 条件对象
普通对象条件映射为 `WHERE` 子句。当嵌套对象的每个键都是 `$eq, $gt, $gte, $lt,
$lte, $ne, $in, $nin, $notIn, $like, $notLike, $between, $notBetween` 之一时,
视为操作符条件。
```js
Post.find({ title: 'New Post' }); // WHERE title = 'New Post'
Post.find({ title: { $like: '%Post%' } }); // WHERE title LIKE '%Post%'
Post.find({ id: { $gt: 0, $lt: 999999 } }); // WHERE id > 0 AND id < 999999
Post.find({ id: { $in: [1, 2, 3] } }); // WHERE id IN (1, 2, 3)
Post.find({ id: { $between: [1, 10] } }); // WHERE id BETWEEN 1 AND 10
```
#### 链式查询
`find()`/`findOne()` 返回 `Spell`——一个惰性的、可链式调用的查询对象,只有
await 或迭代时才真正访问数据库。
```js
const posts = await Post.find({ title: { $like: '%Post%' } })
.with('comments')
.order('id', 'desc')
.limit(10)
.offset(20);
const count = await Post.find({ active: true }).count();
const sum = await Post.sum('views');
const first = await Post.find().order('id').first;
```
#### 原始查询
```js
const { rows } = await realm.query('SELECT * FROM posts WHERE id = ?', [42]);
const posts = await Post.find(raw('title = "x"')); // 或 new Raw(...)
```
#### 字符串条件
```js
Post.find('title = ? OR title = ?', 'a', 'b');
```
### 事务与批量操作
```js
import { Bone } from 'leoric';
// async 回调——事务内每个查询都必须传 { connection }
await Bone.transaction(async ({ connection }) => {
const post = await Post.create({ title: 'New Post' }, { connection });
await Comment.create({ postId: post.id, content: 'First!' }, { connection });
});
// generator——connection 自动注入到 yield 的查询中
await Bone.transaction(function* () {
const post = yield Post.create({ title: 'New Post' });
yield Comment.create({ postId: post.id, content: 'First!' });
});
// 从 realm 实例发起
await realm.transaction(async ({ connection }) => {
await Post.create({ title: 'Hello' }, { connection });
});
// 批量创建 / upsert
await Post.bulkCreate([{ title: 'a' }, { title: 'b' }, { title: 'c' }]);
await Post.upsert({ title: 'a' }); // 唯一键冲突时执行 upsert
```
### Sequelize 兼容模式
开启 `sequelize: true` 激活 Sequelize 适配层,获得类 Sequelize 的 API,便于从
Sequelize 迁移:
```js
const realm = new Realm({
dialect: 'sqlite',
storage: '/tmp/leoric.sqlite3',
sequelize: true, // 开启 sequelize 适配
});
await realm.connect();
// sequelize 模式下,模型用 名字 + attributes 定义(或继承 realm.Bone)
const Shop = realm.define('Shop', {
id: { type: BIGINT, primaryKey: true, autoIncrement: true },
name: { type: STRING, allowNull: false },
credit: { type: INTEGER, defaultValue: 0 },
});
await realm.sync();
```
#### CRUD
```js
// 创建
await Shop.create({ name: 'MILL' });
await Shop.bulkCreate([{ name: 'wagas' }, { name: 'family mart' }]);
await new Shop({ name: "McDonald's" }).save();
// 查询
const shop = await Shop.findOne({ where: { name: 'MILL' } });
const shops = await Shop.findAll({
attributes: [ 'id', 'name' ],
where: { name: { $like: '%M%' } },
order: [[ 'id', 'desc' ]],
limit: 10,
});
const byPk = await Shop.findByPk(1);
// 先查后建——返回 [instance, created]
const [brewhouse, created] = await Shop.findOrCreate({
where: { name: 'Shanghai Brewhouse' },
});
// 更新——sequelize 语义:Model.update(values, { where }),返回受影响行数
const affected = await Shop.update({ credit: 10 }, { where: { name: 'MILL' } });
// 删除 / 聚合
await Shop.destroy({ where: { name: 'wagas' } });
await Shop.increment({ credit: 5 }, { where: { name: 'MILL' } }); // 或 increment('credit', { where }) 每次 +1
const { count, rows } = await Shop.findAndCountAll({ where: { name: { $like: '%M%' } } });
const total = await Shop.count();
```
注意:
- sequelize 模式下 `update` 是 sequelize 语义(`values`, `{ where }`),与 leoric 原生参数顺序不同。
- sequelize 模式 + SQLite 时建议用文件库而非 `:memory:`——内存库按连接隔离,并发查询
(如 `findAndCountAll`)可能命中无表的新连接。
- 完整兼容对照见 [Sequelize 适配](https://leoric.js.org/sequelize.html)。
### 常见错误与修复
| 现象 | 原因 | 修复 |
|---|---|---|
| `model X is not connected yet` | `realm.connect()` 之前就查询 | 先 `await realm.connect()` |
| `ER_NO_SUCH_TABLE` | 表尚未创建 | `await realm.sync()`(`{ force: true }` 可重建) |
| 事务内查询实际在事务外执行 | 缺少 `{ connection }` 选项 | 回调内每个查询都传 `{ connection }`,或改用 generator 函数 |
| N+1 查询 | 循环里惰性访问关联 | 用 `.with('assoc')` 预加载 |
| `X must extend this realm's Bone` | 模型类来自其他 realm/实例 | 使用同一个 `Realm` 实例的 `realm.define()` |
| 类字段遮蔽属性访问器 | ES class field 遮蔽了 Leoric 访问器 | 用 `declare`、`@Model()`,或通过 `realm.define(Model, attributes)` 定义属性 |
### 给 AI 助手的提示词模板
向 AI 助手请求编写 Leoric 代码时,请包含三要素:
1. 数据库方言与连接信息(或说明"用 sqlite 内存库")。
2. 模型定义(从你的代码原样粘贴)。
3. 用数据语义描述期望行为,而非 API 术语。
示例提示词:
> 使用 Leoric + MySQL,给定以下模型:
> ```js
> class Post extends Bone {
> static initialize() {
> this.belongsTo('author', { className: 'User' });
> this.hasMany('comments');
> }
> }
> ```
> 请编写代码:获取最新 10 篇文章及其作者与评论数,避免 N+1 查询。
也可以把本页或 [llms-full.txt](https://leoric.js.org/llms-full.txt)
(中文:llms-full-zh.txt)链接提供给助手,获取完整 API 上下文。